Woodland management plans and tree health support: prepare a map
Find out how to prepare a map for a Countryside Stewardship woodland tree health or management plan application and mark it with boundaries and features.
Applies to England
Foresters and other land managers can apply for woodland management plans and tree health support under Countryside Stewardship.
What applicants need to do
Applicants need to:
- get a map
- identify the areas that are included in the application using compartments and subcompartments
- mark land boundaries and features
- submit the map with the application
The map will be digitised by the Forestry Commission and checked against rural land register (RLR) land boundaries. The area of activity will also be checked and measured.
Get a map
Submit a map request form to get a free Ordnance Survey (OS) map from the Forestry Commission.
The Forestry Commission can provide a digital copy of OS map data but geographic information system software is required to open and edit this.
Applicants can also buy OS map data for use in their own geographic information system (GIS).
Applicants can send a digital map as electronic data or produce and send a PDF or printed copy.
Use an Ordnance Survey map from another source
If using an OS map from a source other than the Forestry Commission, applicants must:
- show the markings needed on the map for the application
- produce the map at a scale of 1:1250, 1:2500, 1:5000 or 1:10000 and show the scale clearly on each map
- draw one clearly-labelled cross near the centre of the map, or near the application area, giving the position of an 8 figure grid reference (2 letters and 6 numbers)
Each map must also give at least 2 horizontal and 2 vertical grid lines showing both:
- a square grid of 1km at the scale of 1:10000 and 1:5000
- a square grid of 100m at the scale of 1:1250 and 1:2500
The grid lines must be clearly annotated with OS National Grid Eastings and Northings.
Use an Integrated Administration and Control System compliant map
Applicants can submit a photocopy of an Integrated Administration and Control System (IACS)-compliant map instead.
The map will still need to be marked and labelled and sent with the application. Make sure there are no details hidden by other markings.
Use another type of map
Applicants can only send a different map with their application if it:
- is produced by a computer using a GIS
- shows an accurate backdrop and all the required features
Compartments: identify the land included in an application
Mark the map with compartments. These are different areas of woodland that can be identified or managed separately.
Compartments are individual woodlands, or parts of larger woodlands. They are defined by physical features such as:
- roads
- watercourses
- tracks
- land use changes
Most small farm woodlands are considered to be one compartment.
How to mark compartments
Follow these steps to create compartments:
-
Mark the boundaries on the outside of all the woodland edges, along tracks, fences, streams and ownership boundaries.
-
Mark any boundaries of important designations such as Sites of Special Scientific Interest, Special Areas of Conservation, Special Protection Areas, Scheduled Ancient Monuments, Ancient Semi-Natural Woodland and Plantations on Ancient Woodland Sites.
-
Number each individual area.
Subcompartments: divide compartments
Compartments can be divided into smaller subcompartments.
Divide the land into subcompartments and mark out boundaries for:
- physical and other major differences
- management differences
- administrative differences
Physical differences
Create subcompartments for permanent features on the ground such as:
- woodland edges
- fences
- tracks
Management differences
Create subcompartments where the land has differences such as:
- differences in species, eg conifer, broadleaved or mixed areas
- significant age differences between adjoining areas
- the environmental status of the woodland area
- features such as rides and open glades
Also create subcompartments for areas that will be managed differently, such as:
- land on river or watercourse banks (riparian zones)
- specific wildlife habitats
- public access facilities
Administrative differences
Applicants can create subcompartments where there are administrative differences, even if the adjoining woodland areas are similar, such as:
- different ownership
- different grant support
- significant differences in management and usage
A felling licence or funding for undertaking work could also affect the land.
For example, if planting new trees, use subcompartment boundaries to mark out the new woodland.
Or if intending to fell an area of woodland, show the boundary of the area being felled and how it will be restocked afterwards.
How to mark subcompartments
Only mark subcompartments for the areas included in the application.
Each subcompartment should normally be no smaller than 0.1ha and can incorporate very small areas into adjoining subcompartments.
-
Mark out the boundaries on the map, making sure they are clear so that grants are applied to the correct areas and they don’t overlap.
-
Label each individual area with a unique reference.
The unique reference must be made up of a number and a letter, eg 7D. The number represents the compartment and the letter represents the individual part of that woodland.
Applicants can also place items on a certain percentage of a subcompartment so that they don’t need to divide the areas further, eg tree shelter on 25% of subcompartment 3A.
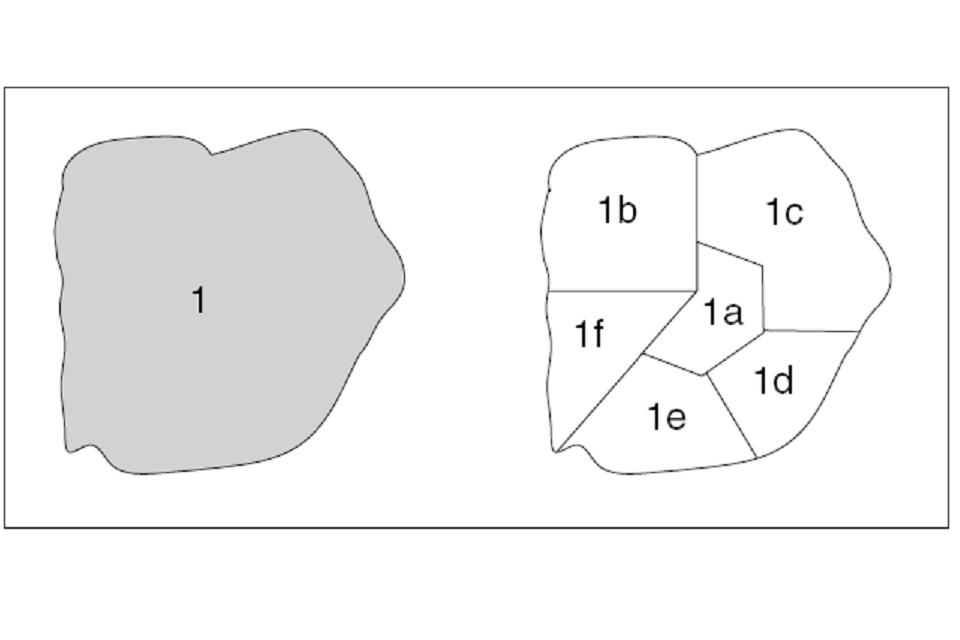
Examples of compartments and subcompartments
The picture on the left is compartment 1 and shows the outside edge of the woodland.
The example on the right shows the same woodland divided into subcompartments.
Examples of compartments and subcompartments
How to mark boundaries and features
Keep the map precise and uncluttered. Applicants can use a second copy of the map to give additional details about the land with more colours, notes and labels.
When completing the map:
- use red ink for boundaries so that they contrast with the base map
- use a fine roller-ball point or draughtsman style pen
- highlight the boundary
- make sure folds or imperfections on paper maps don’t hide details
Highlight boundaries that can’t clearly be shown on the map and describe them on a separate page. For example, if a boundary follows the centre of a stream.
View of the following map annotation marks that must be used.
Scheme boundary
Draw a red external boundary line, no wider than 0.7mm. Highlight the inside of the boundary in colour with, for example, a yellow highlighter. Make sure that the colours don’t hide the base map detail.
Access point
Use clearly-labelled red crosses, as many as needed, to show where FC staff are permitted to enter the woodlands.
Compartment boundary
Use a red dash/dot line no wider than 0.7mm.
Compartment number
Write the number inside the area, or clearly link to it with an arrow. Numbers can go up to 9999.
Subcompartment boundary
Use a red line of long dashes no wider than 0.7mm.
Subcompartment letter
Write a single letter after the compartment number.
Track/permissive path/public footpath
Use a black line of short dashes no wider than 0.7mm and write the feature type next to it.
Wayleave (all wires, pipes, pylons etc)
Use a black line no wider than 0.7mm with alternate chevrons and write WL (Wayleave) next to it.
Watercourse
Use a black line no wider than 0.7mm and write WS (water supply) next to it.