Managing an intervener case
Updated 23 June 2026

© Crown copyright 2026
This publication is licensed under the terms of the Open Government Licence v3.0 except where otherwise stated. To view this licence, visit nationalarchives.gov.uk/doc/open-government-licence/version/3 or write to the Information Policy Team, The National Archives, Kew, London TW9 4DU, or email: psi@nationalarchives.gov.uk.
Where we have identified any third party copyright information you will need to obtain permission from the copyright holders concerned.
This publication is available at https://www.gov.uk/government/publications/myhmcts-how-to-use-online-financial-remedy-services/managing-an-intervener-case
1. Before you start
Before you can access financial remedy services using MyHMCTS, you and your organisation must have completed other steps:
- Set up an HMCTS Payment by Account (PBA) to pay any relevant fees
- Register your organisation with MyHMCTS
- Set up your MyHMCTS user account
Read the MyHMCTS registration guidance for further information and instructions on how to register your organisation. If your organisation already has an account, contact the administrator to arrange for your account creation.
Once you have a MyHMCTS account, you can sign in to manage a case or manage an organisation using your email address and password.
If you need more help with MyHMCTS, email MyHMCTSsupport@justice.gov.uk. We aim to respond within 5 working days.
You can find more information about how to complete case administration tasks.
2. Join proceedings
Once you have permission to join proceedings, the court will add the intervener and their legal representative to the case. Once added, you will receive email confirmation and guidance to access the case.
Notice of change is not available for intervener solicitors. If you wish to join proceedings acting on behalf of an intervener client, you must send your notice of acting to the court. You must include the conduct of your case.
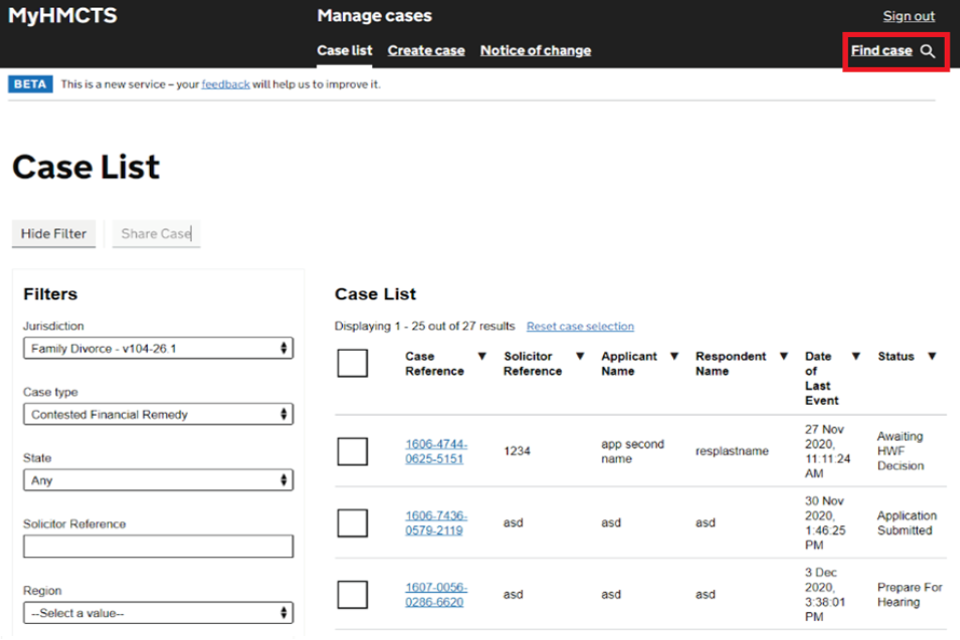
3. Find your cases
1. Once you have signed in, you will see a case list with all the cases that have been assigned to you.
2. To find the case you want to manage, select ‘Find case’. You must then input information from the case, such as the applicant or respondent details, or the case and solicitor references.
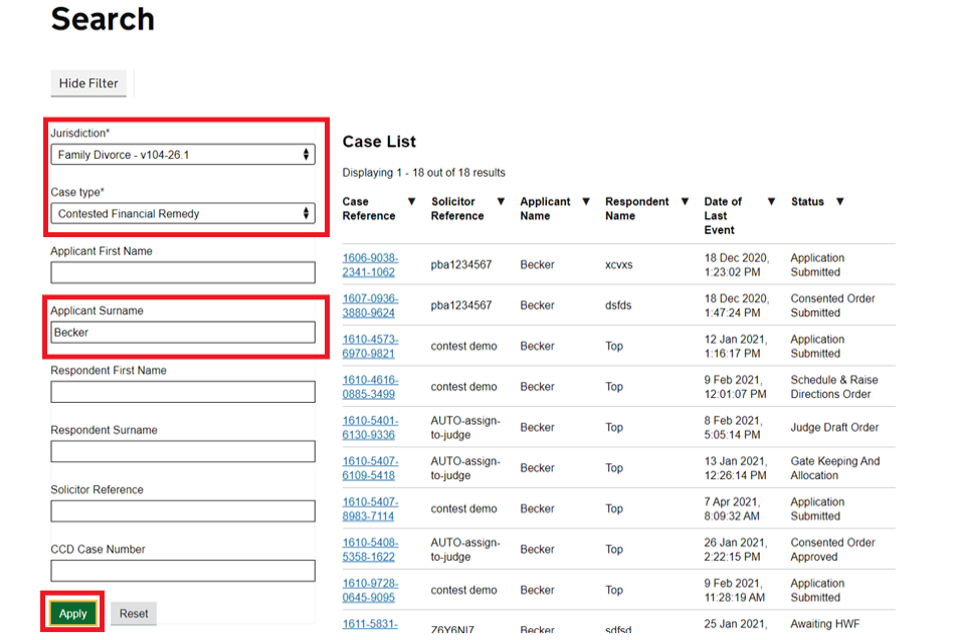
3. Alternatively, you can find a case using the filter search. Use the drop down menus to select the jurisdiction and case type, then add the details to the field you want to search. Select ‘Apply’.
4. Open the case by selecting the link in the ‘Case Reference’ column.
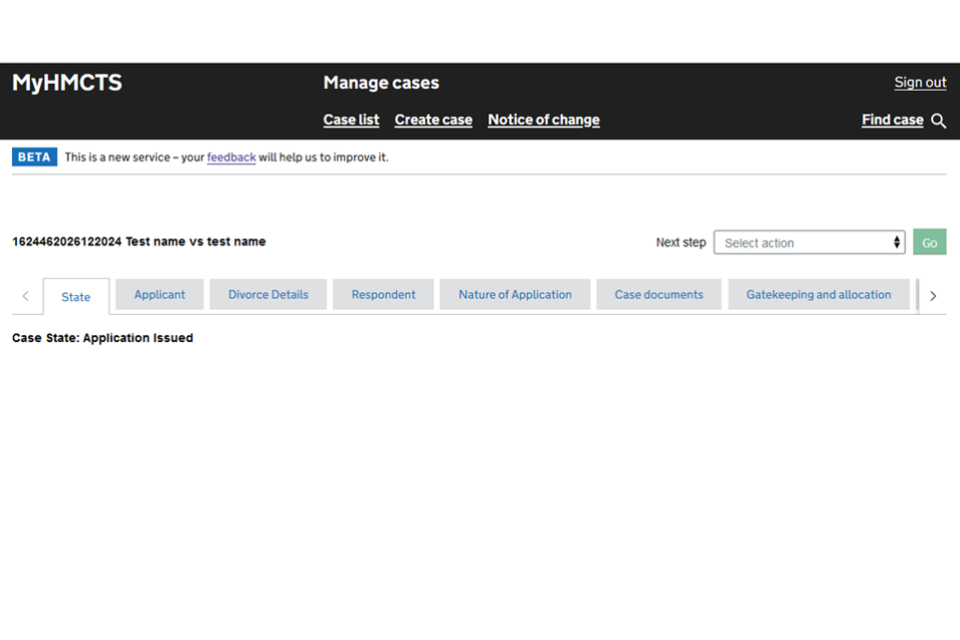
5. You will then see the case dashboard, which has different tabs showing information about the case. The dashboard will open on the ‘State’ tab – showing what state the case is in.
4. Upload evidence in support
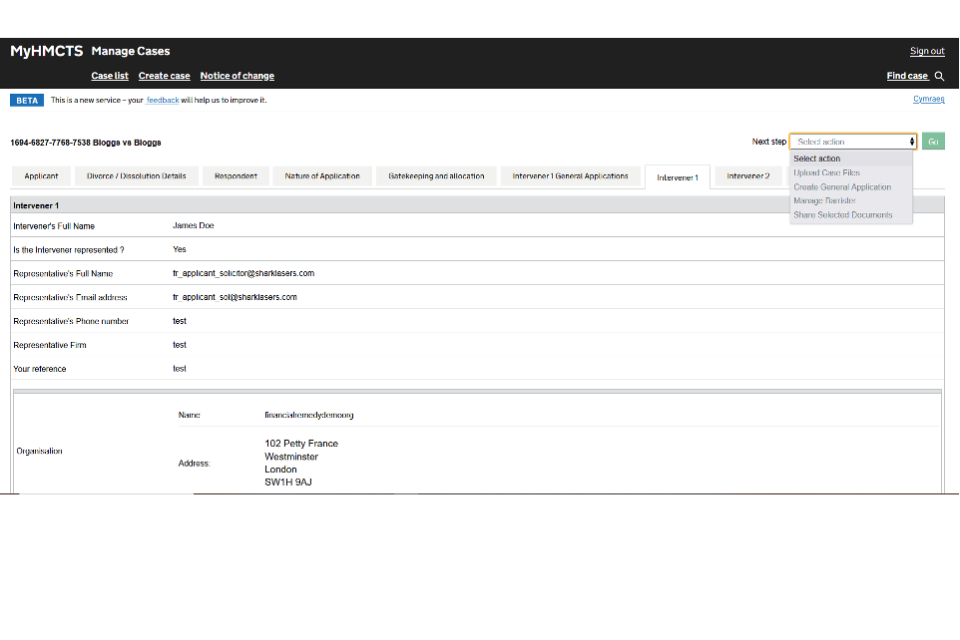
You must upload case documents on MyHMCTS – do not submit them directly to the financial remedy centre. You can upload documents at any point during proceedings – you can find them in your ‘Intervener documents’ tab. This is only visible to you and the court.
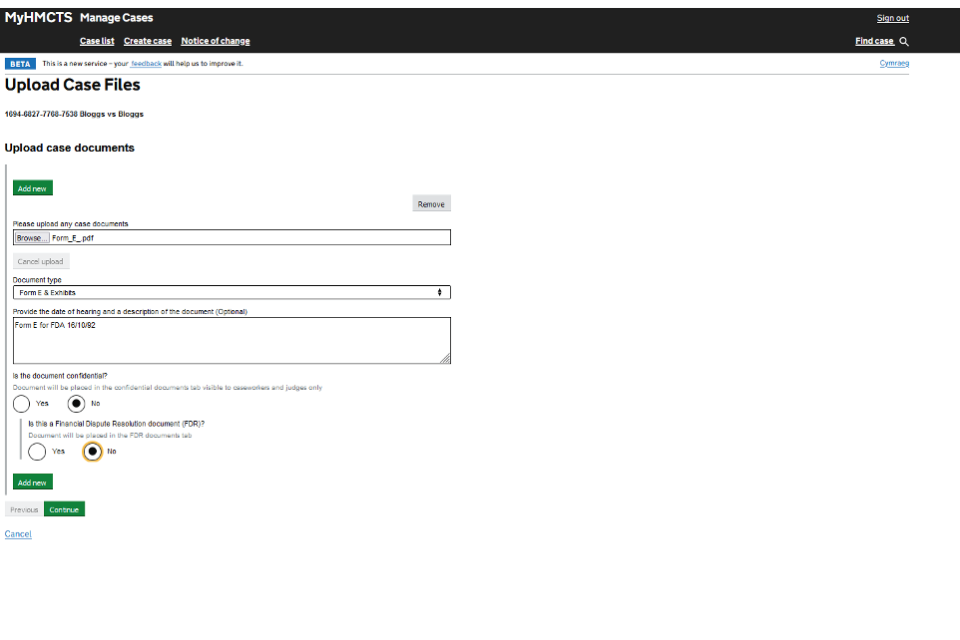
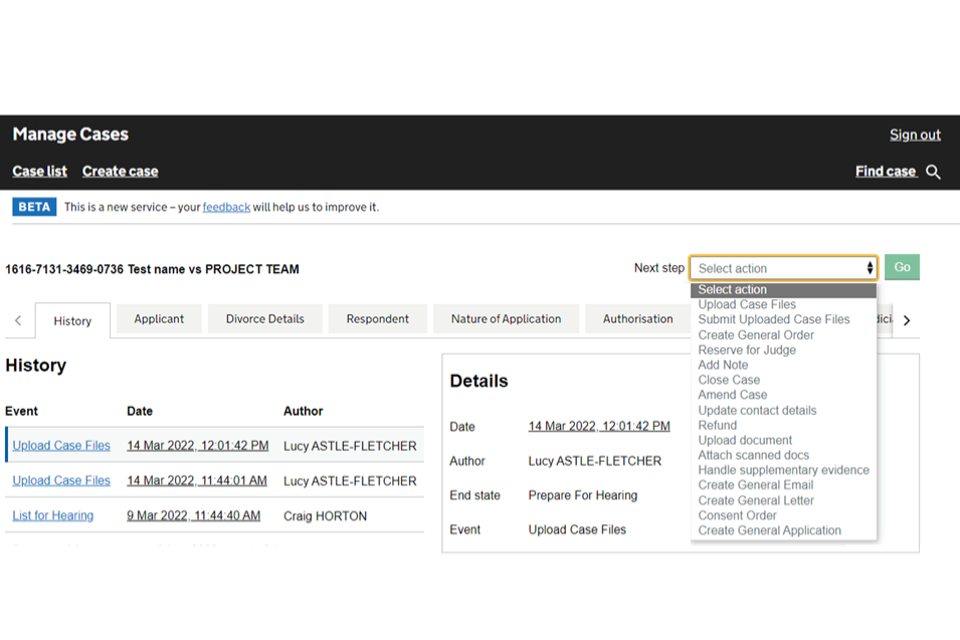
1. To upload a document, select ‘Upload Case Files’ from the ‘Next step’ drop down menu. Then select ‘Go’.
2. Select ‘Add new’ then ‘Choose file’ to upload the document.
3. Select the document type from the drop down menu. Enter any other information about the document, such as a description and the date of the next hearing.
4. Select whether the document should be kept confidential or not. If you select that a document is confidential, it will be stored in the ‘Confidential documents’ tab , which only you and the court can access.
5. Select whether the document is for a financial dispute resolution (FDR) hearing. If yes, the documents will appear in the FDR tab .
6. If you need to add another document, select ‘Add new’ and then repeat steps 2 to 6.
7. When you have entered all the information, select ‘Continue’.
8. Check the answers – if you need to make any changes, select ‘Change’ next to the answer you want to change. Once all answers are correct, select ‘Submit’.
9. The system will automatically detect which party you are acting on behalf of. When you select ‘Submit’ the documents will be added to your ‘documents’ tab.
You must share the documents directly with the other parties. They cannot view uploaded documents automatically.
10. To share your documents with the other parties, select ‘Share Selected Documents’ from the ‘Next step’ drop down menu.
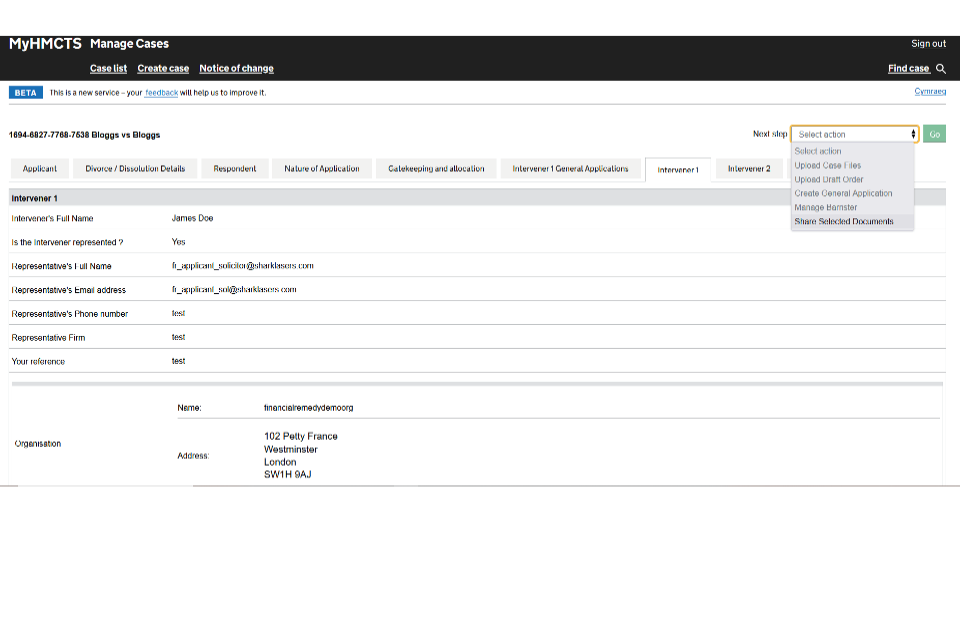
11. You must then select which documents you wish to share.

12. You must then select which party you wish to share these documents with, for example applicant, intervener or respondent.
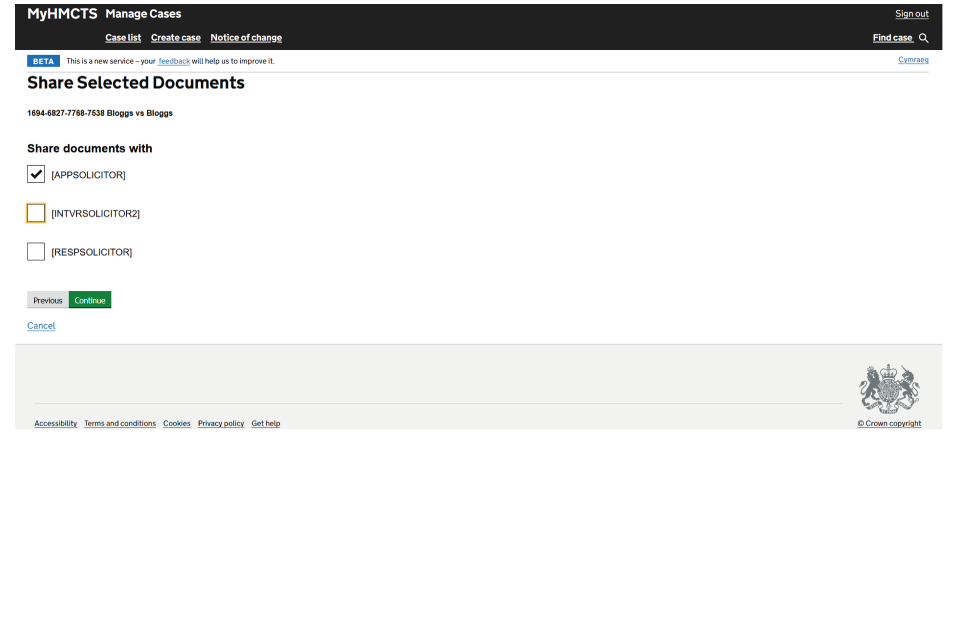
13 . Once you have shared the documents, the applicant and respondent can access the documents in the ‘Shared documents’ tab. Any selected intervener can access the documents in the ‘Intervener documents’ tab.
The court will share all relevant orders and hearing notices with you. These will be stored in your ‘Intervener documents ’ tab.
5. Upload a draft order
Follow the guidance in this section if you’re applying for an:
- agreed order before a hearing as part of the accelerated procedure – this is where you agree with the respondent on directions before the first appointment, and then send the agreed order to be approved by the judge without a hearing
- agreed order following a hearing – once submitted, you should only email the court if the judge has asked you to
Once you have an agreed order, you must upload this for the judge to approve.
When you name the draft order document you must include the:
- parties’ name
- hearing type
- date of hearing
For example, JonesFDA11Mar2023. The judge’s name and hearing date must also be included on the order before uploading.
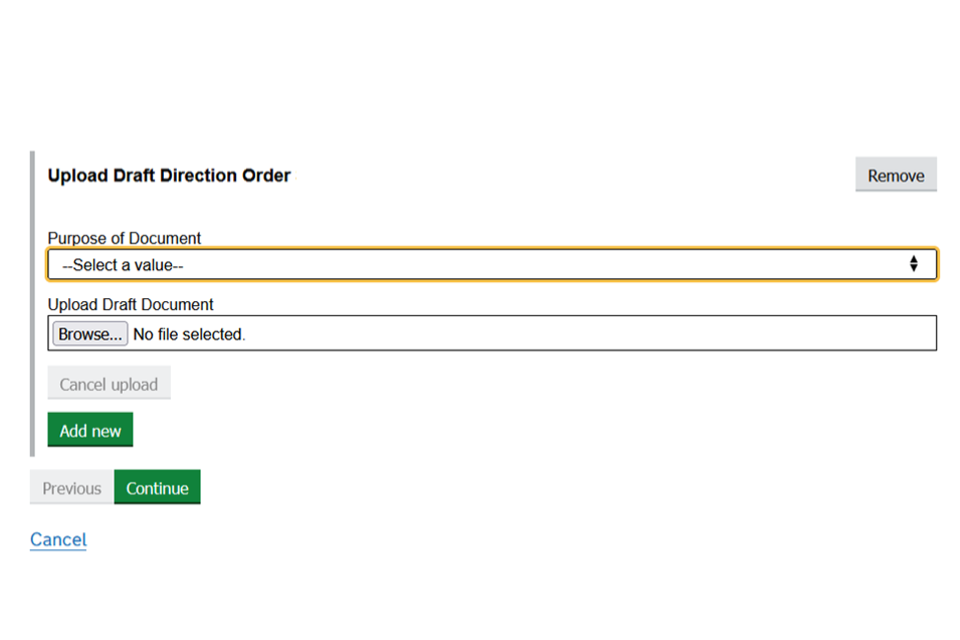
1. Select ‘Upload Draft Order’ from the ‘Next step’ drop down menu. Then select ‘Go’.
2. Select ‘Add new’ then ‘Browse’ to upload a draft order. The draft order must be uploaded as a Word document.
3. Select the purpose of the document from the drop down menu. Then select ‘Continue’.
6. Add a general application to the case
You must follow the guidance in this section if you’re applying:
- to vacate a hearing by consent
- to vary a maintenance order
- to capitalise maintenance
- to set aside a financial remedies order
- for an interlocutory application
You can make a general application at any stage of the case, for example if you are seeking to have a hearing adjourned.
You must upload the application and any draft order as a PDF.
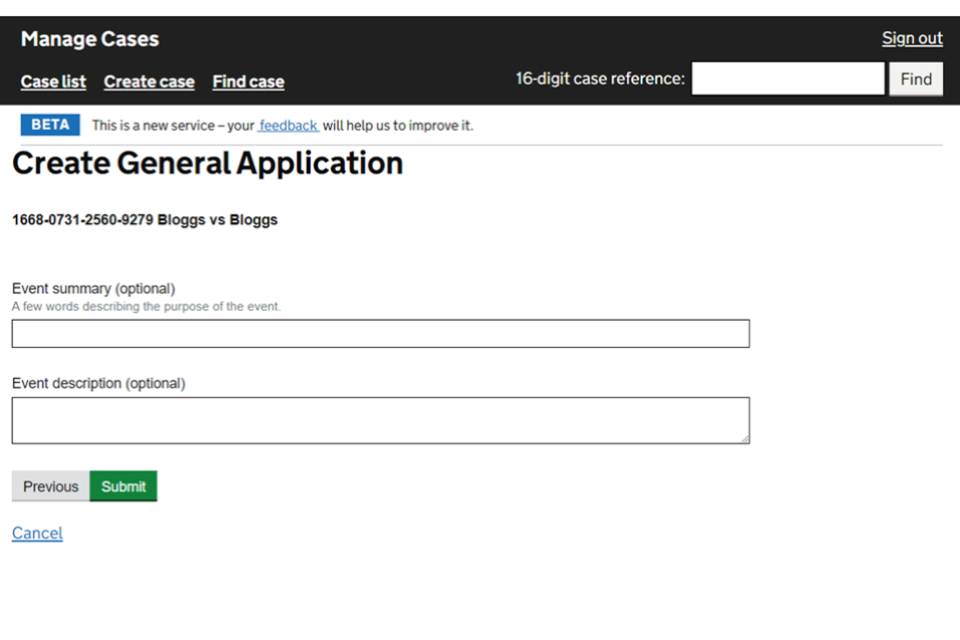
1. Select ‘Create General Application’ from the ‘Next step’ drop down menu. Then select ‘Go’.
If previous applications on the case are listed, make sure you do not overwrite them.
2. Select ‘Add new’ to create a new general application.
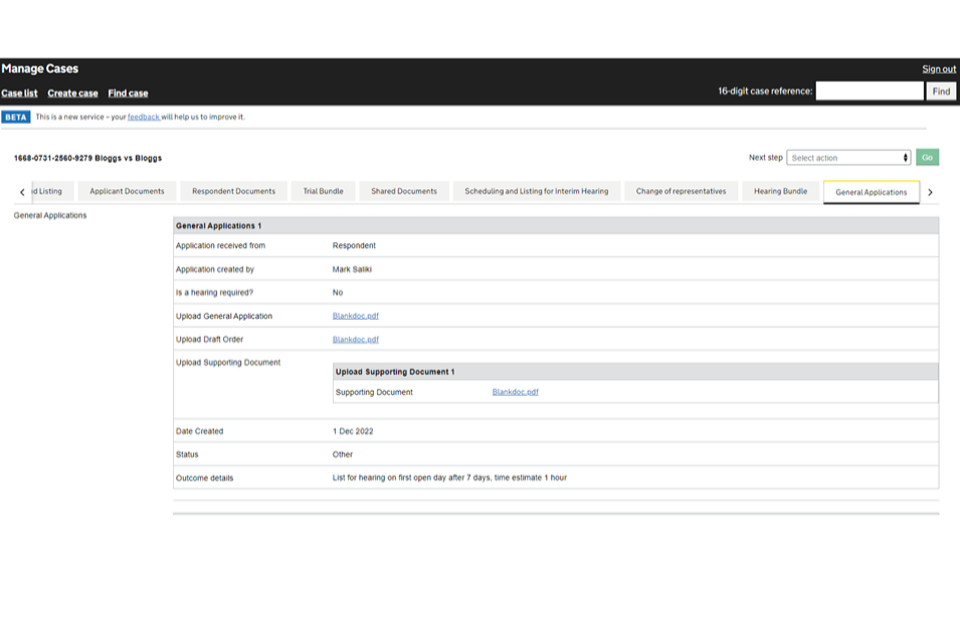
3. Select ‘Intervener’ as the person applying.
4. Select ‘Yes’ if you need a hearing. Enter the amount of time you estimate you’ll need for a hearing and any special measures needed from the court.
5. Select ‘Choose file’ to upload the general application.
6. Select ‘Choose file’ to upload any supporting documents.
7. Select ‘Continue’.

8. If appropriate, you can add an event summary and description. Select ‘Submit’.
The submitted application will appear in your ‘Intervener general application’ tab. The application will also be available in the ‘General application’ tab, which is visible to the court, applicant, and respondent solicitors.
When you submit, the court is notified of the application and they will contact you to arrange payment, if required.
9. When the judge has considered the application, you will be able to view their comments in the ‘Case documents’ tab.
You will also receive a copy of the application, draft order and the court’s directions in the post.
You can ask the court to remove your application if:
- it has been filed by mistake
- you wish to withdraw your application and no action has been taken on the case
7. Add or remove a barrister
Add a barrister to a case
When you instruct a barrister, you can give them access to the case. They must be registered with MyHMCTS before you can add them.
If the client instructs the barrister directly, the barrister must notify their local financial remedy centre, who can add them to the case.
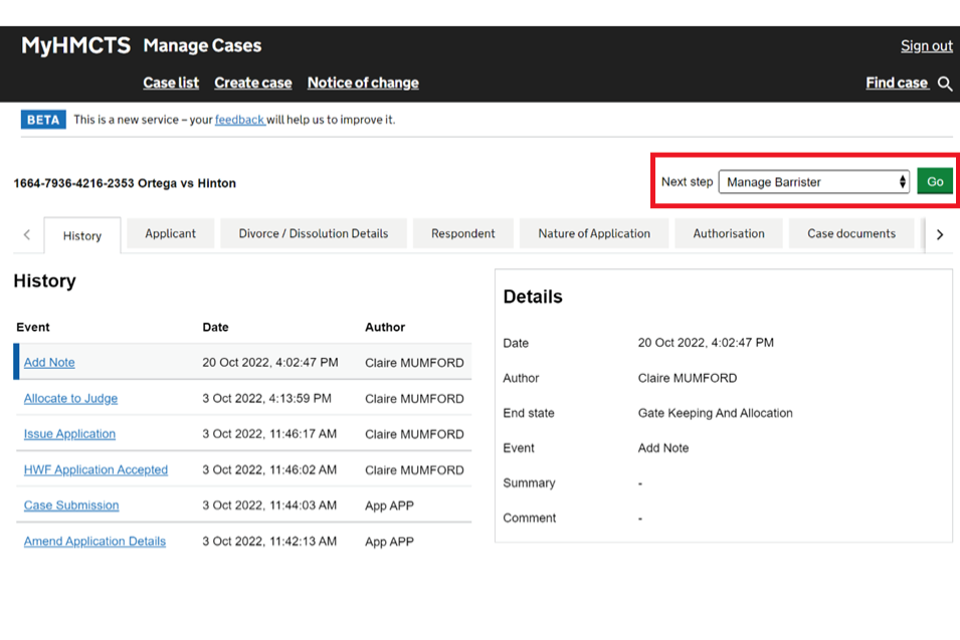
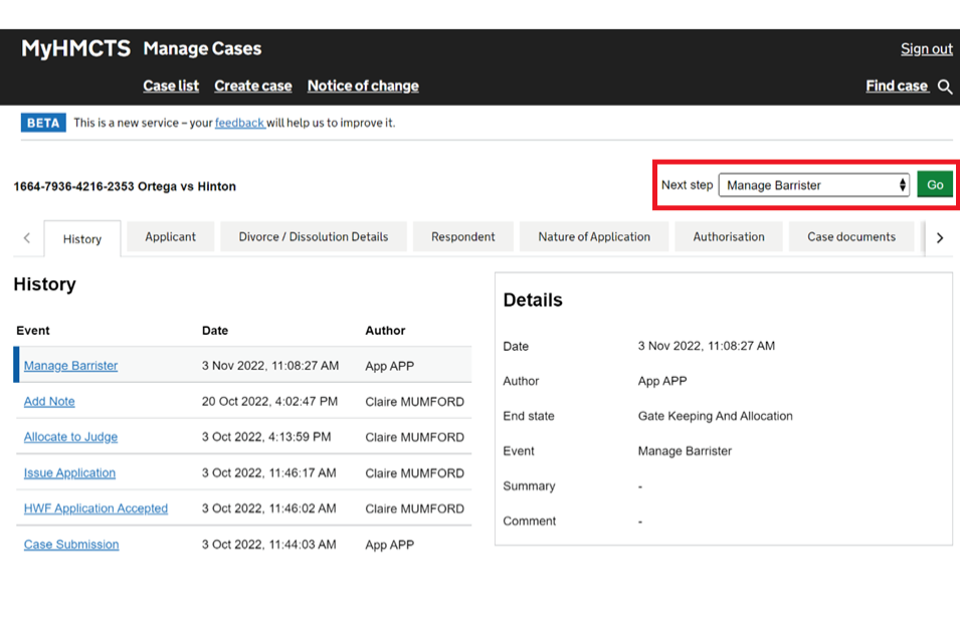
1. Open the case and select ‘Manage Barrister’ from the ‘Next step’ drop down menu. Then select ‘Go’.
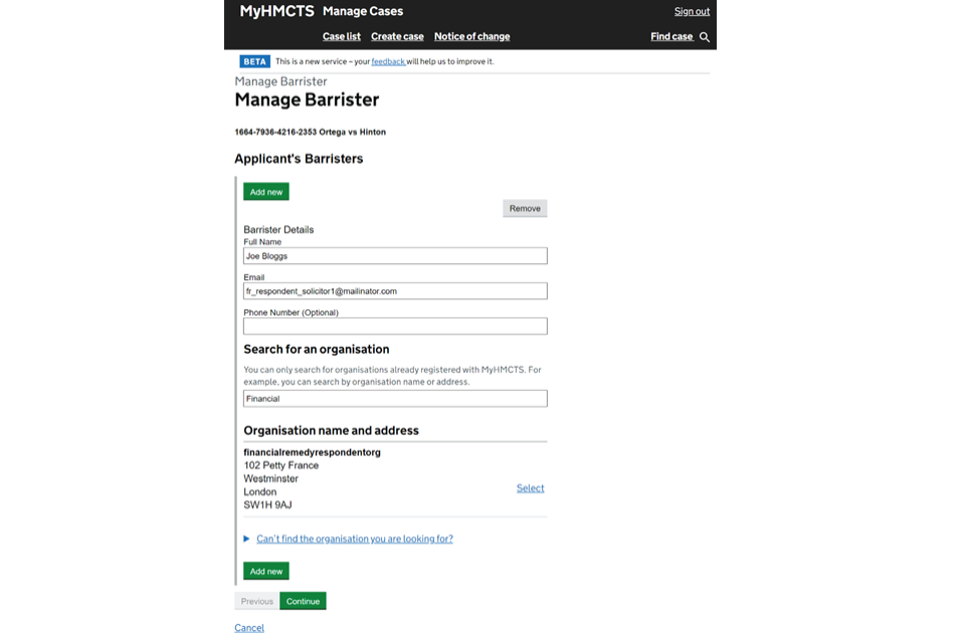
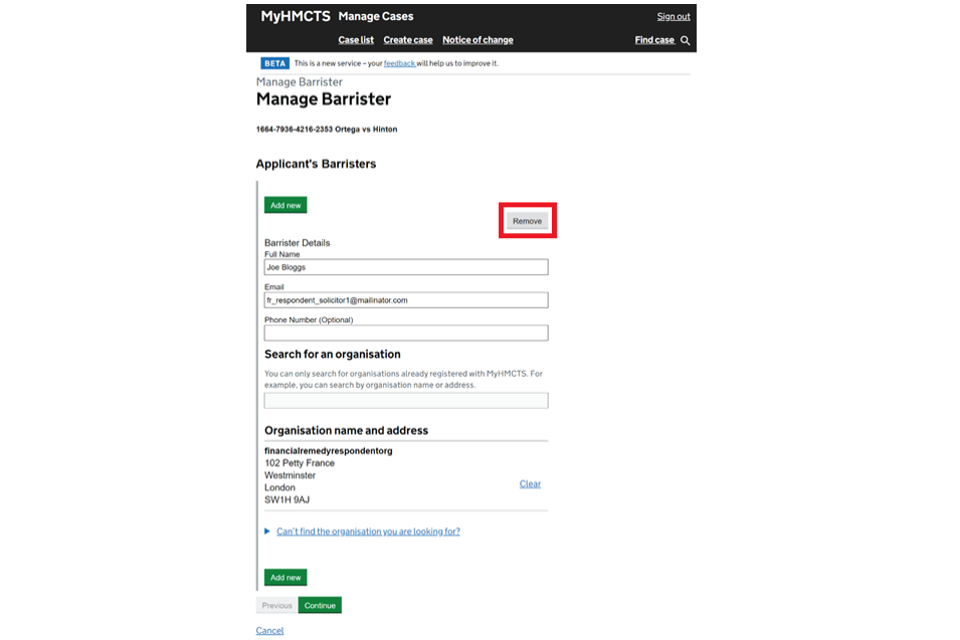
2. Select ‘Add new’ then enter the barrister’s details. Use the ‘Search for an organisation’ box to find and select the barrister’s firm. The details you enter must match the barrister’s details that are registered on MyHMCTS.
3. If you need to add more than one barrister, select ‘Add new’ and repeat step 2. You can also do this later by selecting ‘Manage Barrister’ and following the same steps.
4. Once you have added all the barrister details, select ‘Continue’.
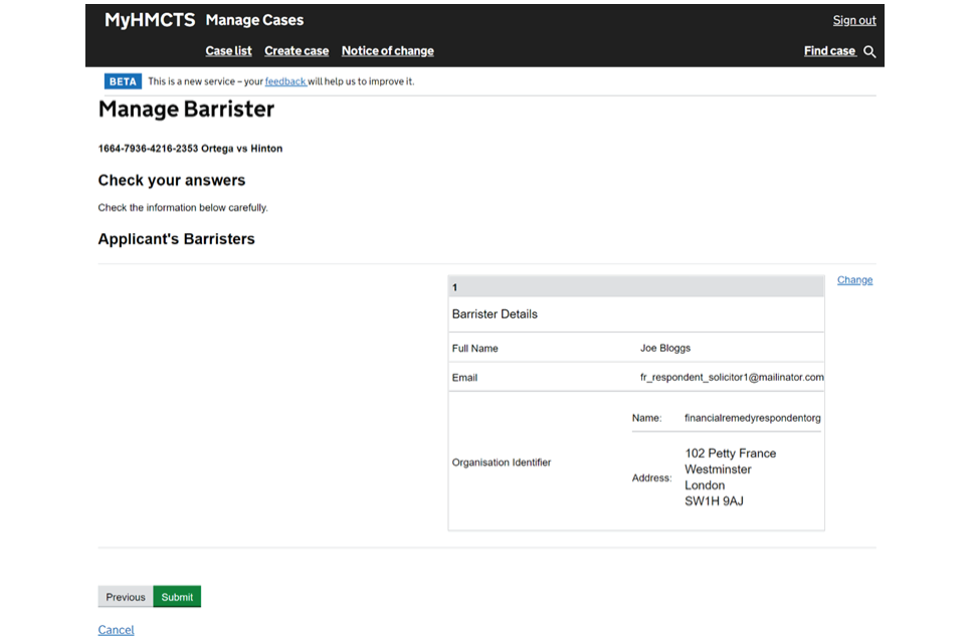
5. Check your answers. If you need to amend anything, select ‘Change’ next to the barrister’s details you need to change. When everything is correct, select ‘Submit’.
6. You will return to the ‘History’ tab to see the event has updated to ‘Manage Barrister’.
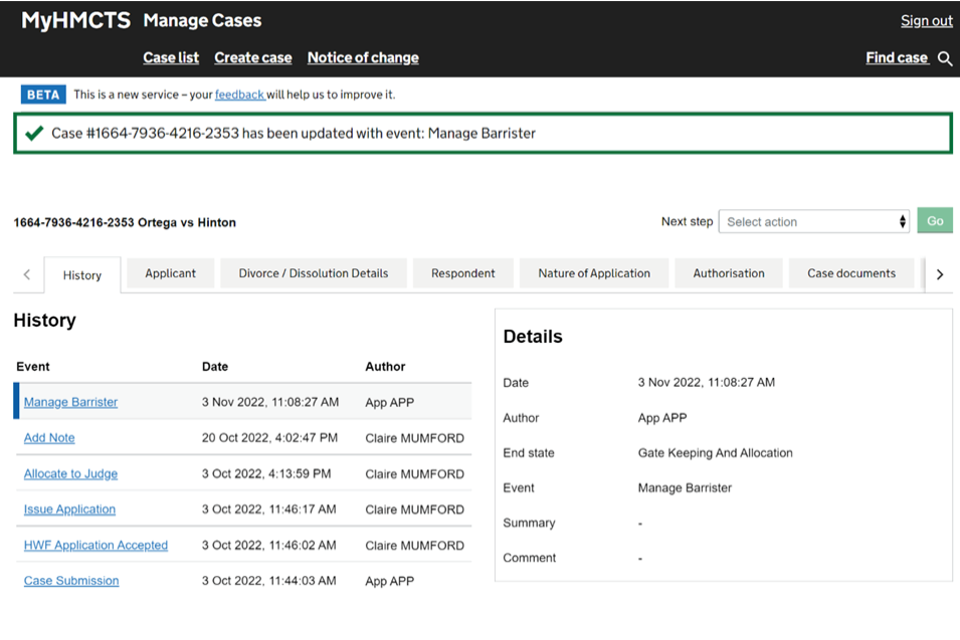
The barrister and the other party or their solicitor will receive an email to say they have been added to the case. The case will also appear in the barrister’s case list.
They will have full access to the case to upload and manage case documents and orders.
Remove a barrister from a case
You can remove a barrister from a case when they are no longer instructed.
1. To remove a barrister select ‘Manage Barrister’ from the ‘Next step’ drop down menu. Then select ‘Go’.
2. Select ‘Remove’ for the barrister that you need to remove from the case.
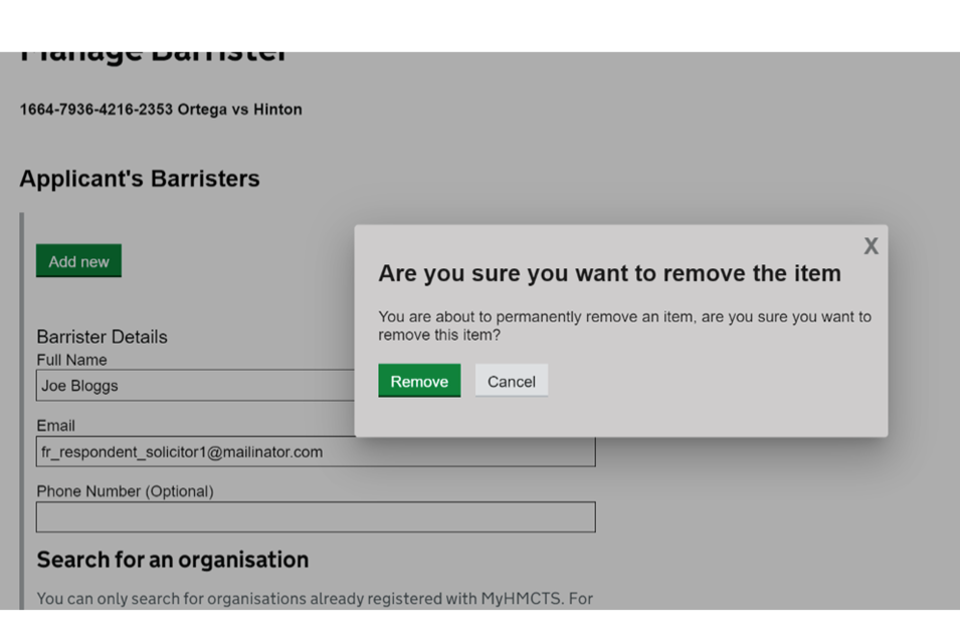
3. Select ‘Remove’ again on the confirmation box.
4. The barrister’s details will no longer appear on the ‘Check your answers’ page. Select ‘Submit’.

The barrister will receive an email to say they have been removed from the case. The case will no longer appear in their case list.
8. Get help with MyHMCTS
Queries about a contested financial remedy application
Contact the financial remedy court managing the case. Contacts can be found at HMCTS financial remedy centres.
Queries on the financial remedy portal
If you are seeing an error message in the service that cannot be resolved, or if you have feedback on how we can improve, contact the HMCTS financial remedy service team at HMCTSFinancialRemedy@justice.gov.uk.
Queries about cases lodged on the portal
If you are a party to a case or intend to lodge a consent case on the portal and require assistance, please contact the Court and Tribunal Service Centre at ContactFinancialRemedy@justice.gov.uk or on 0300 303 0642.
Manage case and manage organisation queries
If you are having difficulties or errors with logging in or assigning cases, contact the MyHMCTS support team at MyHMCTSsupport@justice.gov.uk.