Individual Vehicle Approval (IVA) for lorries: help to get a pass
Updated 9 March 2017

© Crown copyright 2017
This publication is licensed under the terms of the Open Government Licence v3.0 except where otherwise stated. To view this licence, visit nationalarchives.gov.uk/doc/open-government-licence/version/3 or write to the Information Policy Team, The National Archives, Kew, London TW9 4DU, or email: psi@nationalarchives.gov.uk.
Where we have identified any third party copyright information you will need to obtain permission from the copyright holders concerned.
This publication is available at https://www.gov.uk/government/publications/individual-vehicle-approval-iva-for-lorries-help-to-get-a-pass/individual-vehicle-approval-iva-for-lorries-help-to-get-a-pass
Introduction
This guide tells you how to avoid the top 10 reasons lorries and other heavy goods vehicles in the N2/3 inspection category fail the IVA inspection:
- lateral protection (side guards)
- headlamp aim
- retro reflectors
- general construction
- statutory plates and Vehicle Identification Number (VIN)
- end outline, side, stop & side marker lamps
- Spray suppression systems
- fuel tanks and rear under run protection devices
- installation of lights
- exterior projections of cabs
This guide tells you:
- how each item is inspected
- what to check before each item is inspected
- the required standard
Full compliance with this guide doesn’t guarantee a pass. You’ll need to view the IVA Inspection manual for the full requirements and testing procedures needed to get your vehicle passed.
You must apply for vehicle approval if you’ve:
- built a vehicle
- rebuilt a vehicle
- radically altered a vehicle
- reconstructed a classic vehicle
- imported a vehicle
Vehicles in the N2/3 categories are defined as:
- N2 - vehicles used for the carriage of goods and having a maximum mass exceeding 3.5 tonnes but not exceeding 12 tonnes
- N3 - vehicles used for the carriage of goods and having a maximum mass exceeding 12 tonnes
With the IVA inspection some sections are covered by documentary evidence and for the other sections DVSA will examine the rest of the vehicle.
‘Age related IVA’
Your vehicle will have an ‘Age related IVA’ if it is up to twenty five years old.
This means that for certain parts of the inspection your vehicle will be inspected to the older regulations that were in place when the vehicle was originally built.
Difference between IVA and MOT
IVA inspections are different from the annual MOT test.
The IVA inspection looks at the way your vehicle is constructed or adapted, while the annual MOT test looks at roadworthiness of your vehicle.
Your vehicle might pass the MOT test, but that doesn’t mean it will pass an IVA inspection.
1. Lateral protection (side guards)
1.1 How lateral protection is inspected
The lateral protection inspection will check the:
- measurements
- dimensions
- spacing
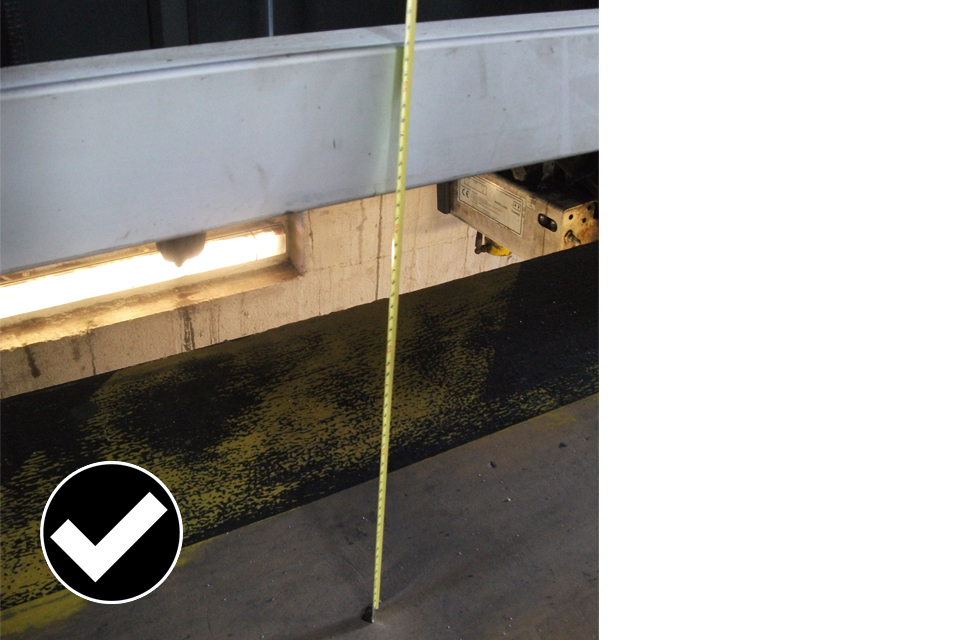
Measure the height from the ground to make sure that this is no more than 550mm.
DVSA will measure the height from the ground to make sure that this is no more than 550mm.
More than one horizontal rail used it will be measured to make sure that they’re no more than 300mm apart.
When your vehicle has more than one horizontal rail used it will be measured to make sure that they’re no more than 300mm apart.
Allowed: a side guard may be of continuous construction.
A side guard may be of continuous construction, and of sufficient strength, any external edges must be radiused to at least 2.5mm.
Equipment may be incorporated into the side guard but still must meet the requirements in the manual.
Equipment may be incorporated into the side guard but still must meet the requirements in the manual.

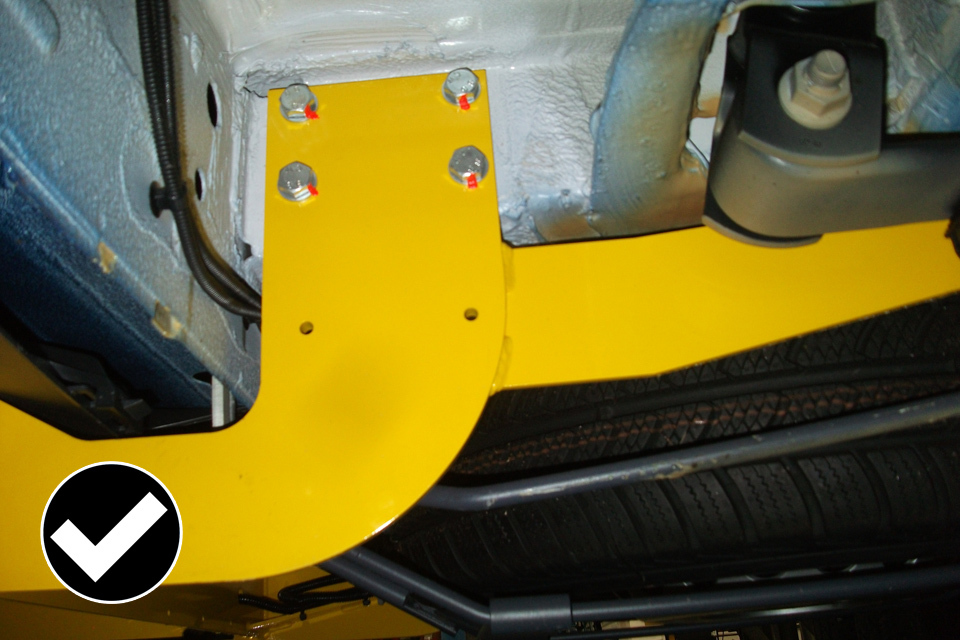
Not allowed: dome head or flush fitting bolts on the exterior only.
The image above shows the protruding bolt heads on the side guard. On the exterior only dome head or flush fitting bolts are allowed.
There are different dimensions for the upright dependant on vehicle category.
The above image shows there are different dimensions for the upright and horizontal rails for N2 & N3 vehicles. You can build all vehicles to the higher N3 specification to avoid this issue.
All external edges must be radiused to 2.5mm.
DVSA will measure the radius with a radius gauge. All external edges must be radiused to 2.5mm.
A gap of no more than 300mm between the tyre and the front of the side guard.
There must be a gap of no more than 300mm between the tyre and the front of the side guard.
1.2 What to check before lateral protection is inspected
DVSA will check and measure lateral protection for:
- dimensions
- fitting position
- security
- radius
- projections
There are different specifications for N2 & N3 type heavy goods vehicles. The correct dimensions are listed in the IVA inspection manual.
There are figures and drawings for gaps for stabiliser legs etc, equipment may be incorporated into the side guard, but it must comply with the manual.
You can build all vehicles to the higher N3 specification.
Exemptions for lateral protection are very specific and very few vehicles will meet the exemption. Refer to the method of inspection in manual section 42 for more details.
DVSA will accept the design of the side of the body instead of a side guard in some cases, eg car transporters.
1.3 The standard lateral protection must meet
See section 42 - lateral protection of the IVA inspection manual for the full inspection standard.
2. Headlamp aim
2.1 How headlamp aim is inspected
Headlamp aim for IVA uses exactly the same European criteria as that for annual test.
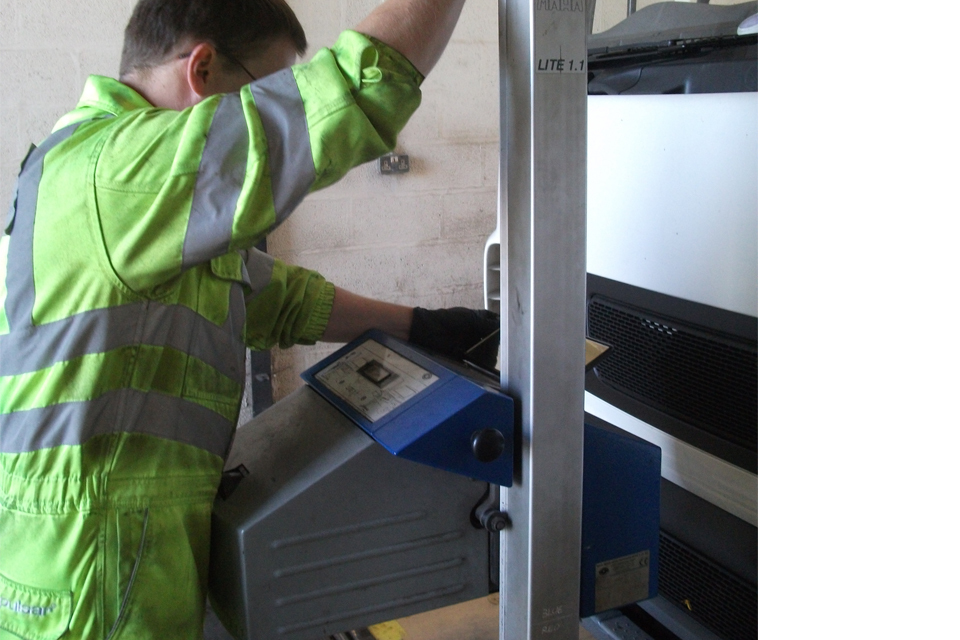
Headlamp aim will be checked using an approved head lamp aim tester.
The headlamp aim will be checked using an approved headlamp aim tester. As part of the inspection DVSA will check for correct:
- image
- height and horizontal aim
- dipping to the left
- a European type pattern
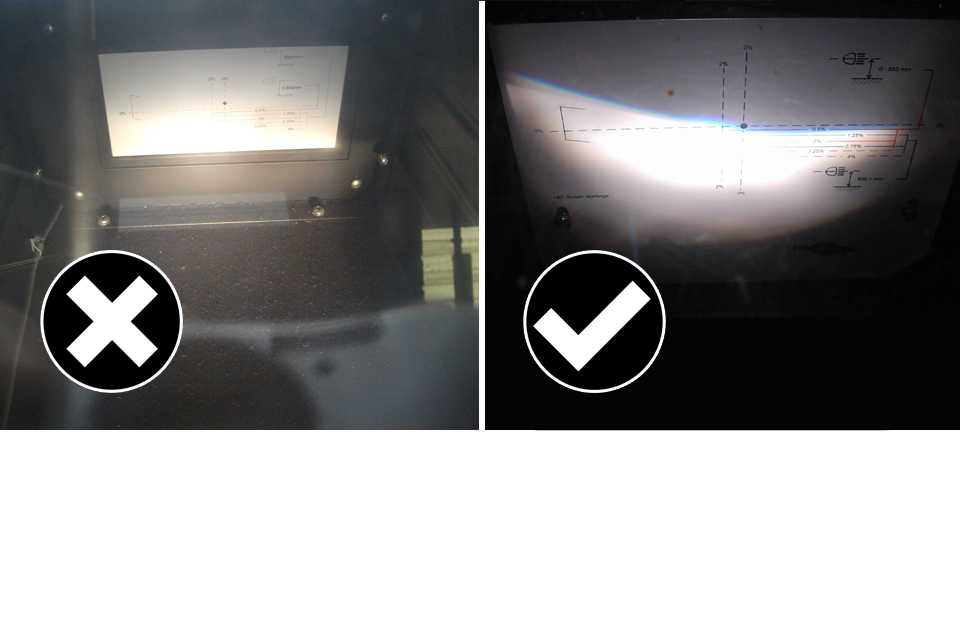
Example of a correct and incorrect headlamp output.
The images above show an incorrect and correct output.
The headlamp aim in the incorrect example doesn’t provide a clear image to allow the headlamp aim to be checked.
The correct example shows what your vehicle needs:
- a good clear image
- the ‘cut off’ to the left
- correct alignment
- a European type image
2.2 What to check before headlamp aim is inspected
Make sure that your headlamps dip the correct way for driving on the left.
You might need to have headlamps on vehicles imported from countries that drive on the right converted or replaced before the inspection.
Have the headlamp aim checked with a calibrated headlamp aim tester before the inspection.
A voluntary headlamp aim test at an Authorised Test Facility (ATF) can check and allow adjustment of the headlamps if you don’t have the equipment. You’ll need to contact the ATF to make sure that they can provide the check.
The IVA inspection doesn’t allow any kind of internal or external ‘masking’ of the headlamp.
2.3 The standard headlamp aim must meet
See section 25 (headlamps) of the IVA inspection manual for the full inspection standard.
3. Retro Reflectors
3.1 How retro reflectors are inspected
Retro reflectors covers both reflectors and conspicuity.
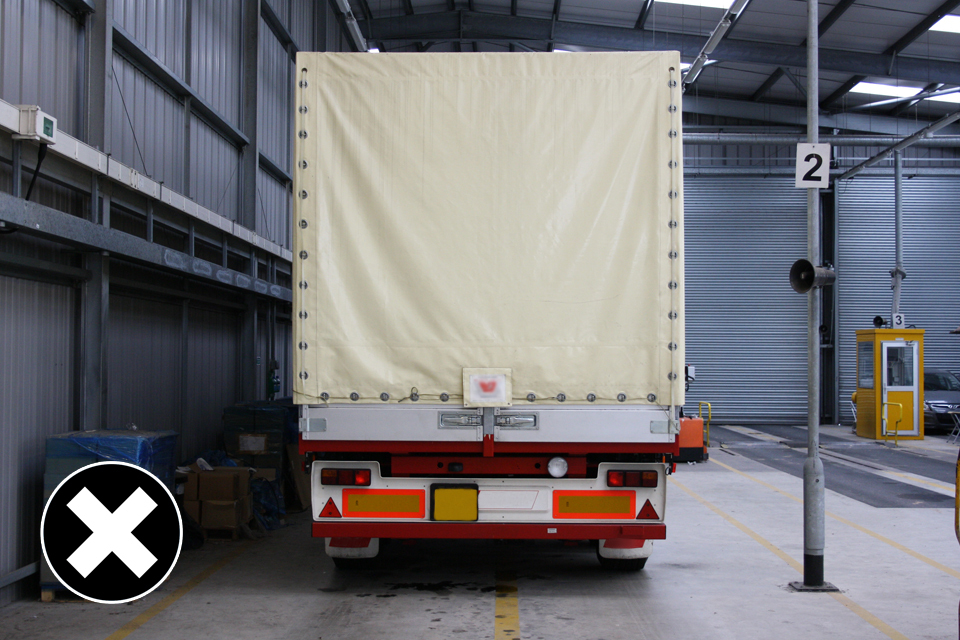
Not allowed: marker boards are insufficient on their own.
Marker boards used commonly on heavy goods vehicles can be used as part of conspicuity but are insufficient on their own.
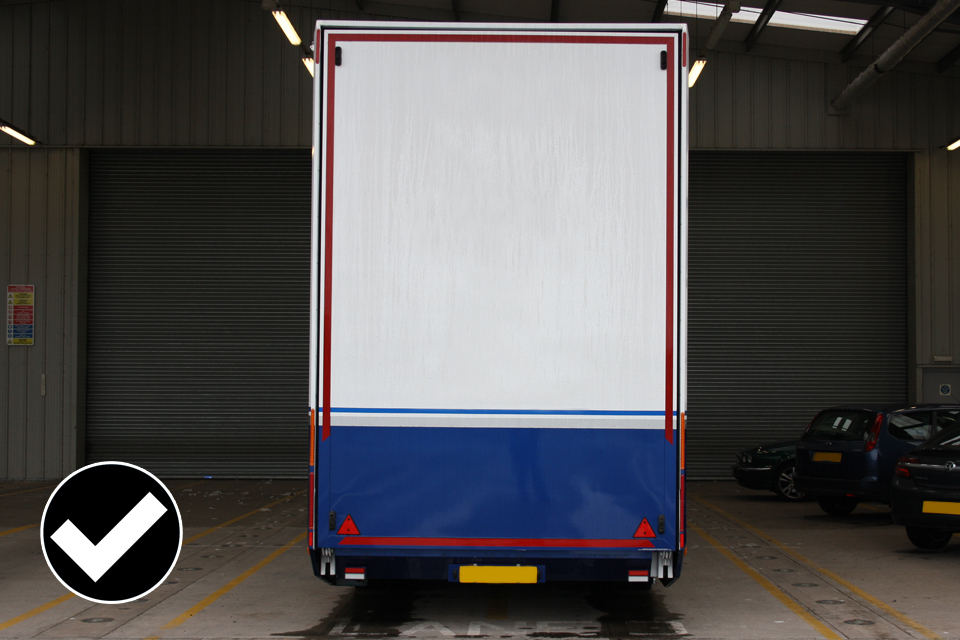
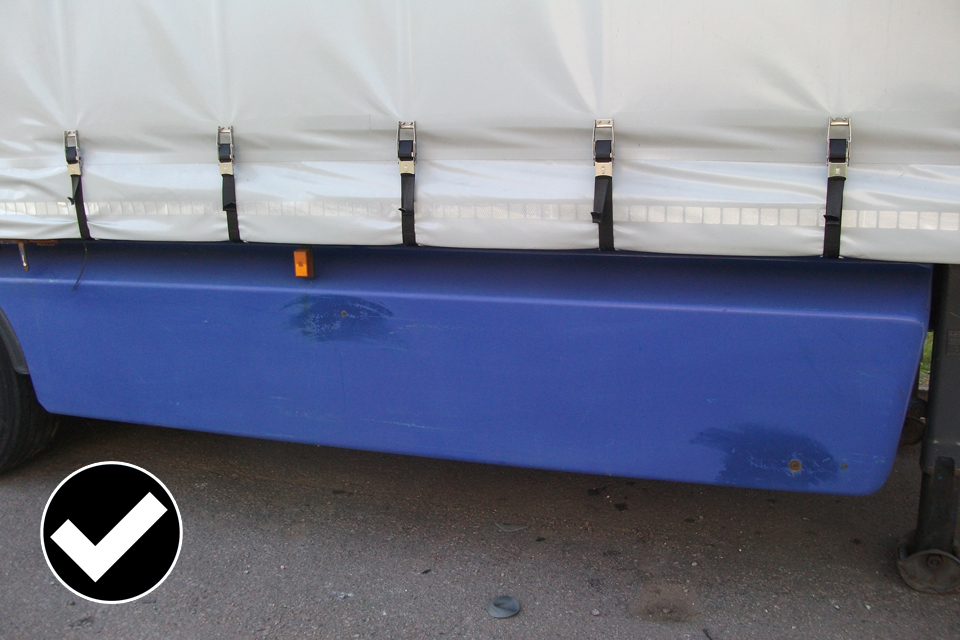
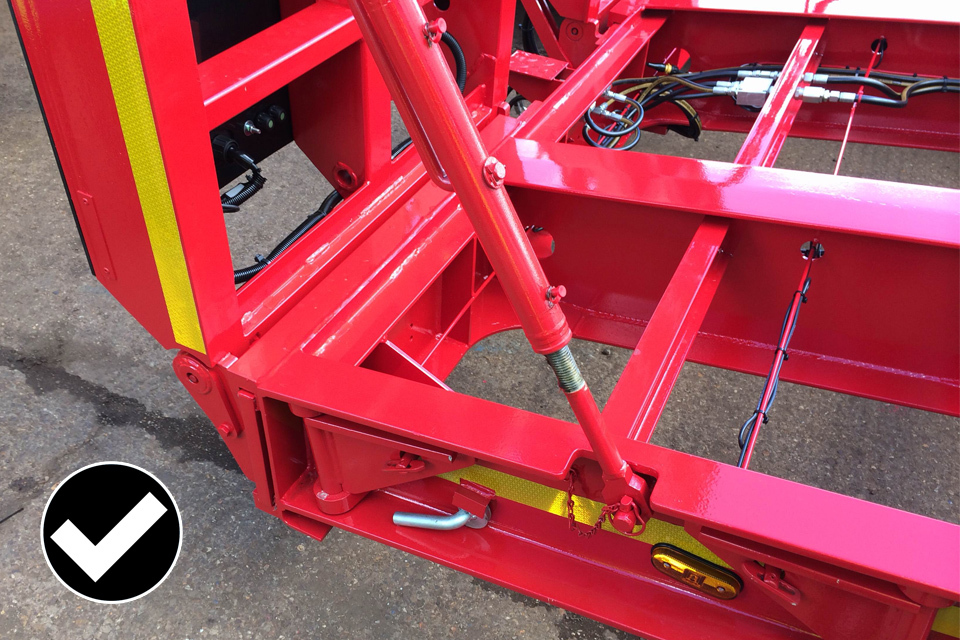
Allowed: conspicuity that has been applied all around the outside.
The above image shows conspicuity that has been applied all around the outside of this trailer. The same principal will apply to a HGV.
Rear conspicuity must outline the vehicle and be red or yellow.
The rear conspicuity must outline the vehicle and be red or yellow.
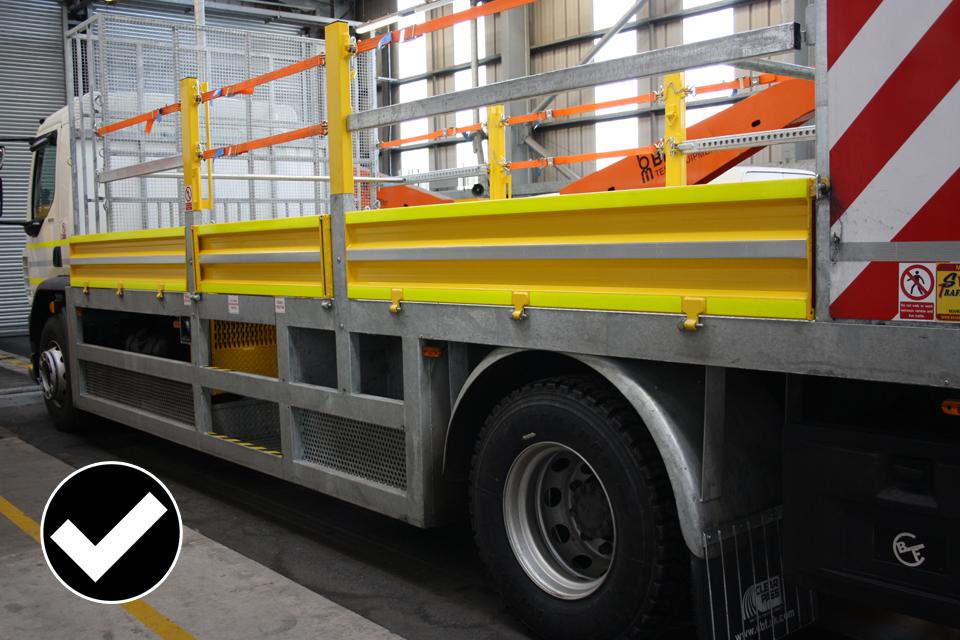
White and yellow conspicuity must cover at least 70% of the vehicle length.
The side conspicuity must cover at least 70% of the vehicle length and be coloured white or yellow.
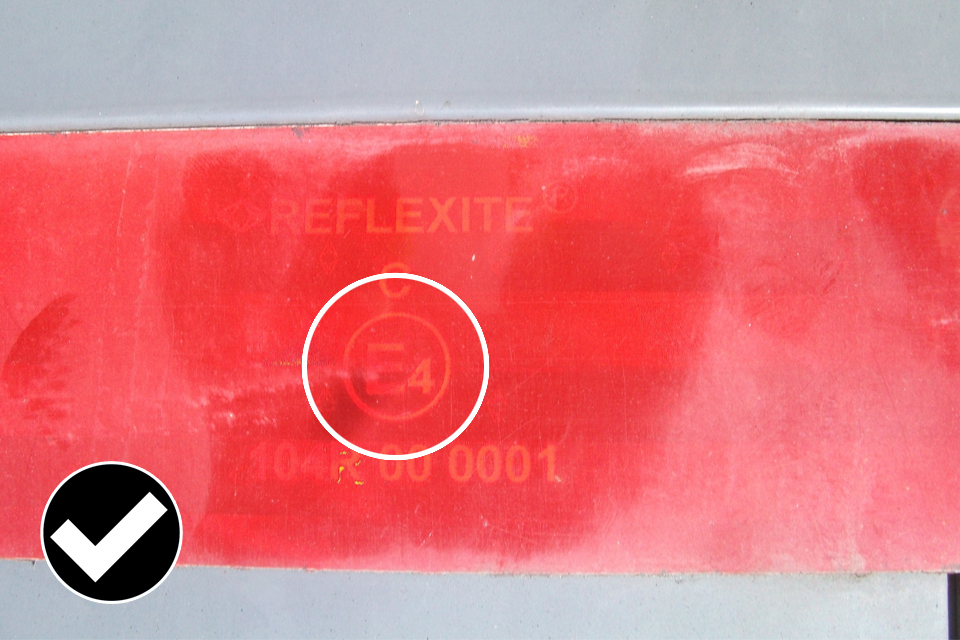
Conspicuity tape must carry an approval mark.
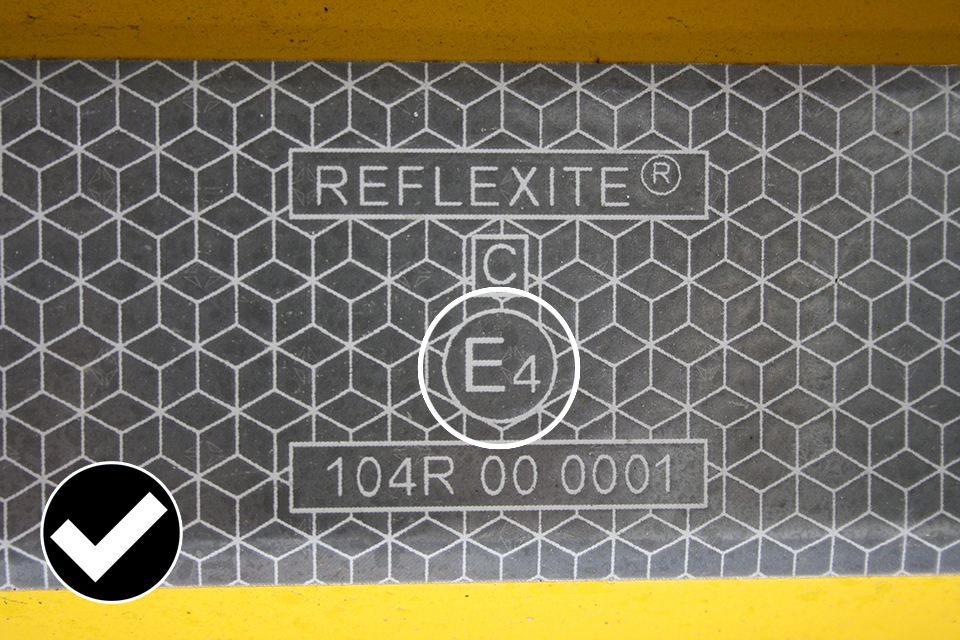
Conspicuity tape must carry an approval mark.
Conspicuity tape must carry an approval mark.
Conspicuity tape must cover 70% of the overall vehicle length.
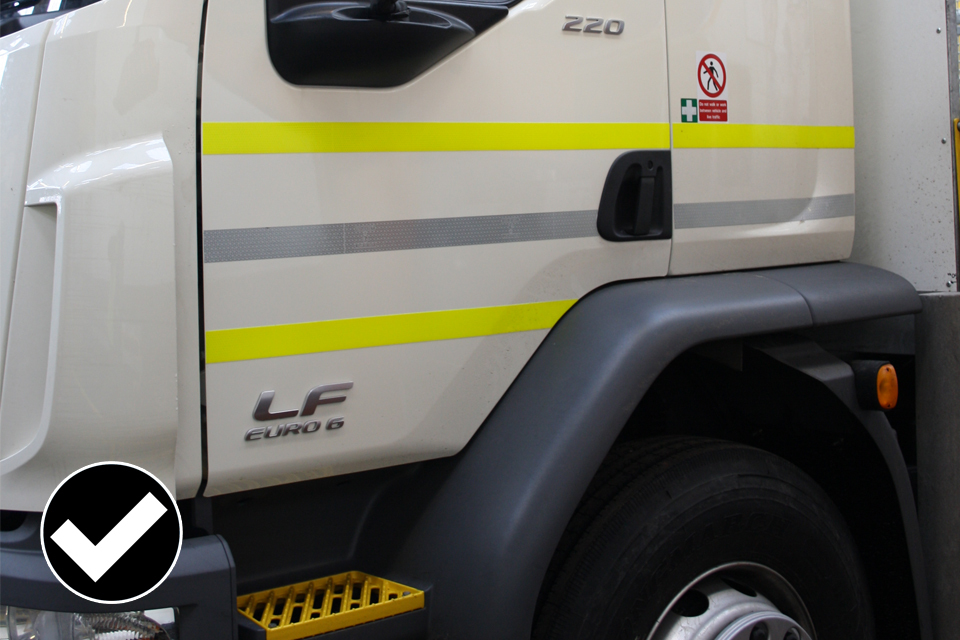
The conspicuity tape must cover 70% of the overall vehicle length distributed over the cab and body.

Conspicuity markings must take into account the body shape and contour.
The conspicuity markings must cover the body outline to the best extent possible. It must take into account the body shape and contour etc.
3.2 What to check before retro reflectors are inspected
This section covers:
- rear reflectors
- side reflectors
- front reflectors (if required)
Reflectors must be fitted in accordance with the table in the manual and must be marked with:
- “e” or “E”
- the relevant identity symbol IA or IB
The rear reflector must:
- be at least 50% visible at all times taking into account opening doors, hatches, lockers
- face to the rear and not be triangular.
Conspicuity markings for side and rear differ and are dependent upon both:
- the weight of the vehicle
- the size of vehicle
At least one approval mark must be visible on the material fitted to both sides and rear.
You can use the figures in the manual as a template to show you what is required.
Rear marker boards are no longer required if full conspicuity markings are fitted.
For ‘Age related IVA’ the vehicle must be brought up to the latest standards, conspicuity must be fitted.
3.3 The standard retro reflectors must meet
See section 21 (retro reflectors) of The IVA inspection manual for the full inspection standard.
4. General construction
4.1 How general construction is inspected
All aspects of design and construction are inspected to make sure that the vehicle is of no danger to the driver, passengers or other road users.
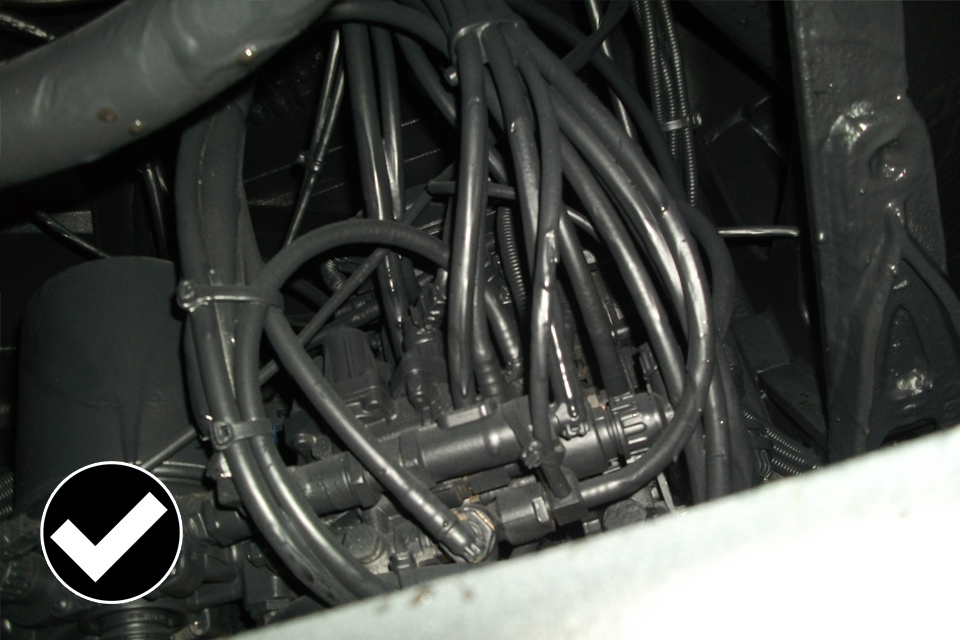
Good example of design and construction.
Good example of design and construction.
The images are above are good examples of design and construction where:
- suitable size steel is used in construction of the body, frame, brackets etc
- there is professional build quality
- adequate size nuts and bolts have been used
- there is secure wiring and piping
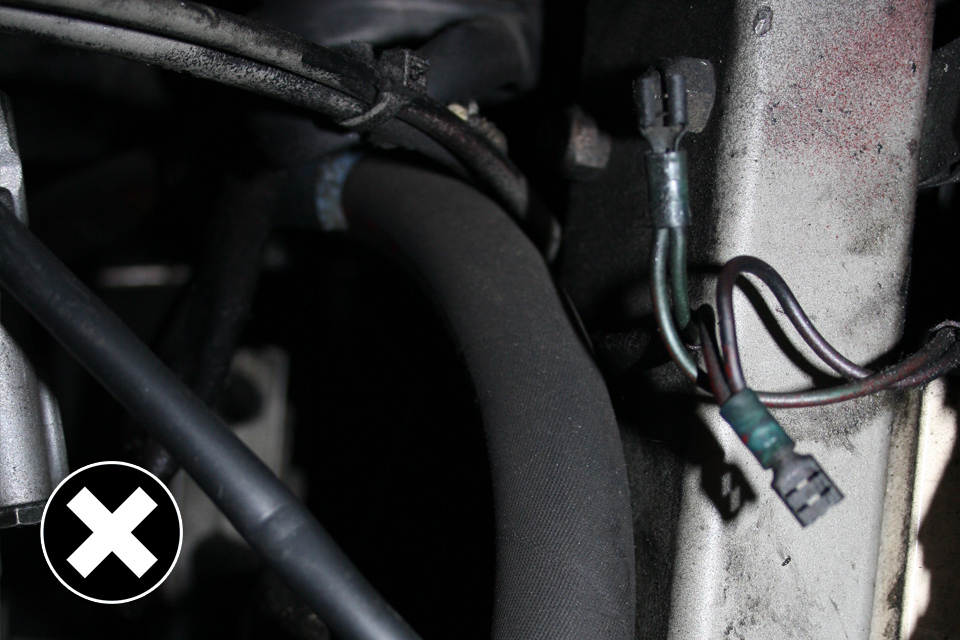
Not allowed: insecure wires that are likely to rub through on the metal edge.
The above image shows an example of insecure wires that are likely to rub through on the metal edge. This isn’t allowed and requires that they are refitted and secured to meet the required standard.

Allowed: wires that are clipped in and grometed.
The above image is a good example of wires that are clipped in and grometed.
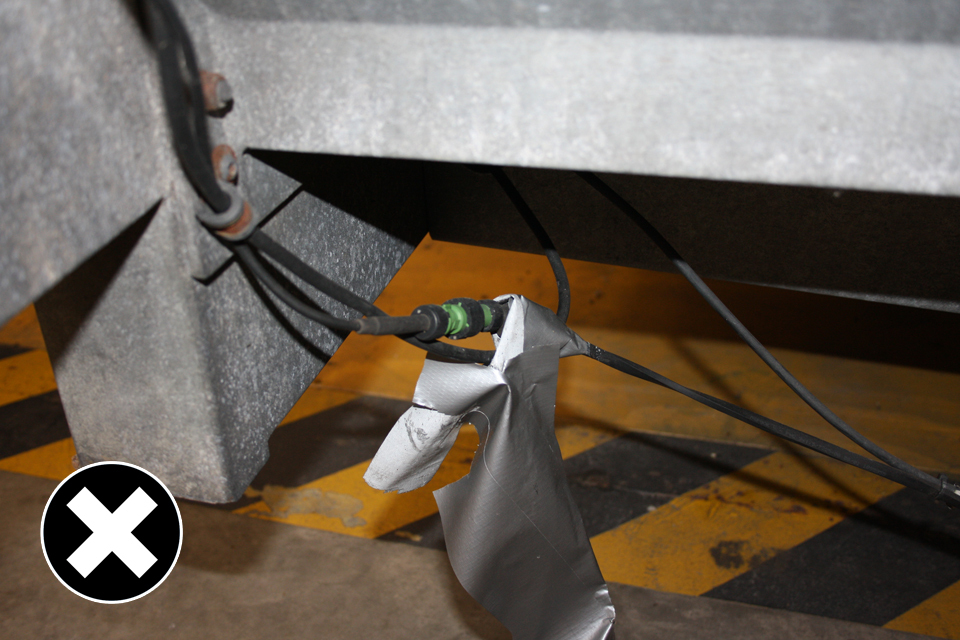
Not allowed: insecure wiring and piping.
Most common problem DVSA sees for IVA is insecure wiring and piping. The underside of a truck will have a lot of pipe work and cables.
Allowed: wiring secure, clipped into place every 300mm, or in trunking.
Wiring and piping needs to be secure, clipped into place every 300mm, or in trunking.
Not allowed: uninsulated and insecure wires.
The image above shows uninsulated and insecure wires, this isn’t allowed.
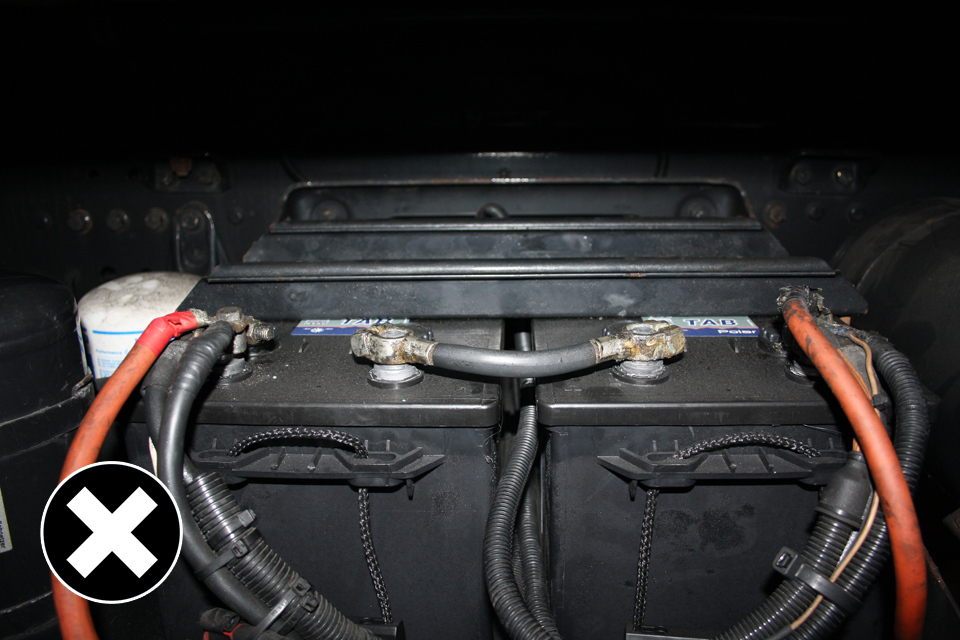
Not allowed: no battery terminal insulation.
The image above shows that there is no battery terminal insulation, this isn’t allowed.
4.2 What to check before general construction is inspected
DVSA will look at how the vehicle is designed and constructed and consider all aspects of the vehicle in all the conditions it will be operated under, this includes:
- speed
- load
- vibrations
- acceleration
- cornering
- braking forces
Second stage builders need to copy the good workmanship of the base vehicle.
The common problems DVSA finds are:
- insecure wiring and piping
- loose or inadequate fittings
- poor finishing
All of the above applies to ‘Age related IVA’ and your vehicle will need to be prepared as though it were new.
4.3 The standard general construction must meet
See the IVA inspection manual for the full inspection standard.
5. Statutory plates and Vehicle Identification Number (VIN)
5.1 How statutory plates and VIN are inspected
A statutory plate must be fitted for each stage of the build of your vehicle.
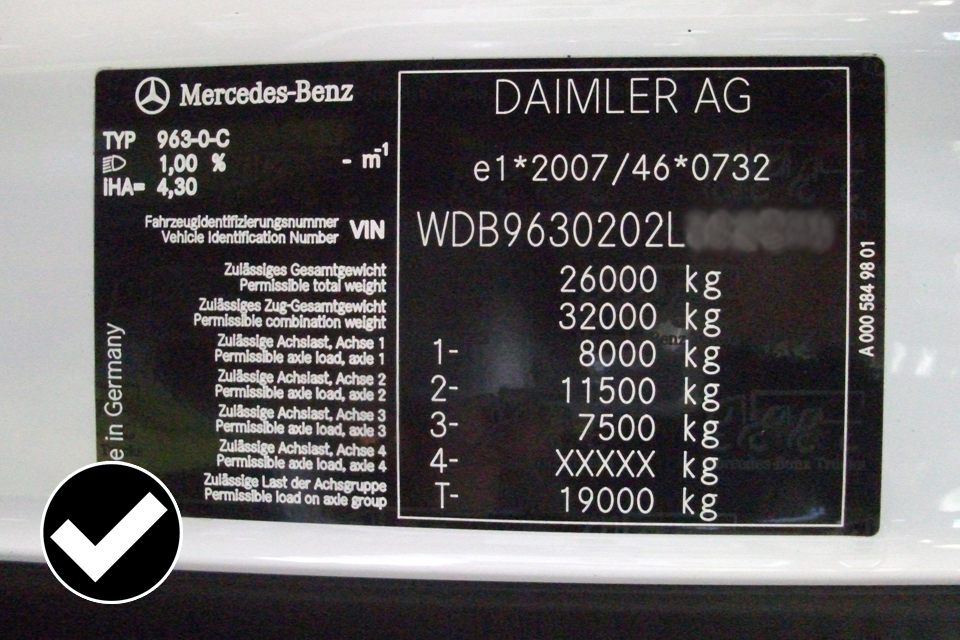
Example of a first stage build.
The image above is an example of a first stage build.

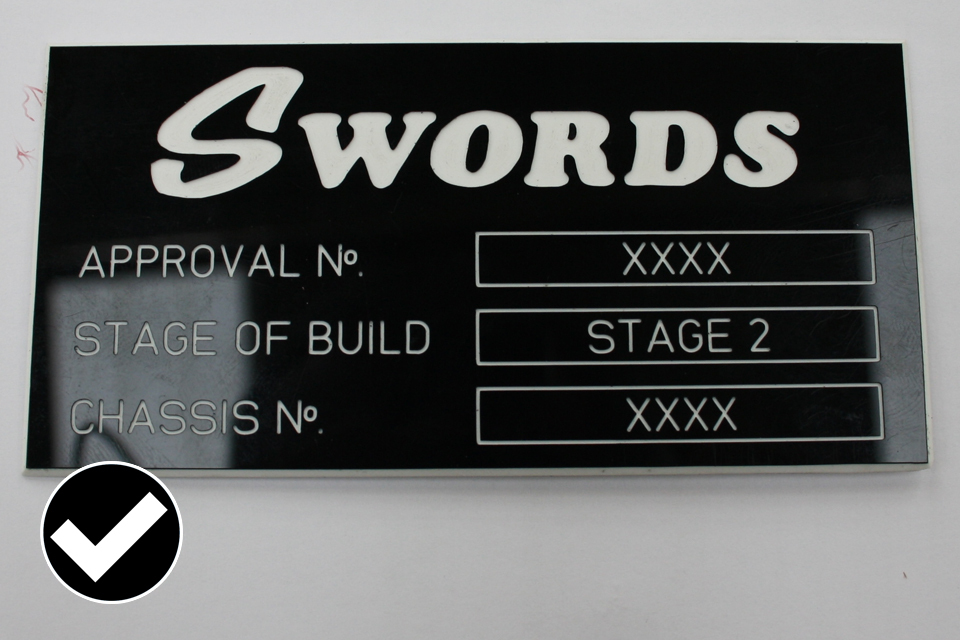
Example of a second stage build.
The image above is an example of a second stage build.
The first image shows a first stage plate where all the required information is in a clearly defined rectangle in the correct order.
The second image shows a second stage plate where all the required information has been hand stamped in the correct order in a rectangle.
There is other information on the example plates but as it’s outside the rectangle it’s allowed and both VIN plates are securely fixed to the vehicle.
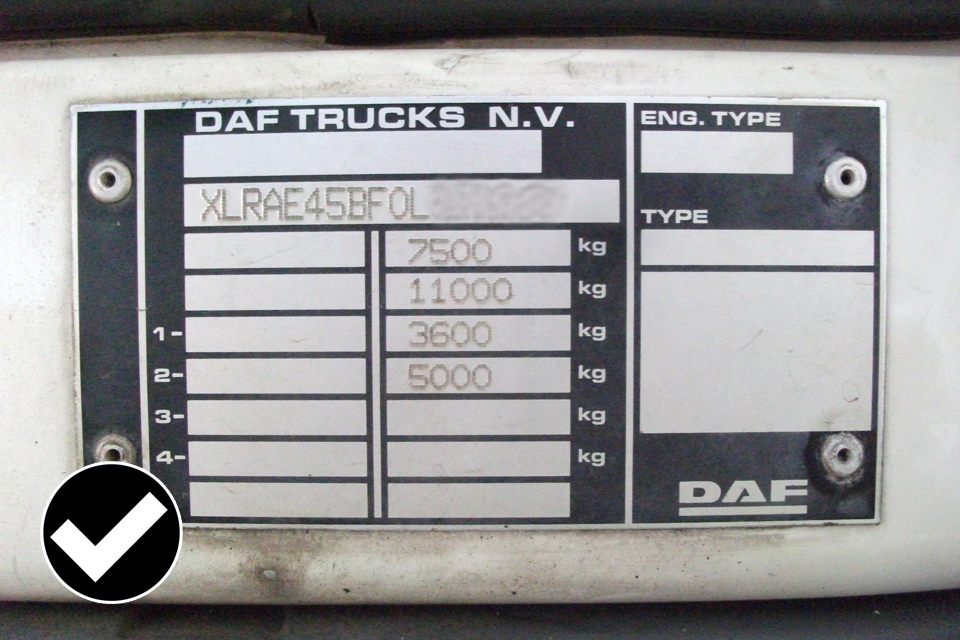
Allowed: stage one plate that lists the weights in the order that the legislation requires.
The image above shows a stage one plate where the plate lists the weights in the order that the legislation requires. This means that the plate doesn’t have to define what they are and works in any language.
Allowed: stage one weights haven’t been altered so there is no requirement to list the weights.
The image above is an example where the stage one weights haven’t been altered so there is no requirement to list the weights.
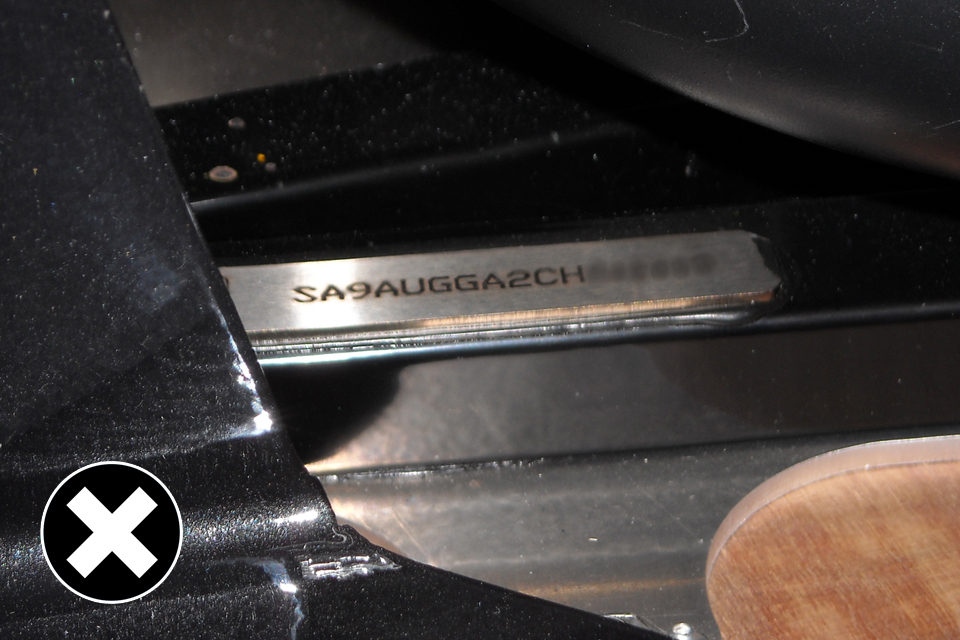
Not allowed: plate needs to be seam welded to the frame/body.
A ‘stamped in’ VIN must be:
- marked on the chassis or frame
- permanent (stamped, hammered, etched)
In the above image the VIN is stamped into a plate that is bonded to a part of vehicle. This isn’t allowed as the plate has not been seam welded to the frame/body.
5.2 What to check before statutory plates and VIN are inspected
The plate must:
- be permanent
- be durable
- contain the required information in the correct order
The only information allowed on the plate must be within a clearly defined rectangle and in the correct order. The order is:
- name of manufacturer
- approval number and/or build stage (if applicable)
- VIN
- maximum permitted laden mass of vehicle
- maximum train weight (if applicable)
- maximum laden mass for each axle in order from front to rear
There may be other information on the plate but this must be outside of the clearly defined rectangle.
5.3 The standard statutory plates and VIN must meet
See section 18 (statutory plates) of the IVA inspection manual for the full inspection standard.
6. End outline, side, stop & side marker lamps
6.1 How end outline, side, stop & side marker lamps are inspected
This section covers the lamps themselves and the angles of visibility.
Refer to section 22 of the IVA inspection manual for required standards.
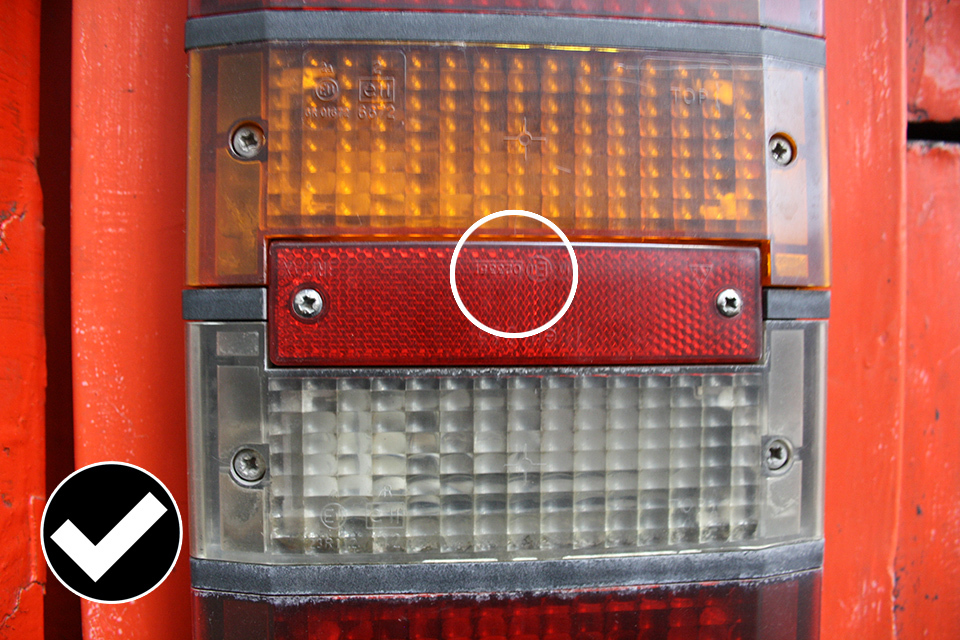
DVSA will check the approval marker and identify symbol.
DVSA will check the approval marker and identify symbol.
To make sure each lamp on the vehicle is suitable, DVSA will check for an:
- “E” or “e” approval mark
- correct identity symbol

DVSA will check the height from the floor.
DVSA will check the distance from the side of the trailer.
DVSA will check side and stop lamps for:
- height from the ground
- distance in from the side of the vehicle
Side markers are checked for the correct colour and position.
Side marker lamps are checked for correct:
- colour
- position
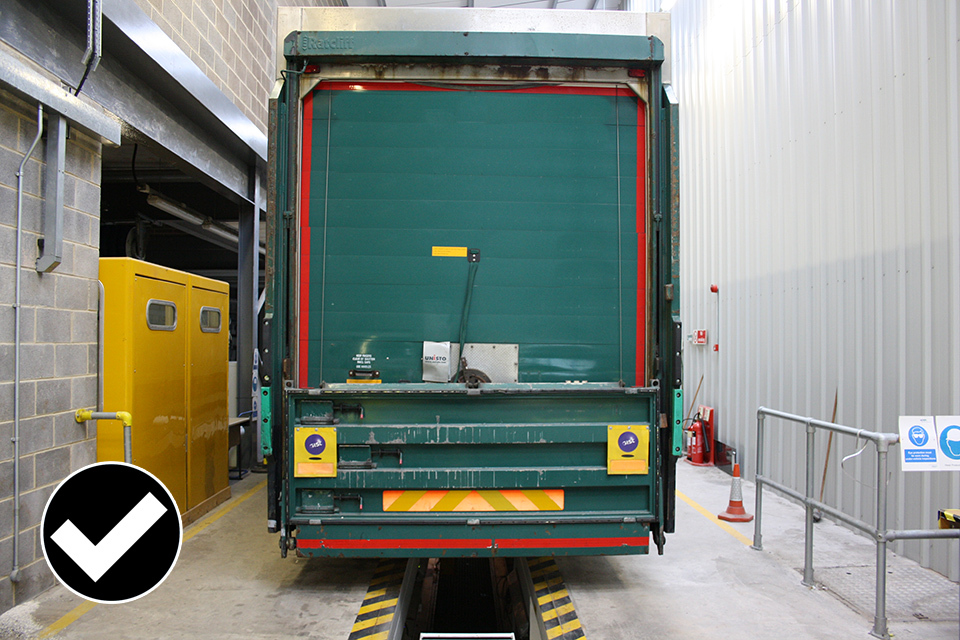
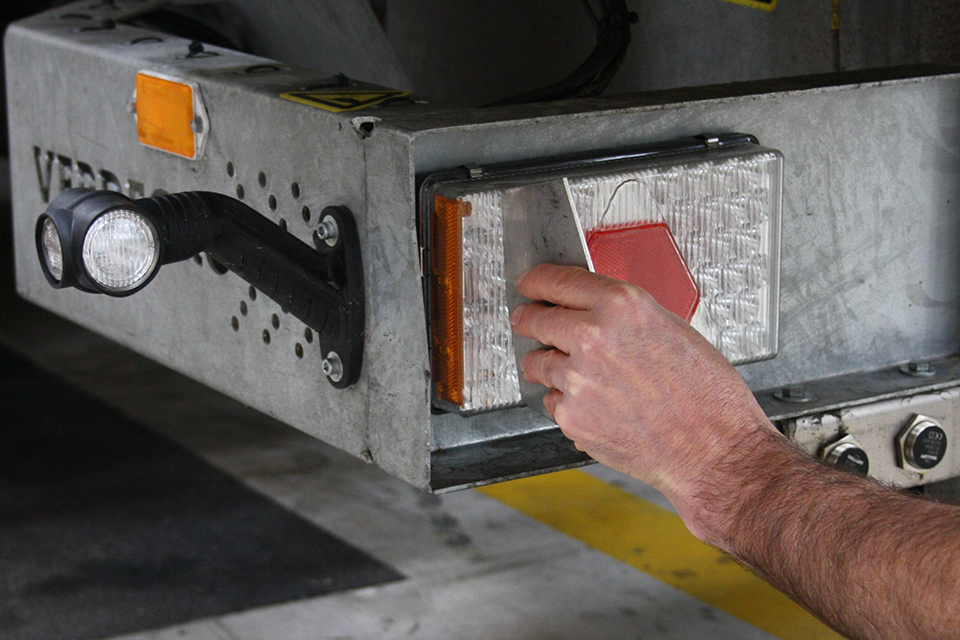
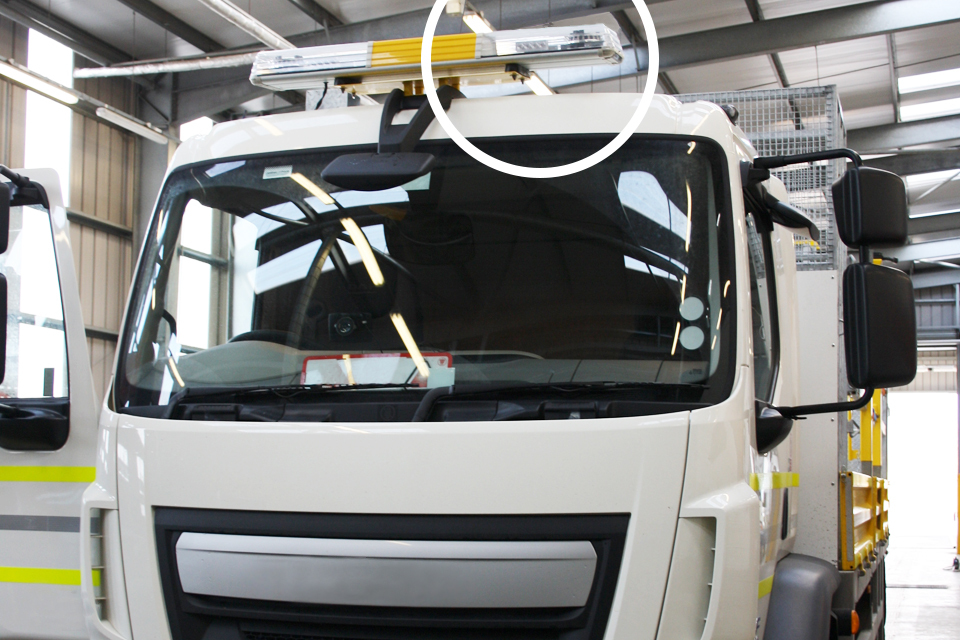
An end outline marker must be fitted as high as practical.
An end outline marker must be fitted as high as is practical.
In the image above it shows that with a tipper body, the outline marker can’t be positioned any higher. This is allowed.
6.2 What to check before end outline, side, stop and side marker lamps are inspected
DVSA will check the lamps fitted to the vehicle for:
- number
- operation
- position
- colour
- required symbols
- required angles of visibility of lamps
- approval mark
Wider or longer vehicles may need end outline and/or side marker lamps.
There is no need to fit special brackets to accommodate end outline lamps if there is no bodywork in the required position.
6.3 The standard end outline, side, stop & side marker lamps must meet
See 22 (end outline, position(side), stop and side marker lamps) of the IVA inspection manual for the full inspection standard.
7. Spray Suppression
7.1 How spray suppression is inspected
All road wheels must be fitted with spray suppression.
Section 43 (spray suppression) of the IVA inspection manual has diagrams and figures to help explain the requirements.
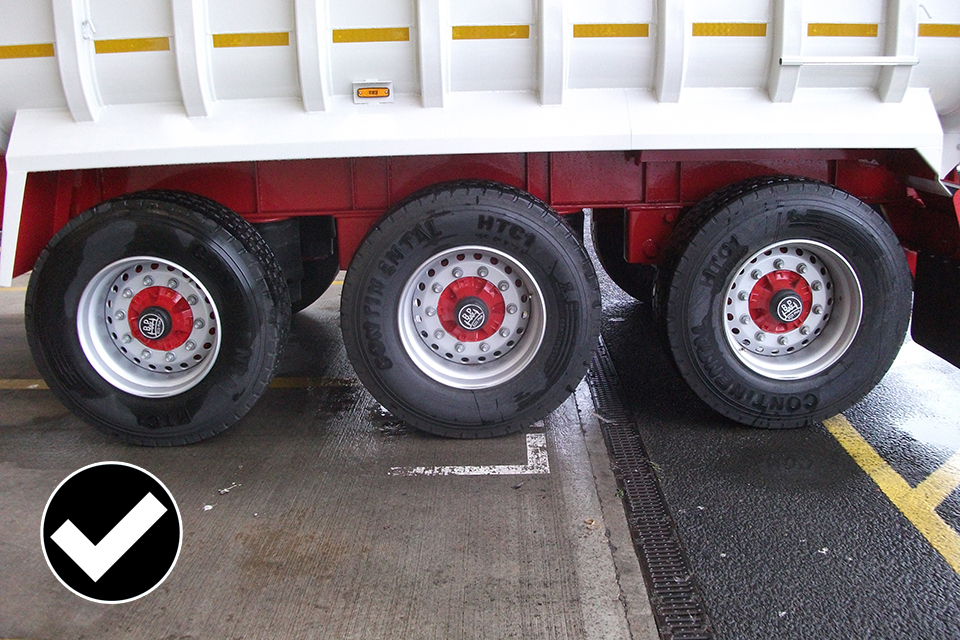
Large mudguard with spray at the rear axle.
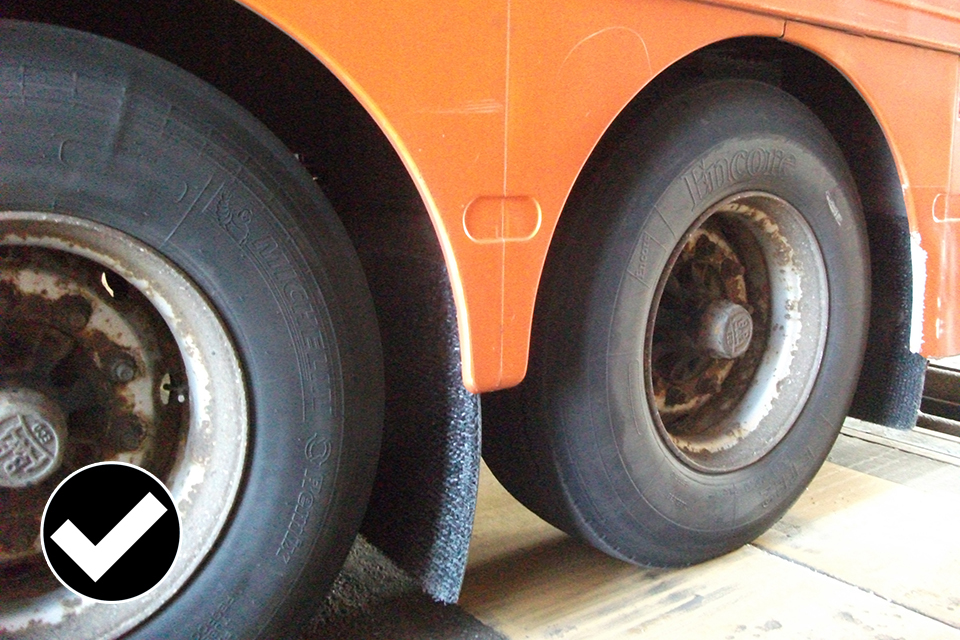
The body forms the mudguards.
Different spray suppression systems can be fitted.
The first image shows one large mudguard with spray suppression at the rear axle.
The second image shows where the body forms the mudguards.
Refer to section 43 (spray suppression) of the IVA inspection manual for the required standard measurements.
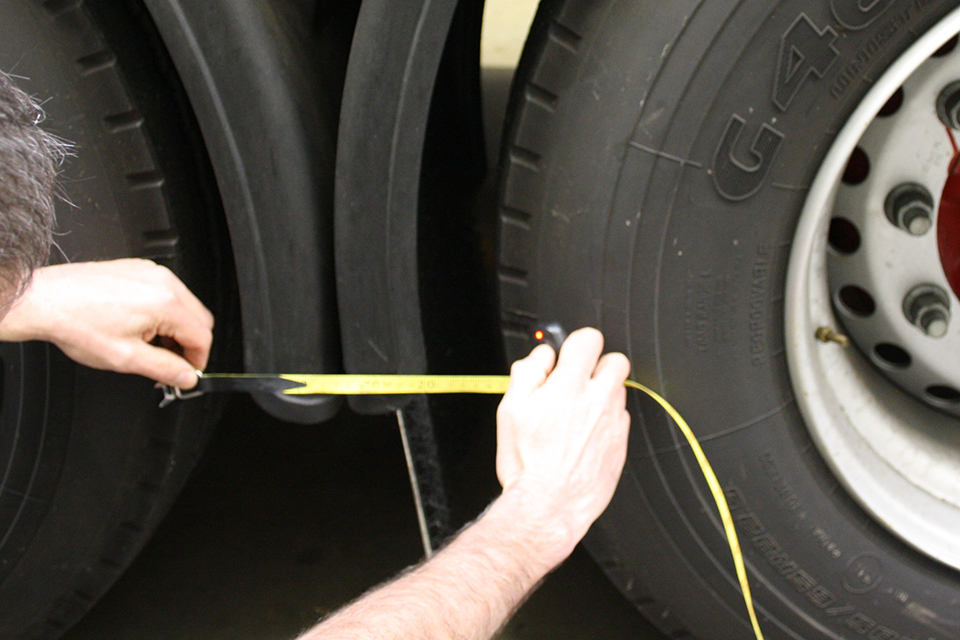
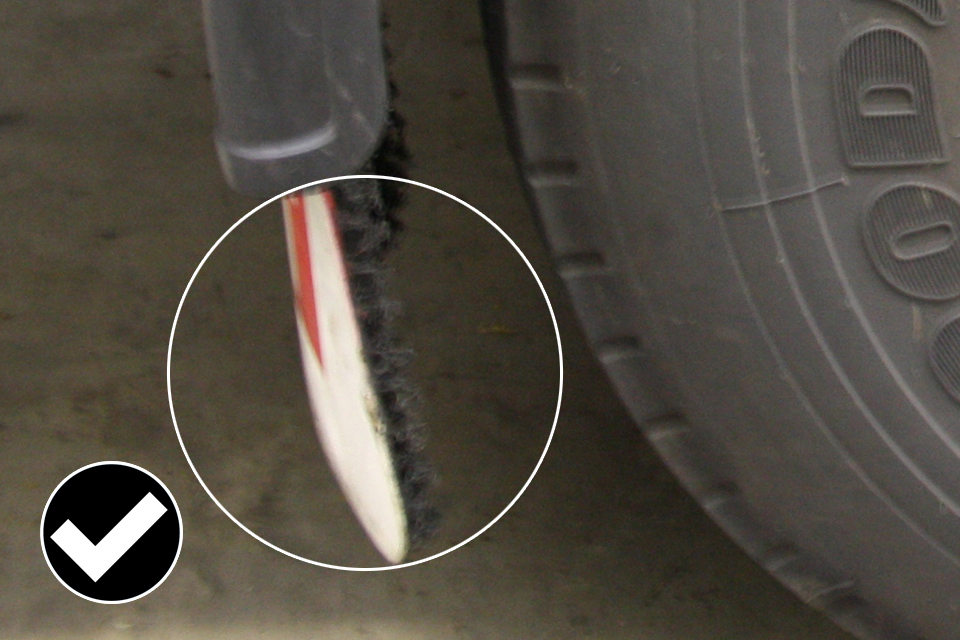
DVSA will measure the distance between the tyres.
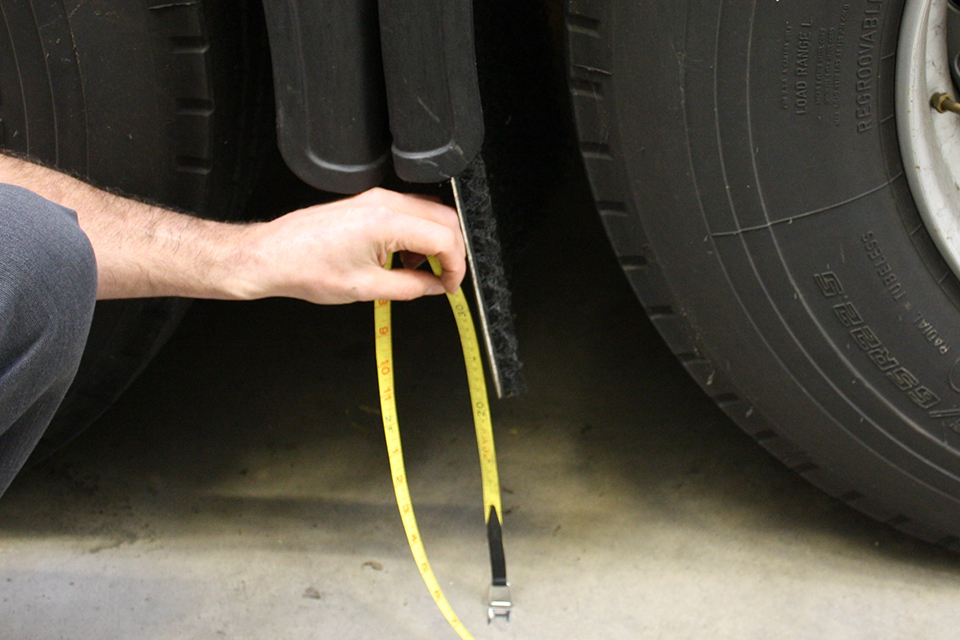
DVSA will measure the height from the ground.
As shown in the images above DVSA will check the:
- distance between the tyres to determine if separate spray suppression is required for each axle
- height from the ground
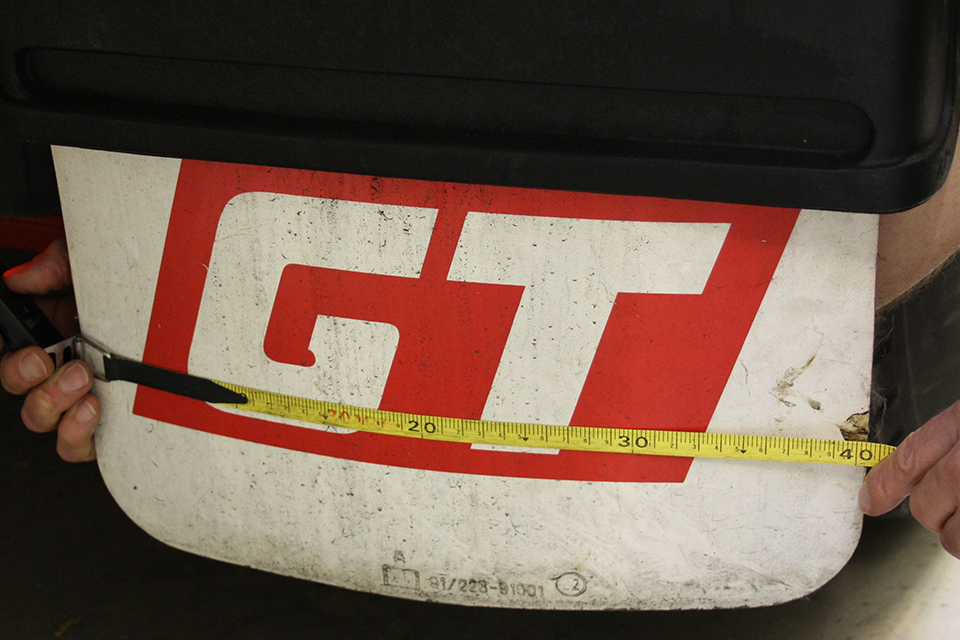
DVSA will measure the width of the spray suppression.
DVSA will measure the spray suppression to make sure they cover the width of the tyre.
Rain flaps must have the whole face made from spray suppression material.
The rain flaps must have the whole face made from spray suppression material.
7.2 What to check before spray suppression is inspected
DVSA will examine spray suppression fitted for:
- dimensions
- angles
- approval numbers
- heights
- widths
Exemptions are listed in section 43 (spray suppression) of the IVA inspection manual.
Even for spray suppression exempt trailers certain required standards still apply.
To help define what system is fitted to your trailer section 43 (spray suppression) of the IVA inspection manual has definitions of:
- mudguard
- outer Valance
- rain Flap
- lift axle
- self tracking axle
DVSA will use a gauge/template to check compliance of mudguard and rain flaps - it’s based on the diagrams in section 43 (spray suppression) of the IVA inspection manual.
7.3 The standard spray suppression must meet
See section 43 (spray suppression) of the IVA inspection manual for full inspection standard.
8. Fuel tanks and Rear Under run Protective Devices (RUPD)
8.1 How fuel tanks and RUPD are inspected
The IVA manual section (03) is divided into:
- fuel tanks
- RUPD
You will be required to provide documentary evidence at the inspection.
Fuel tanks
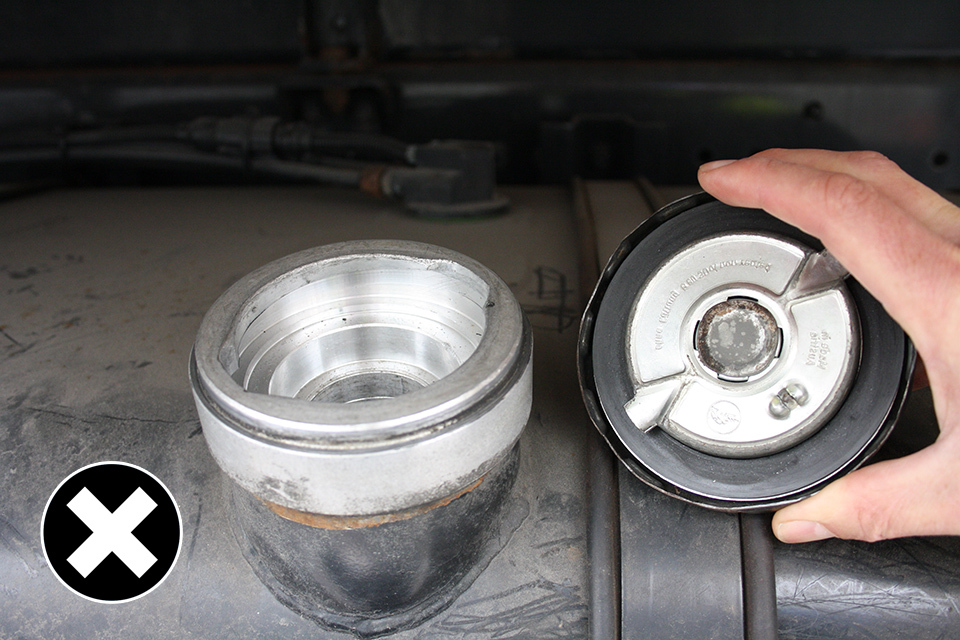
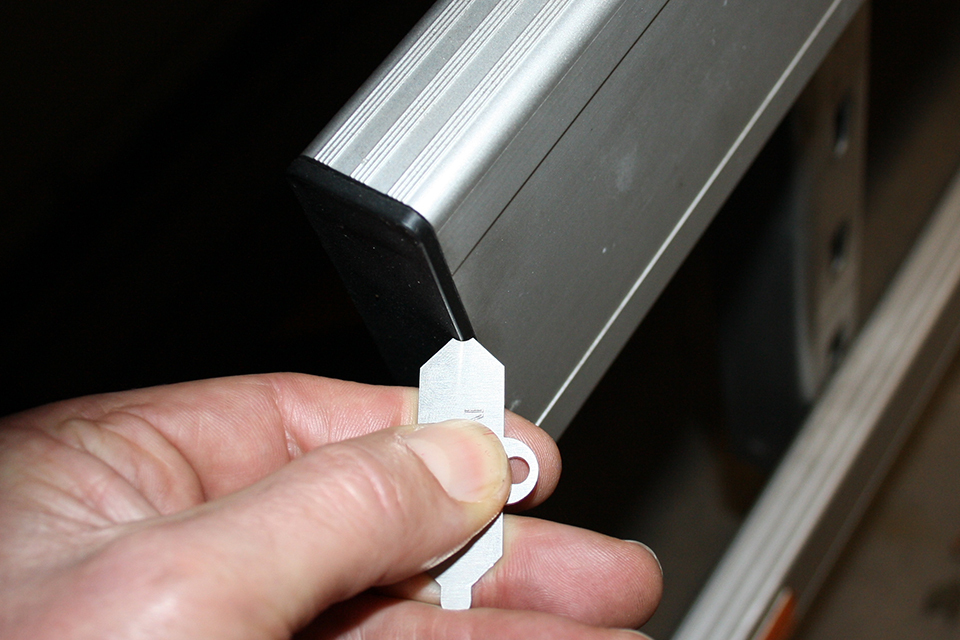
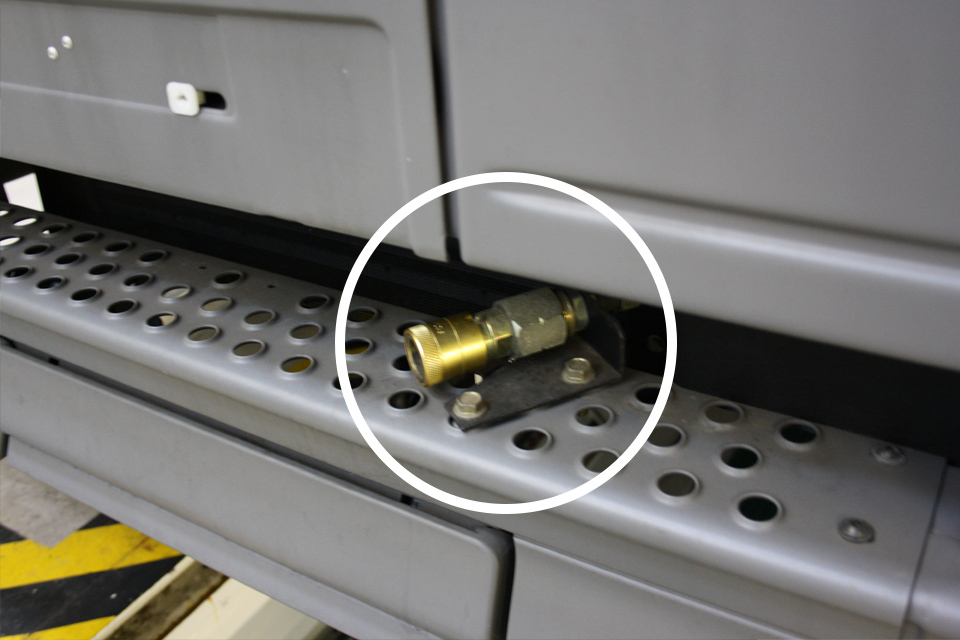
Not allowed: a fuel tank cap that isn’t tethered.
The above image shows a fuel tank cap that isn’t tethered which isn’t allowed.
A fuel cap must either be:
- attached to the vehicle
- a type where the key can only be removed when locked
- of an automatically opening/closing type

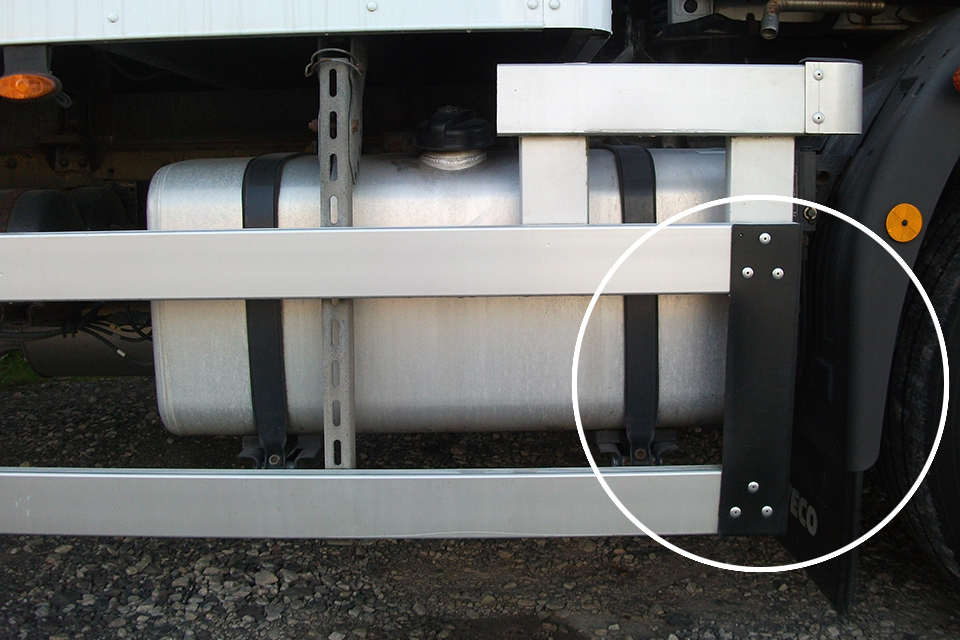
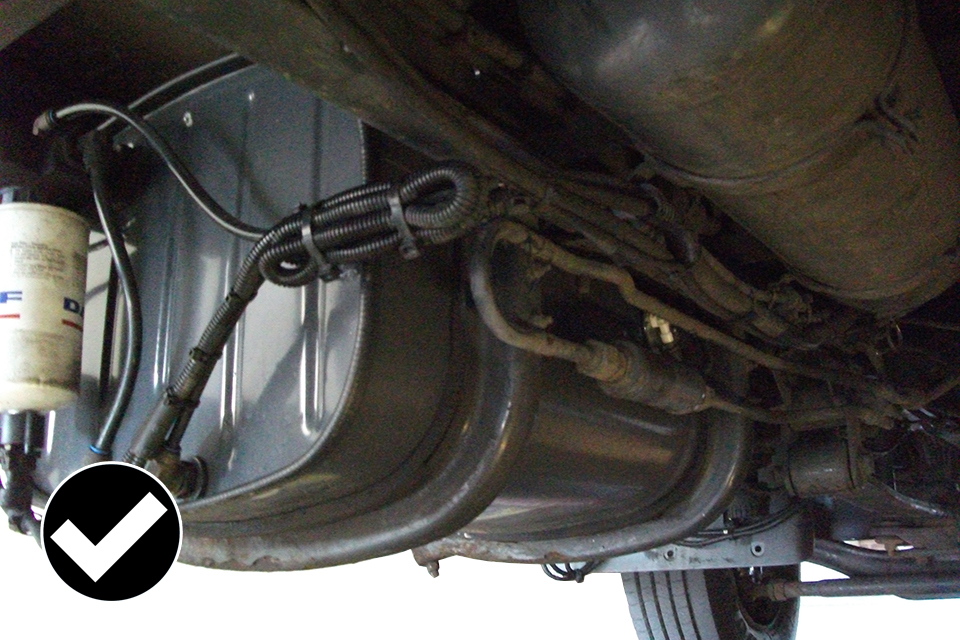
The fuel tank must be secure and positioned so it’s unlikely to be damaged in the event of front or rear impact.
The above image shows that the fuel tank must be secure and positioned so it’s unlikely to be damaged in the event of front or rear impact.
RUPD
DVSA will inspect:
- dimensions
- spacing,
- measurements radius
- approval
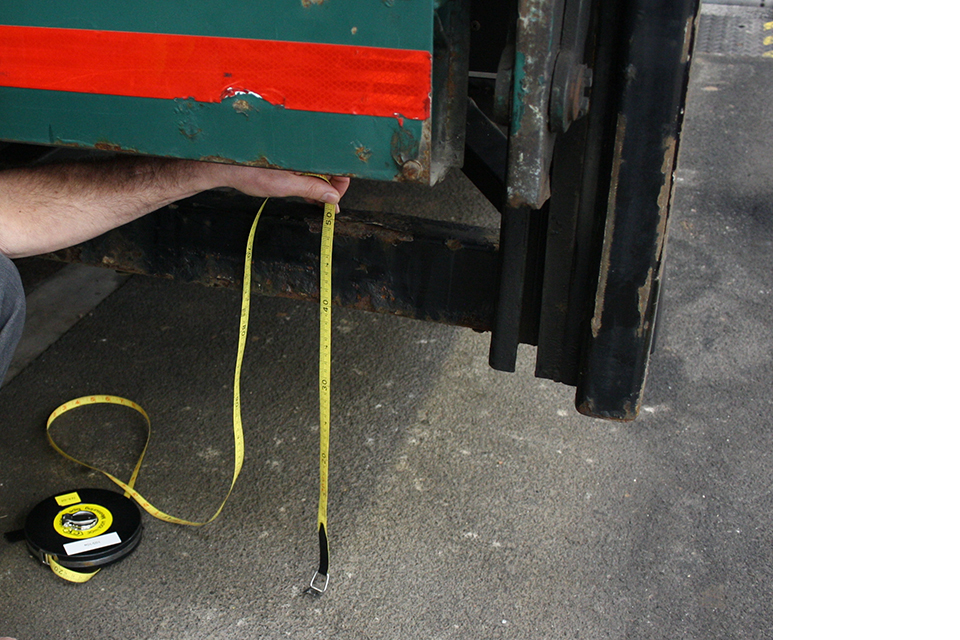
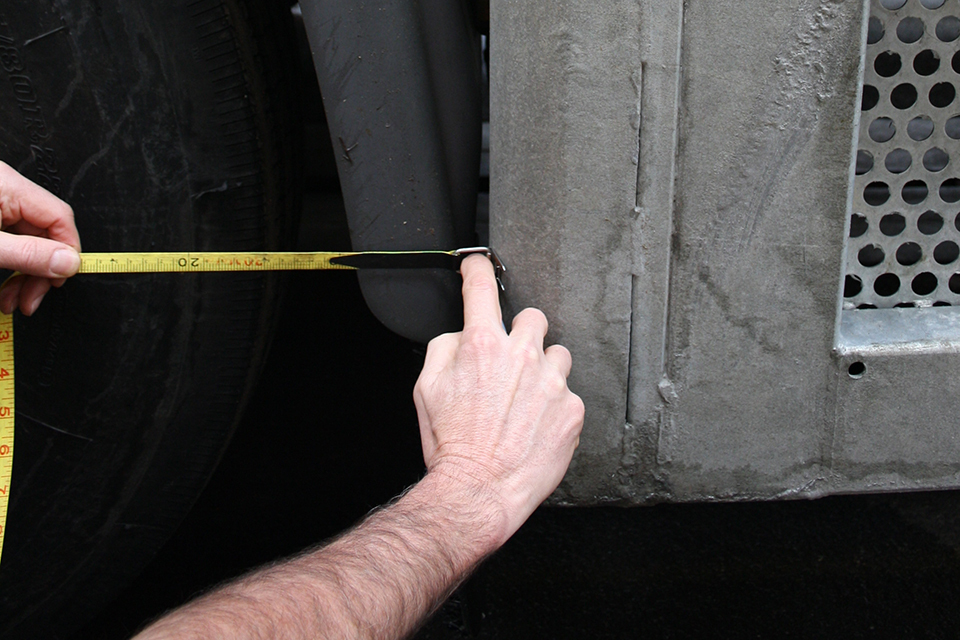
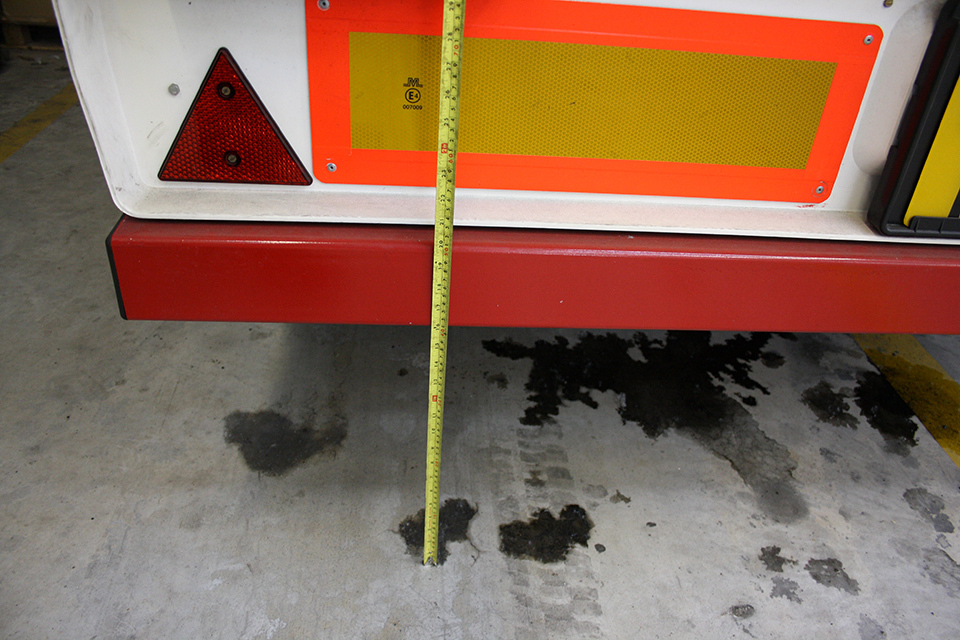
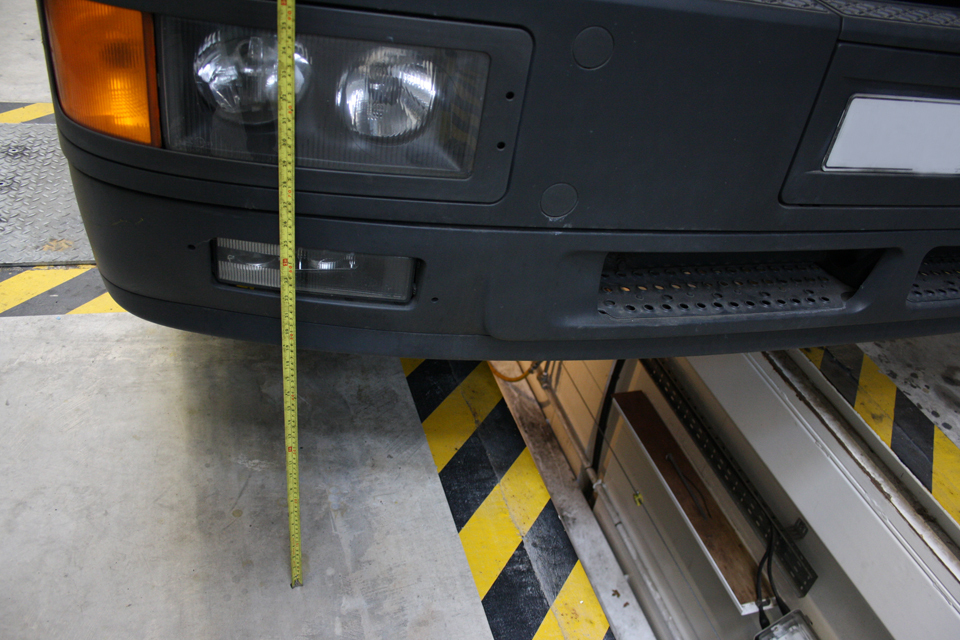
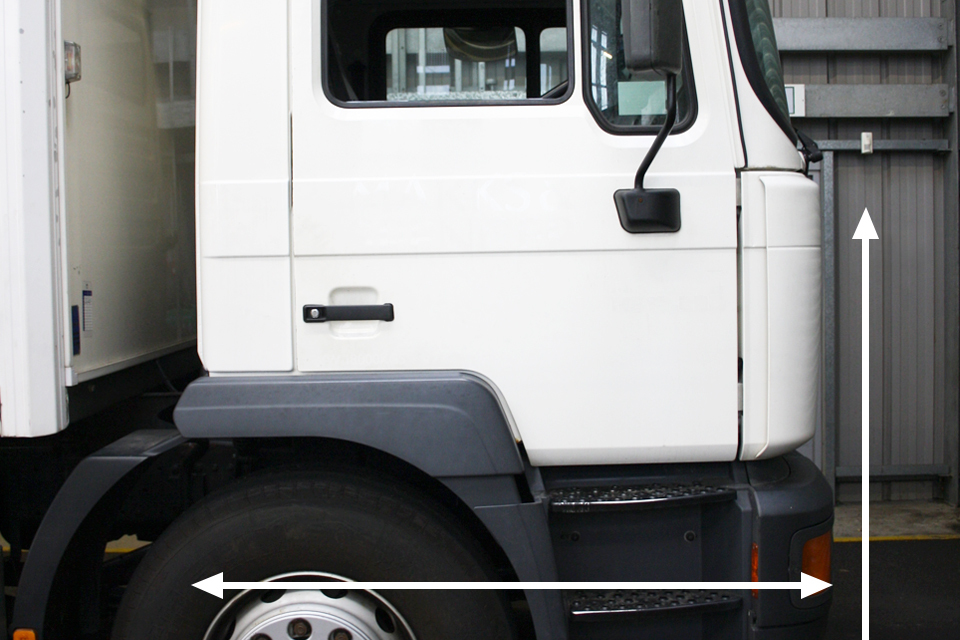
The RUPD mustn’t be more than 550mm from the ground.
The image above shows that DVSA will measure the height that the RUPD is fitted at, it mustn’t be more than 550mm from the ground.
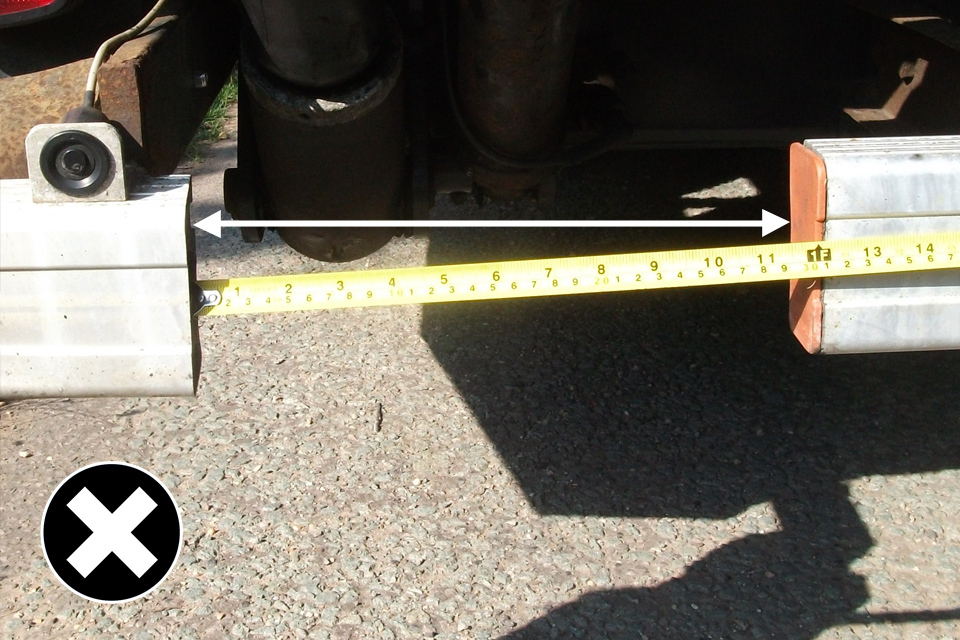
RUPD mustn't extend beyond the width of the rear axle
The image above shows that the RUPD mustn’t extend beyond the width of the rear axle, where a tail lift, etc is fitted this may extend beyond the axle width to the width of the body.
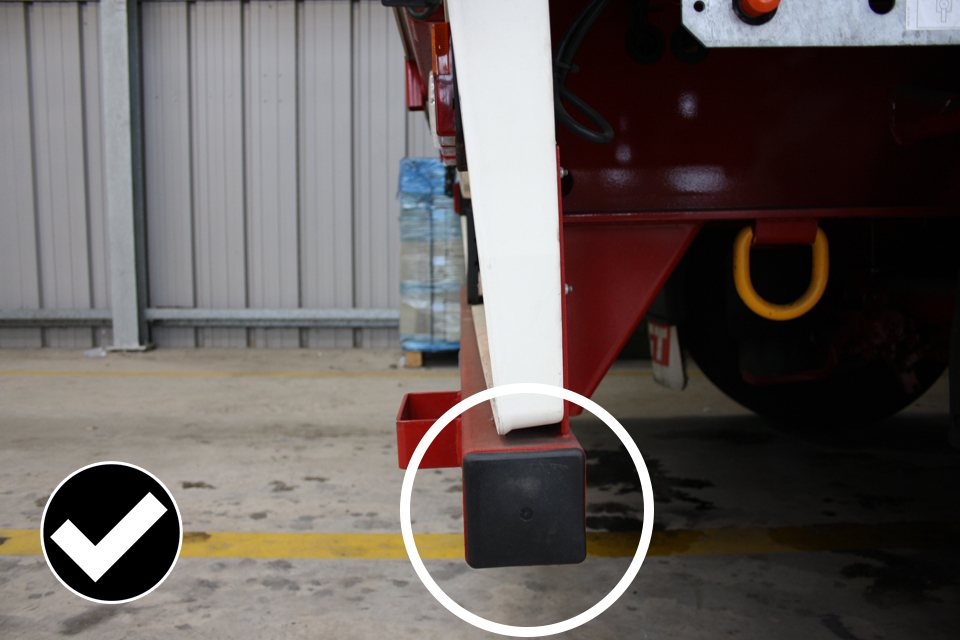
The outer end of the RUPD must be rounded on the outside and radiused to 2.5mm.
The image above shows the outer end of the RUPD must be rounded on the outside and radiused to 2.5mm.
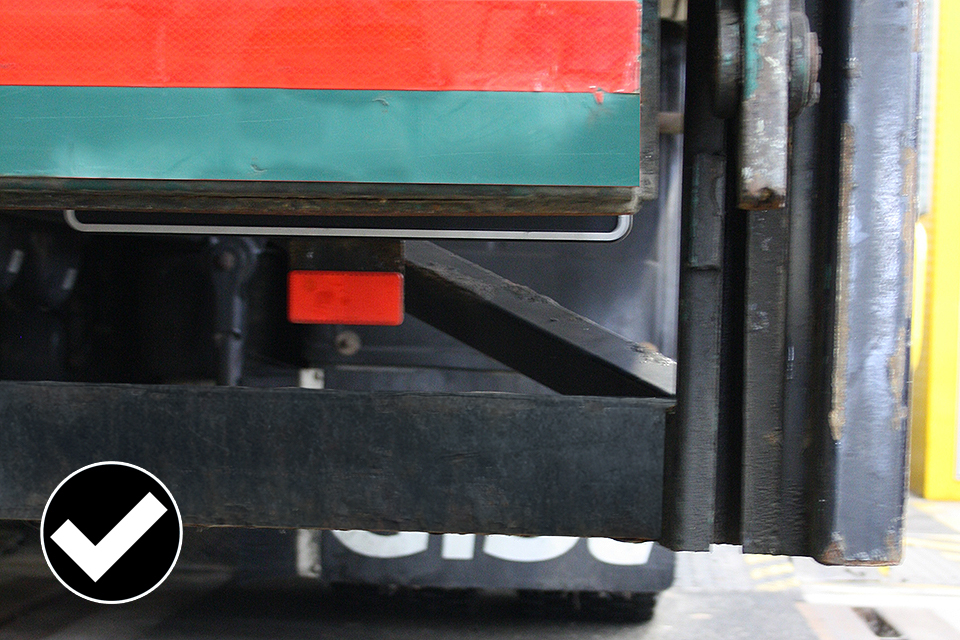
Gaps are allowed for lifts, but the limit is 25mm between working elements of the lift and fixed elements of the RUPD.
The image shows that gaps are allowed for lifts, but the limit is 25mm between working elements of the lift and fixed elements of the RUPD.
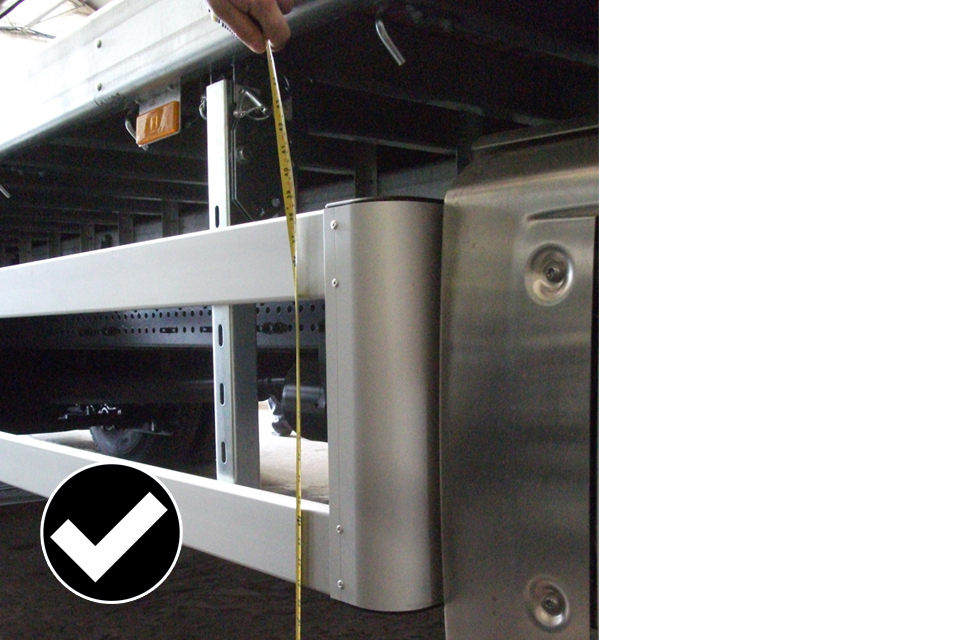
The section height of the RUPD and this must be at least 100mm.

The strength of the RUPD mountings are checked.
The first image shows DVSA will check the section height of the RUPD and this must be at least 100mm. The device must have an approval.
The second image shows that DVSA will inspect the strength of the RUPD mountings to check they’re adequate.
8.2 What to check before fuel tanks and RUPD are inspected
Fuel tanks
The same requirements apply to ‘Age related IVA’, where the original cap isn’t of a tethered type, you must bring the vehicle up to the standard required in the IVA inspection manual.
Stage one builders must make sure that the tank fitted:
- has approval
- is fitted to meet the manufactures instructions
This examination only applies to the tank that supplies fuel for the propulsion of the vehicle.
Stage two builders, the stage one approval will cover the tank, unless it’s moved outside of the manufactures limits.
RUPD
For RUPD satisfactory evidence of compliance for either the device fitted, or the design of the vehicle must be supplied, this may be a test report or approval.
DVSA will check if a separate device is fitted and make sure it’s fitted in accordance with the fitting instructions, these must be supplied along with proof of approval at time of test.
DVSA will check the dimensions of the unit and how it’s fitted. Refer to the IVA Inspection manual section 03 for the measurements and dimension. The manual will have further information that will affect the RUPD on your vehicle.
When a you claim an exemption DVSA will ask you for proof that your vehicle is exempt and how the exemption applies to your vehicle.
The RUPD are there to save lives and reduce injuries so if DVSA believes it could be fitted it will be expected that it is fitted.
8.3 The standard fuel tanks and RUPD must meet
See the IVA inspection manual for the full inspection standard.
9. Installation of lights
9.1 How Installation of lights is inspected
All obligatory and optional lamps fitted will be inspected for:
- position
- security
- colour
- orientation
- obstruction
- interaction with other lamps
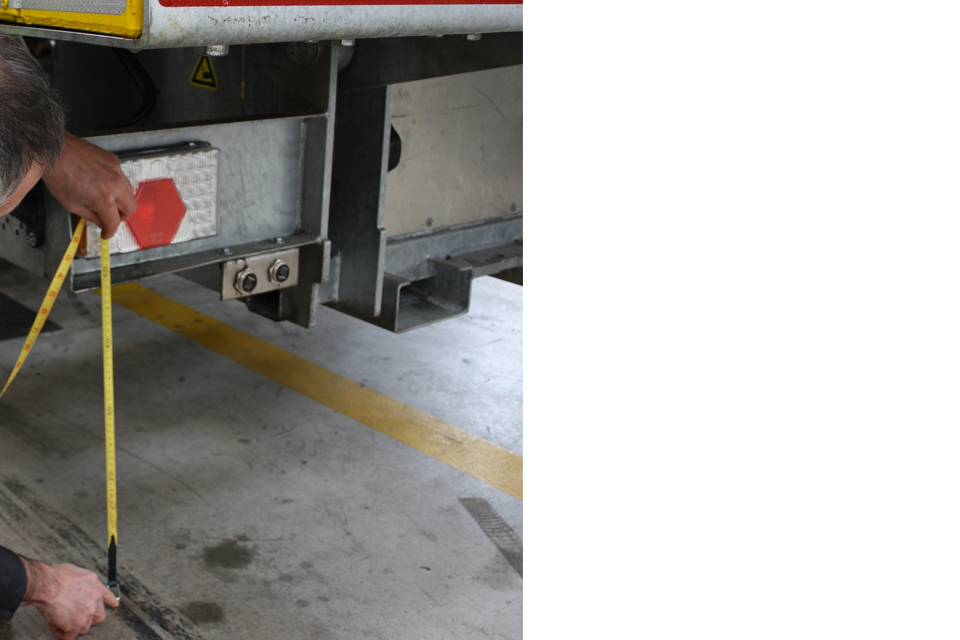
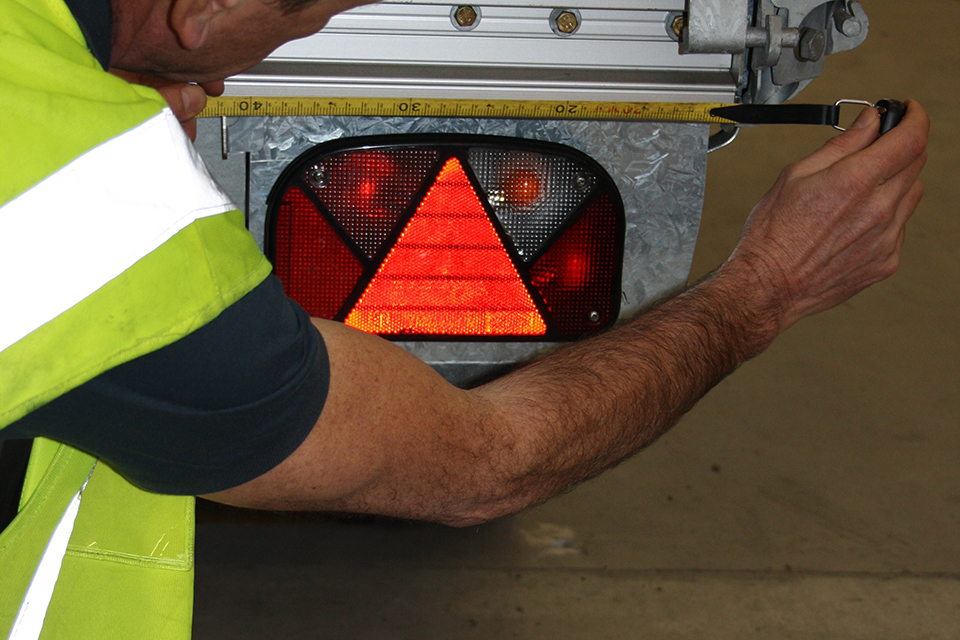
Measure the height and positions of the lamp.
Measure the height and positions of the lamp.
The two images above show the how to measure the height and position of the lamp.
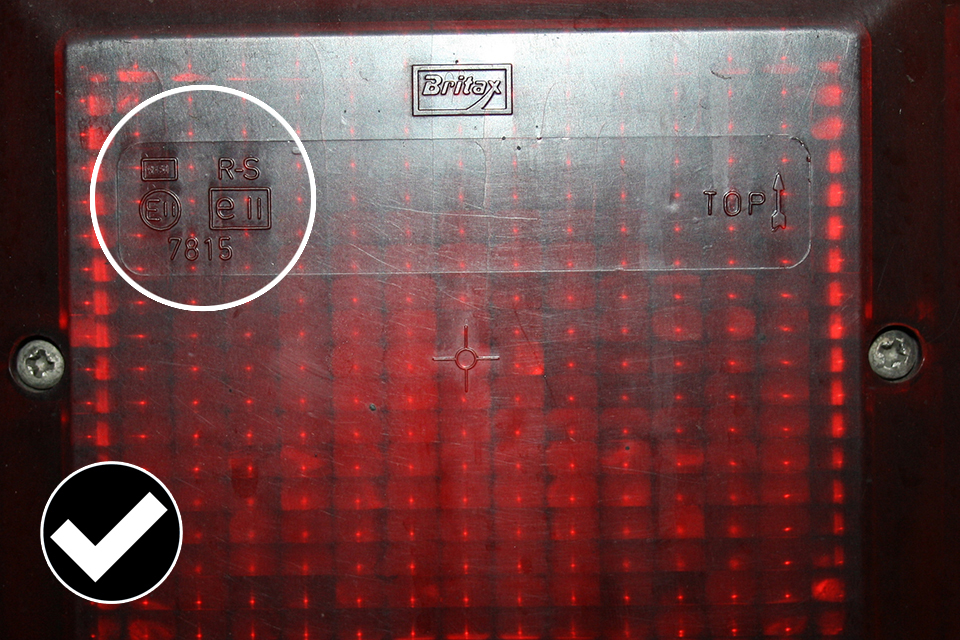
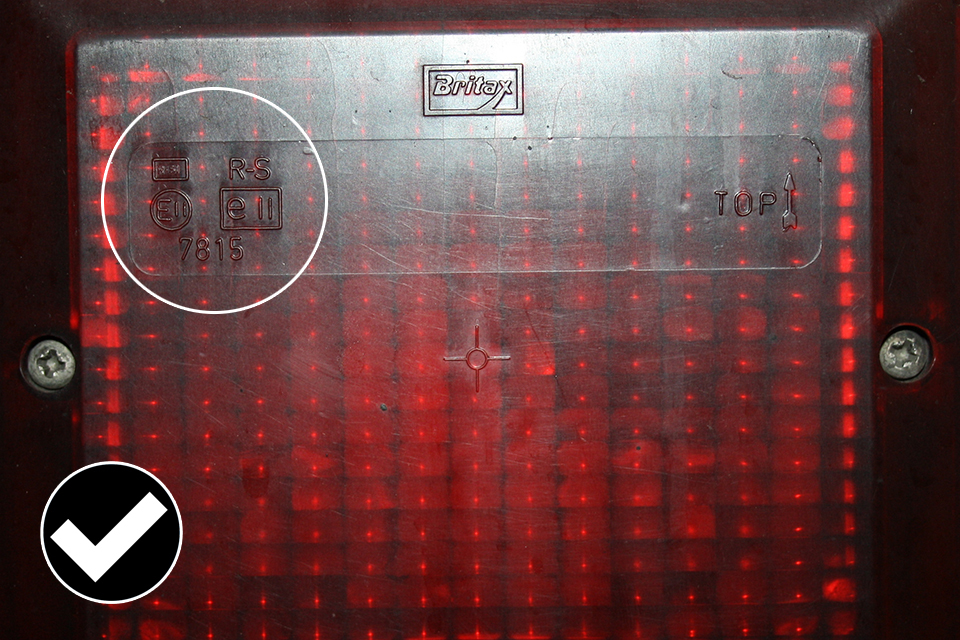
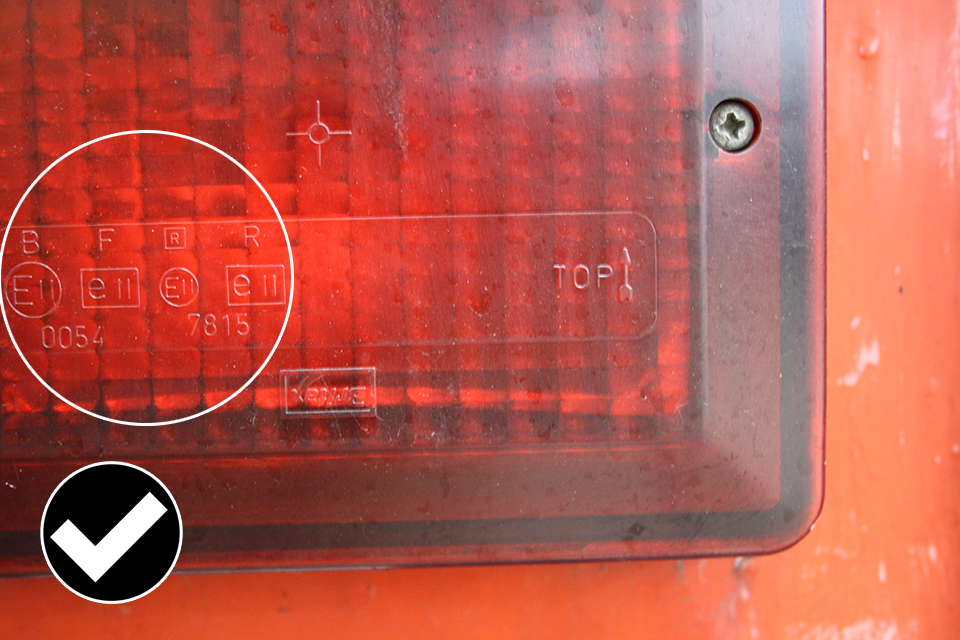
Allowed: an approved lamp that is marked with both “E” and “e”.
The image above shows an approved lamp that is marked with both “E” and “e”. The R signifies that it’s a rear position lamp.
In the IVA inspection manual each lamp section lists the relevant identity symbol.
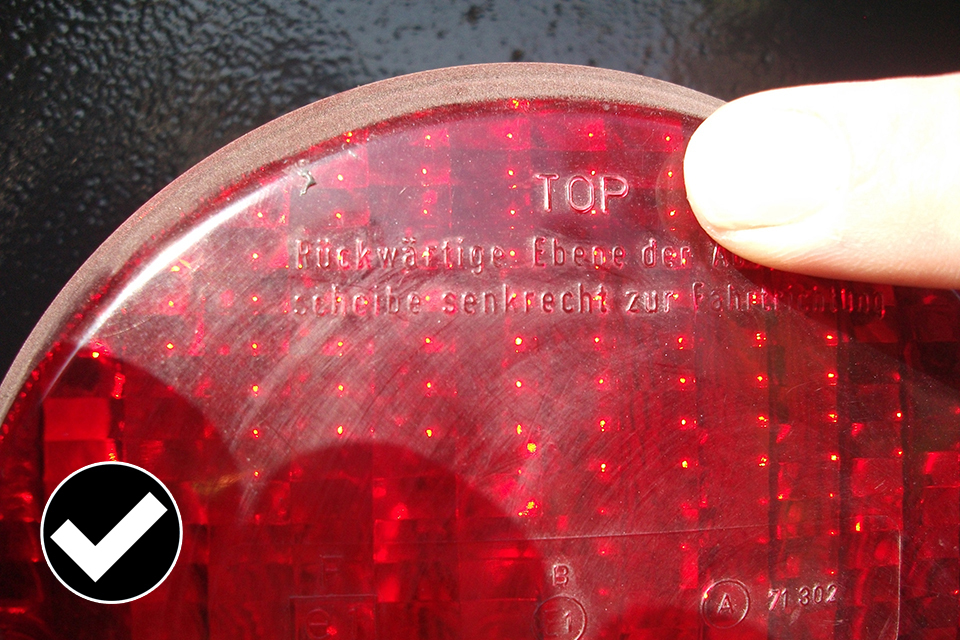
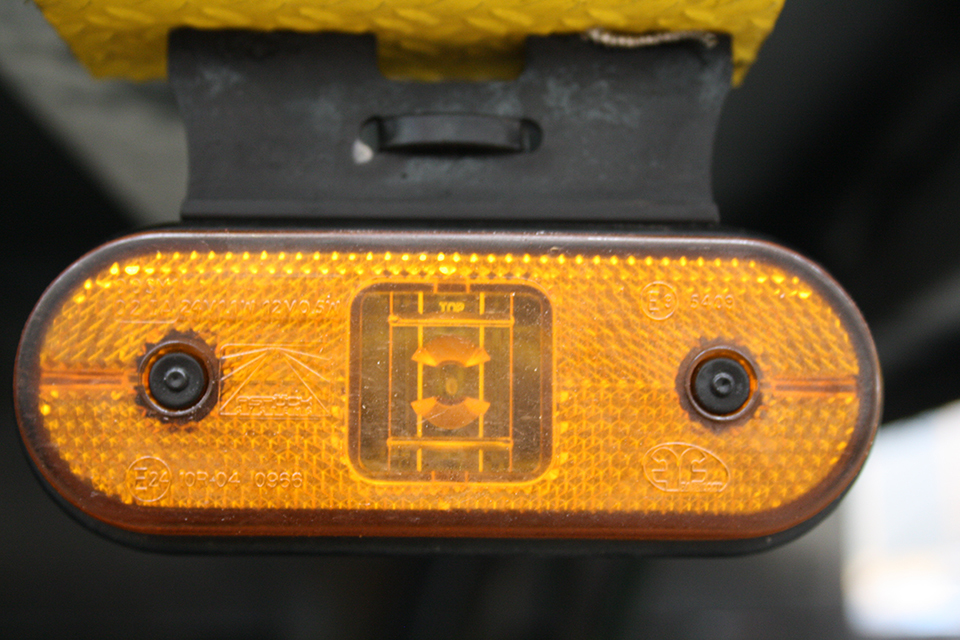
Allowed: a lamp which has been fitted in the correct orientation.
The above image shows a lamp which has been fitted in the correct orientation.

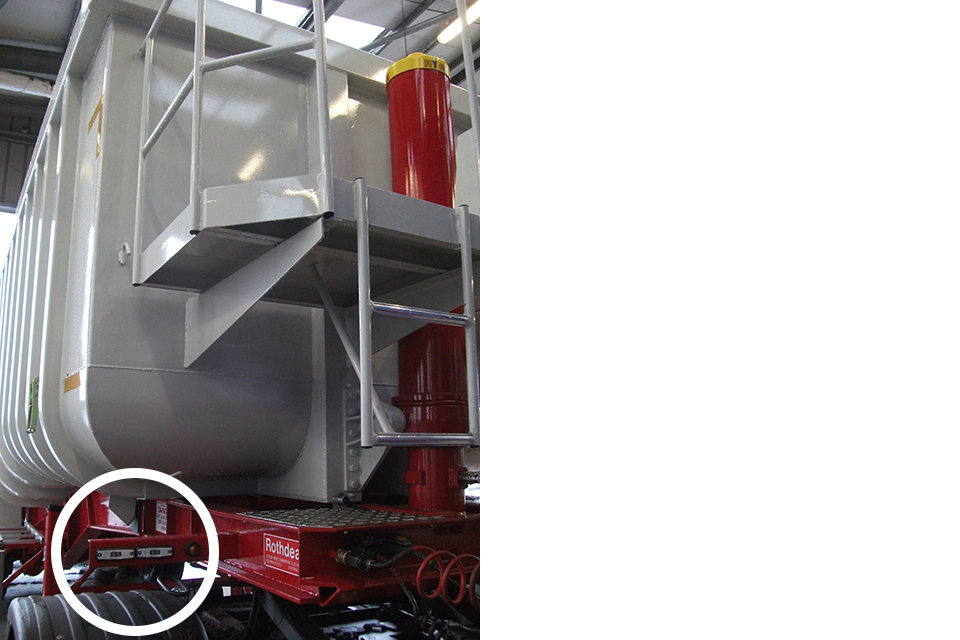
Angle of visibility are checked to make sure that they’re not obstructed.
Angle of visibility are checked to make sure that they’re not obstructed.
The angles of visibility are checked to make sure that they’re not obstructed.
As shown in the images above DVSA will use a gauge to check for any obstruction of the angles of visibility by:
- side guards
- doors
- access panels
- other obstructions
Lamp cluster that contains a reflector will need to be marked with either IA or IB.
A lamp cluster that contains a reflector will be marked, on the lamp or lens, with either:
- IA
- IB
9.2 What to check before Installation of lights is inspected
All lamps must be fitted the correct way up.
You’ll see that some lamps will have the word ‘TOP’ or an ‘arrow’ on the lamp to indicate the correct orientation.
Follow the figures and charts for each lighting section in the IVA inspection manual. They will give you the correct:
- number
- application
- colour
- position
- angle of visibility
- approval mark (if) required
You can check for obstructions to lamps and reflectors by movable components, lockers, tail lifts, etc and fixed items such as RUPD, side guards etc.
Lights may be partially obscured up to 50% in this way, but reflectors must be visible at all times.
Make sure a reflector is incorporated if you have fitted a lamp cluster from another vehicle – not all lamps contain one.
9.3 The standard Installation of lights must meet
See the sections, listed below, of the IVA inspection manual for the full inspection standard:
- section 20 installation of lights
- section 21 retro reflectors
- section 22 end-outline, position (side), stop, side marker and daytime running lamps
- section 23 direction indicators
- section 24 rear registration lamps
- section 25 headlamps
- section 26 front fog lamps
- sections 28 rear fog lamps
- sections 29 reversing lamps
10. Exterior projections of cabs
10.1 How exterior projections of cabs are inspected
DVSA will look for sharp edges that could cause injury to other road users.
DVSA will inspect the outside of the cab area for any hard parts contactable by the 100mm sphere between the floorline and two meters from the ground.
Anything that the sphere contacts will need radiusing to 2.5mm if it either:
- forms an external surface
- protrudes more than 5mm
Unmodified mass produced vehicles (cabs) shall be considered to meet the standards.
A projection is visible.
In the image above it shows that a projection is visible.
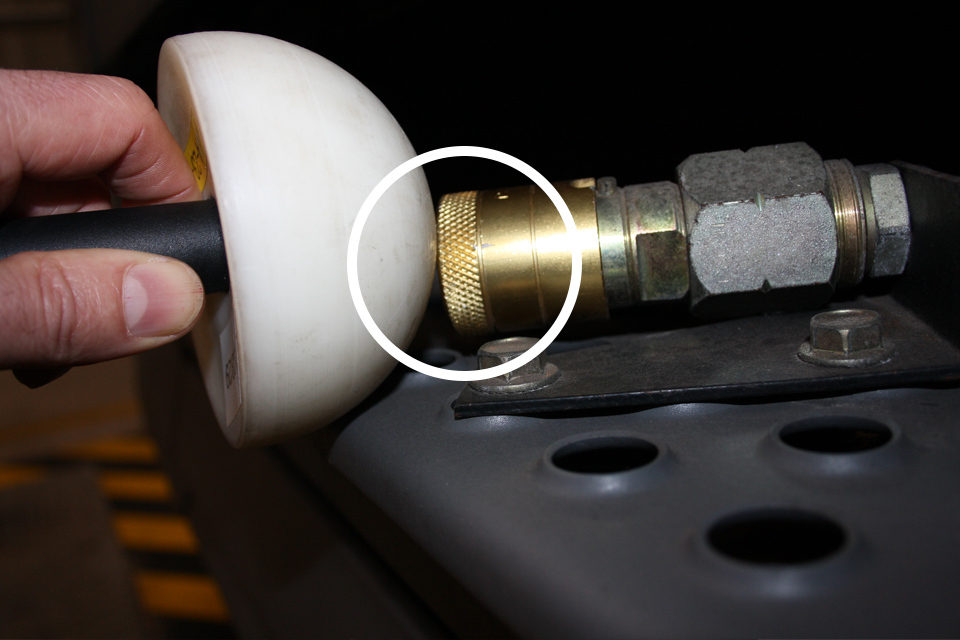
Projection contacted by the 100mm sphere.
In this image it shows that the projection is contacted by the 100mm sphere.

Measured with a radius gauge of 2.5 mm and it’s found not to comply.
In this image it shows that when measured with a radius gauge of 2.5 mm it’s found not to comply.
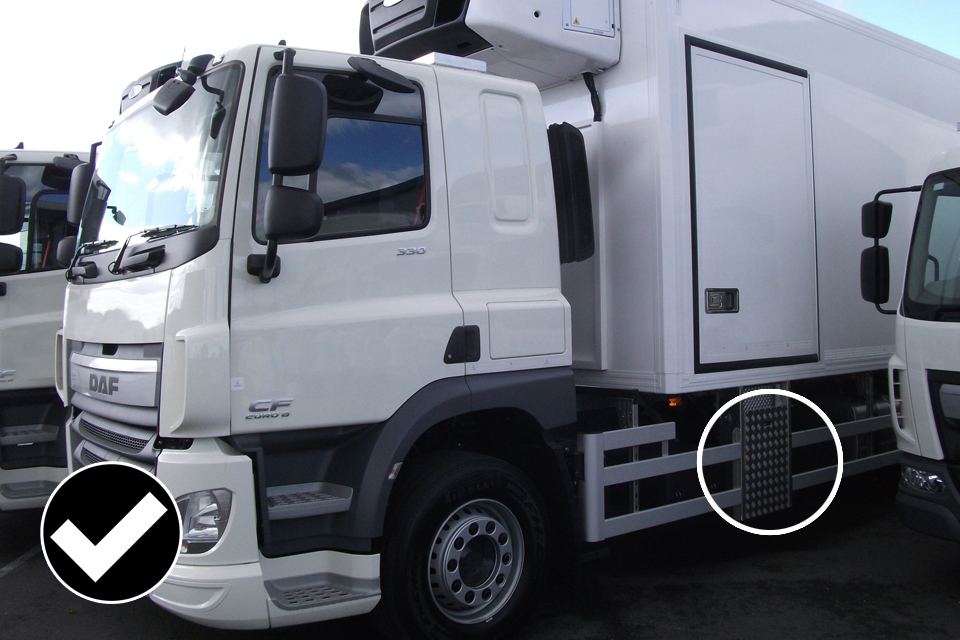
Front and side of the cab are inspected.
Front and side of the cab are inspected.
DVSA will inspect only the front and side of the cab area. DVSA won’t inspect:
- anything to the rear of the cab
- anything above two meters from the ground
10.2 What to check before exterior projections are inspected
DVSA uses a 100 mm sphere to assess the exterior. Anything that is contactable is checked with a radius gauge.
Any hard part that the sphere touches must be ‘radiused’ to at least 2.5 mm or any items that project:
- more than 5mm needs to ‘radiused’ to 2.5mm
- less than 5mm needs to be blunted
A sharp edge may cause a pedestrian an injury, whereas a ‘radiused’ or a blunt edge/corner may cause less of an injury.
Check the exterior of the vehicle by look and touch to see what you think may cause injury. This is what DVSA will look for.
Second stage builders building on a chassis cab with a Statement of Compliance that don’t add or alter the cab will retain stage 1 vehicle approval. Items that are added to the exterior of the cab must comply with the Required Standards.
10.3 The standard exterior projections must meet
See section 49 - exterior projections of the IVA inspection manual for the full inspection standard.