Hydraulic modelling: best practice (model approach)
Updated 8 May 2026
Applies to England

© Crown copyright 2026
This publication is licensed under the terms of the Open Government Licence v3.0 except where otherwise stated. To view this licence, visit nationalarchives.gov.uk/doc/open-government-licence/version/3 or write to the Information Policy Team, The National Archives, Kew, London TW9 4DU, or email: psi@nationalarchives.gov.uk.
Where we have identified any third party copyright information you will need to obtain permission from the copyright holders concerned.
This publication is available at https://www.gov.uk/government/publications/river-modelling-technical-standards-and-assessment/hydraulic-modelling-best-practice-model-approach
This document is part of the flood modelling standards for river systems. There are 4 more documents that cover this topic. Read all the documents to make sure you have the information you need to start your modelling project.
A hydraulic model is a collection of mathematical equations that give a simple representation of reality. They estimate:
- flow, water level and velocity in river channels
- pipe networks
- tidal systems
- open coast processes
- floodplains
After establishing suitable inflow boundary conditions, you need to apply them to hydraulic models. The hydraulic model represents pathways and receptors of a fluvial, tidal, open coast or pipe system.
This guide gives best practice approaches for aspects of hydraulic modelling that cannot be categorised as pathways or receptors. This document assumes some existing knowledge of hydrological and hydraulic modelling.
Find out when you may need to use modelling in flood risk assessments.
Think about your hydraulic model before you start
We recommend that you develop a conceptual model before you start a hydraulic modelling project. The document, ‘LIT11327: computational modelling to assess flood and coastal risk’ recommends representing the main flow routes and structures on a map.
This will help you understand areas of interest and points of flow interaction. It will also help you decide where to place model boundaries and get topographic survey specifications.
Think about how you apply hydrological estimates to the model. This is important as it will help inform model length.
The Fluvial Design Guide (FDG) (2009) encourages you not to carry out detailed analysis unnecessarily. You should challenge the level of detail and the validity of results throughout the modelling process, so you know when further analysis is needed.
Hydraulic models are normally only suitable for the purpose they were built. However, minor changes to the models may make them suitable for your project. It’s important to understand the goal of your modelling project, so you can identify the appropriate level of modelling detail. For example, you can carry out hydraulic analysis by applying basic theory. You do not need to use computer-based modelling software for a simple problem like culvert capacity calculations.
Complete a method statement
You should write a hydraulic modelling method statement before you start your modelling tasks.
Technical reviewers and project managers should approve the method statement before you commit to develop a model or collect topographic surveys.
When developing or reviewing the original conceptual model and method statement, you should consider proportionality. You should still reach and record an agreement on your proposed approach.
Your hydraulic modelling method statement should include:
- study objectives, discussion of project scale and outputs that are needed
- reviews of previous and ongoing projects and existing datasets
- discussion of potential assumptions and limitations
It should also include technical methodology, such as:
- a scheme for your model (schematisation)
- proposed topographic survey locations
- software, naming conventions and file management
- boundary conditions and flow application
- defining parameters (parametrisation)
- calibration and verification
- sensitivity testing
- design events - including climate change
- creating scenarios
You can change your proposed approaches during the project. You should not consider this a failure of the method statement, as a partially developed model can identify flood characteristics that were not evident before modelling. You should agree changes to the approved approaches with technical reviewers and project managers before you submit the model for final review.
You should develop your method statement with all stakeholders, including those with local catchment knowledge.
Types of hydraulic model
Spreadsheets can work for simple hydraulic problems, but usually you’ll need to use either a computational one dimensional (1D), two dimensional (2D) or linked 1D2D model.
Three dimensional (3D) models are available but are more suited to localised hydraulic problems. They are not normally used for flood mapping because they need a lot of detail which causes excessive simulation times.
The FDG explains that you’ll need to understand flow routes and the level of detail needed before you commit to a modelling dimension (1D, 2D, 3D or 1D2D).
1D models: what you need to know
A 1D model is constructed from cross-section profiles. Hydraulic calculations are made at each section, often called model nodes. You can use a 1D model for:
- river channels
- well defined valleys
- floodplains with storage areas
- open coast wave transformation
The advantages of a 1D model include:
- accurate flow and level calculations in channels or pipe networks where water flows in one direction
- representation of levels in storage areas
- a range of hydraulic structures options
- simulation of backwater effects and reverse flow
Limitations of a 1D model are, for example:
- spatial resolution is limited to user-defined locations, such as cross-sections, pipe nodes, interpolates, structures and reservoirs
- floodplain flow routes and storage areas must be determined in advance
- significant post-processing is needed to generate flood maps
To construct a 1D model, you’ll need as a minimum requirement, data on:
- boundary conditions
- a cross-sectional survey and pipe network
- hydraulic structure surveys
2D models: what you need to know
A 2D model solves equations across a 2D square grid or mesh for the whole modelled area, based on ground elevation models. 2D models are mainly used for:
- complex floodplains
- direct rainfall modelling
- open coast wave transformation
The advantages of a 2D model are that:
- it can represent large geographical areas - at fine resolution 2D models can represent large channels like estuaries
- the modeller does not need to pre-define the floodplain flow routes
- it can be linked to outflows from channels
- there is little post-processing needed to make a flood map
Limitations of a 2D model are that they have:
- longer run times and large output datasets
- less detailed representation of smaller hydraulic structures
To construct a 2D model, you’ll need data from:
- boundary conditions
- a digital terrain model (DTM)
- hydraulic roughness estimates
- receptors
1D2D models: what you need to know
1D2D models combine a 1D and a 2D model by using each dimension’s benefits. The 1D part of the model usually contains the channel, pipe network and structures, the 2D part represents the floodplains. 1D2D models are mainly used for:
- 1D representation of channel
- 2D representation of floodplains
There are advantages to using a 1D2D model. It can:
- combine the benefit of the 1D and 2D advantages
- prevent the modeller from having to pre-define floodplain flow routes
- give high resolution model outputs with limited post-processing
Limitations to a 1D2D model are that it has:
- more data requirements
- long run times if modelled at a fine scale
- instability over 1D2D boundaries - you need good modelling knowledge to overcome this
To construct a 1D2D model, you may need data from:
- boundary conditions
- a cross-sectional survey or pipe network
- hydraulic structure surveys
- DTMs
- hydraulic roughness estimates
- hydraulic structure parameters
- receptors
Steady and unsteady flow options
You can choose between steady and unsteady flow options for your model.
In steady state models, you would apply a single flow rate at each inflow boundary. Your calculations would be taken on this constant flow rate. These models do not represent volume and are not suitable in situations where you need to consider attenuation or storage.
Unsteady flows vary over time. Unsteady flows give a more complete picture of flood progression but relies on the accuracy of peak flows and hydrograph volume. In most flood mapping projects, you’ll need unsteady models to represent flood volumes. You should use unsteady flow models if volume or attenuation are significant.
Software: find the appropriate platform for your model
There are different software platforms you can use for your model. These software types are suitable for flood modelling in the UK, but they’re not all suitable for every project.
You must be able to demonstrate that the software you choose is suitable for the intended use. Benchmarking tests are available to show software suitability. These tests are presented in the Defra and Environment Agency (EA) 2004 and 2010 article. If the tests are done independently, the EA will need to review the results before you use the software for a project.
Many software platforms are updated regularly. These updates can bring more functionality but may not be readily available for you to use. You should discuss software choice and version early in the modelling process and include them in your method statements.
Many of these software types will be suitable to use, but you might prefer software:
- you are most familiar with
- you have easy access to
- that has existing model data
Model timesteps
A timestep is the time when a hydraulic model makes calculations during the simulation. Hydraulic models are computer representations of river systems. They simplify the system they represent in space and time. Models split the study area and run time into manageable portions. This is known as discretisation.
This section covers discretisation in time. Guidance on discretisation in space is available in representing river channels, floodplains and pipe networks.
Timesteps in explicit models
In an explicit solution, the model calculates results assuming the rate of change for a measure that remains constant over a timestep. For an explicit model, you would need to define the time step. This determines how often the rate of change varies in the simulation. It’s important to select a timestep small enough to produce a ‘courant number’ below 1. To produce the courant number you would:
- Divide the model timestep by the cross-section or grid spacing.
- Multiply the answer by the velocity.
If the courant number is more than one, the model timestep is either too large, or the cross-section spacing too small.
Timesteps in implicit models
In an implicit solution, the model calculates results at the current and previous timestep. You do not need the courant number to be below 1 for an implicit model as the defined timestep is less important. But a model with a large timestep may not be stable and could miss calculations at a critical time during the model simulation. You must consider appropriate values to provide accurate results and maintain manageable simulation times and mathematical stability. The timestep will also be dependent on the scale of the model under consideration. The TUFLOW manual states the:
- 2D timestep should be between a half and a fifth of the grid resolution
- 1D timestep should be divisible into the 2D timestep
For example, a 4-metre grid (2D) could use a 2 second timestep (1D). Follow software specific guidance where available.
Model parameters
All modelling software uses parameters with specific default values. If you do not use these defaults, you should justify your reasons in your modelling report.
The theta parameter is common across many modelling software packages. It decides the importance placed on results from the previous timestep in an implicit solution. A value of:
- 0.5 uses a 50:50 weighting that can maintain accuracy but may lead to instabilities
- 1.0 will likely be more stable but relies on results from only the current timestep and can be inaccurate
You should use sensitivity testing to make sure the software’s default is an appropriate assumption. HEC-RAS uses 1.0 as a default whereas Flood Modeller uses a value of 0.7. Model convergence tolerances can also affect accuracy and apparent stability.
Double precision
You should consider using double precision options. Double precision lets you increase the number of digits and bytes used to store numbers. For example, Flood Modeller stores numbers using 7 digits or 4 bytes. Using the double precision option increases this to 15 digits or 8 bytes.
If the model contains a lot of elevations, or has a water body with a large surface area, you can use more digits to record the integer-part of the number. This can lead to mass conservation issues or instabilities if simulated in single precision.
Double precision is often a suitable option for all models as it only has a small effect on run times. You should always use double precision if:
- the model is on high ground
- includes a large storage area
- you are modelling direct rainfall
- shallow floodplain depths are anticipated
Performance testing your hydraulic models
You should calibrate and verify hydrological and hydraulic models where possible. Full instructions are available in LIT11327: computational modelling to assess flood and coastal risk.
Calibrate the model
To calibrate the model, you’ll need a suitable flow gauge close to the upstream model extent to extract flows for the events in question.
For open coast and estuary modelling, use suitable tidal gauges, wave buoys, Cefas WaveNet or Wavewatch III for analysis.
For fluvial modelling, you should check if the current gauging station rating curve is relevant to past events when representing an historic event.
Where possible, there should be a flow or level gauge at the downstream extent to provide a suitable boundary condition. When there is not a gauge, you should place the boundary far enough away from the site of interest (read Modelling downstream boundaries.
You can use recorded rainfall to feed into direct rainfall models or estimate flows from ungauged lateral catchments (if no tributary gauge exists) using ReFH1/ReFH2 models. For open coast and estuaries, you can make checks against tide tables and the Coastal flood boundaries (CFB) dataset.
Take care when choosing calibration events. You need to consider data availability and the type and date of the event.
You should not calibrate to:
- a summer flood when local flood risk is mostly caused by winter storms
- an historic event that occurred before major catchment changes - for example, where there are new flood defences or a reservoir
You should only use an in-channel event and a larger flood to allow calibration of both in-channel and floodplain model elements. Set out your choice of events in your hydraulic modelling method statement.
Review your data before you start calibration. Calibrating to unreliable data can result in a poorly performing model, even if the outputs appear suitable.
Data used for calibration
To start calibration, you should have at least one of the following:
- Recorded water level or flow from gauging stations - often supplied with data quality flags that you should review. For example, the gauge may be influenced by downstream blockages or malfunctioning equipment.
- Wrack mark survey data - a record of the location and elevation of high flow events that deposited debris on the floodplain. You should check the data before you start as other elements can affect its reliability.
- Aerial photography showing the extent of major flood events. When using this information, you should consider its limitations. Aerial photography cannot capture peak extent. But if the photo is time stamped, you can check aerial photography against gauge time series.
- Recorded flood extents generated in Geographical Information System (GIS) software using wrack mark data, records of flooded properties and aerial photography.
- Anecdotal evidence from Risk Management Authorities (RMAs) and members of the public. This can provide valuable information about a flood event. Compare this information with other sources to check it’s reliable.
You should use at least 3 flood events during calibration where possible. You may need to use more depending on the project scope or data availability. Events do not need to have caused extensive flooding. It’s important to calibrate in-channel areas as well as floodplains. A well-calibrated model should match reliable recorded peak data (typically to within ±0.15 metres) and provide a good representation of hydrograph timing and shape.
For further advice on using different flood events read LIT11327: computational modelling to assess flood and coastal risk.
Before you start calibration, you should check if you need to make event specific changes. You may need to block structures, remove completed flood defence schemes or use historical topographic data. If you need to make changes to calibrate against historic flood events, you should use the present-day representation for your final design runs.
When your first simulation is complete, you can consider different approaches to improve the simulation’s performance. You could:
- assess performance beginning upstream and moving downstream - changes in the upper part of the model can influence the progression of the flood wave through the model
- check your application of inflows, especially for ungauged inflows and lateral catchments - incorrect application may only be clear after your first simulation
- check the inflows are appropriate - unrepresentative inflows may not be clear until after the first simulation
- check that any rules associated with moveable structures give a true representation of structure movements during the flood events
- vary model coefficients such as hydraulic roughness to improve the match to observed data- do not take them beyond typical ranges just to achieve a good match
- check flood extents and active flow paths in 2D models - if they are poorly represented you may need to collect more survey data of main floodplain features
You should complete graphical and tabular comparisons between model results and observed data. Then you’ll need to report on the coefficients you had to adjust to achieve the best performance.
You can find more guidance on calibration outputs in LIT18686: minimum technical requirements.
When completing calibration the Scottish Environment Protection Agency (SEPA) guidance (2016) advises that you:
- acknowledge the differences between the calibrated model and the recorded data in your technical report - models will never be a perfect fit to data
- should not force your model to fit the data by making unrealistic changes to parameter values or making changes at a spatial scale that the data does not support
- check for possible data errors - incorrect data could lead to an error in the model
- check for missing flood mechanisms - a fluvial model may not reproduce observed flood extents if surface water or groundwater contributed to recorded flooding (in this instance it’s inappropriate to adjust parameters of the fluvial only model to achieve a match)
- always use observed data for calibration runs - a comparison of a 0.5% annual exceedance probability (AEP) design event against an observed 0.5% AEP event is not calibration as the design event may differ from the observed
- adjust more than one parameter value to get an acceptable fit to the calibration data - several parameter combinations could give the same fit to the observed data
You should recalibrate if your modelling software has been updated since your initial calibration. Make any adjustments you need to make sure you have suitable results.
Verification
To verify your model, you’ll run another observed flood event through your calibrated model with no changes to the coefficients. This will check the suitability of your model across events.
Use a verification event from the same season as the calibration event to avoid the need to adjust roughness for changes to seasonal vegetation.
LIT11327: computational modelling to assess flood and coastal risk gives guidance on how you should verify your model against further events.
The verification event performing at the same level as the calibration events is a desirable outcome. You do not need to re-calibrate if there are differences in performance but you should investigate the likely causes.
Validate: what to do when you cannot calibrate a model
When there is not enough data for calibration, you can check model performance with validation. When validating a model, you should use all the reliable data you can to check the model results.
For example, you could use a water level gauge on a study reach with no flow data. You can use the water level gauge to calculate median annual flood levels and check them against modelled 50% AEP events.
You should always do a sensibility check on anecdotal evidence. This evidence often reflects small, regular floods rather than extreme floods.
Anecdotal data collected during past flood events may result in changes being made to models. It’s often the case that early model versions show flooding of properties at low magnitude events that is not supported by local data. While adjusting parameters to prevent this does not constitute calibration, these changes can help better reflect reality.
The validation process can give valuable insight into model performance when you cannot complete full calibration. It’s often the only option to sense check results.
Sensitivity testing
Sensitivity tests are simulations that assess the uncertainty of model components, like flow, hydraulic roughness and downstream boundary conditions.
There is uncertainty with all flood risk modelling. This uncertainty can come from different factors, including:
- hydrology - catchment characteristics and changes over time, measurement errors at gauging sites, type or length of data available, non-stationarity
- topography - topographic survey and DTM resolution and accuracy
- model parameters - modelling coefficients and hydraulic roughness estimates
- methodology - choice of appropriate model, experience of modeller, downstream boundary assumptions, degree of calibration or verification
You should complete a sensitivity analysis on the model parameters and coefficients that are the most uncertain.
Testing usually sees a 20% change adjustment to inflows, hydraulic roughness, downstream boundary, structural and spill coefficients. When adjusting downstream boundaries, do not just adjust gradients associated with normal depth by 20%. You should extract a modelled rating at the boundary and use an adjusted version to test the effect of the uncertainty. You should document your changes in your hydraulic model report.
If testing highlights sensitivity to particular uncertainty, you may need to collect more data, such as installing a flow gauging station.
You could complete further tests on initial conditions, grid resolution and model simulation parameters.
You should use the results from sensitivity runs to:
- establish change in peak water levels and flows
- establish any change in flood extents
- note any increased model instability
- identify if the flood mechanism is changed
- identify areas where changes are predicted and confirm if these align with the main sites of interest
- establish if any of the findings will affect project conclusions
Referring more generally to flood risk management (rather than specifically hydraulic modelling), the latest EA guidance (2017) on accounting for residual uncertainty suggests the following stages to assess uncertainty.
Stage 1
Identify all primary sources of uncertainty and their components. An example for a fluvial model would see water levels as the primary source of uncertainty, with flow, hydraulic roughness and downstream boundary conditions (plus others) as components of this uncertainty.
Stage 2
You should account for uncertainty, for example, SC120014: accounting for residual uncertainty: an update to the fluvial freeboard guide describes how designers increased the size of a flood storage area to account for the inflow hydrology having underestimated storm duration.
Stage 3
Estimate the size of the residual uncertainty. Depending on the available information and project scale, this can be based on expert judgement or a more detailed analysis, as outlined in SC120014.
SC120014 also describes ‘global sensitivity analysis’ that examines the sensitivity of an output to uncertainty of input variables. This can give insights into which inputs are most important and where to target efforts to address residual uncertainty. This process is commonly adopted in hydraulic modelling projects.
Stage 4
Determine the appropriate response that may include:
- carrying out further analysis to reduce uncertainty
- accept the uncertainty and acting to reduce its impact
- accepting the uncertainty, but choosing not to act to reduce its impact
Mathematical stability: what you need to know
Hydraulic models can show mathematical instability where significant oscillations or mass balance errors (the artificial gain or loss of water) occur.
Your model could be instable because:
- it’s poorly constructed
- there’s limited data available
- of inappropriate model resolution and timestep
- the system you are modelling is complex
A stable model does not show instability. You can make a model stable if you can discount instability as it occurs at a location or time beyond the focus of the project.
You should try to reduce model instability where you can, but this should be proportionate to considering other uncertainties.
The FDG suggests that to reduce the risk of instability, you should follow these steps to build your model:
- Input channel sections for the 1D main channel, including weir units to represent any significant drops in bed level - you might need interpolated units and you should apply the desired hydraulic roughness values and panel or bank markers at this stage.
- Add hydrology (a bank-full level event) - you might need to include a constant minimum flow before the arrival of the flood peak to allow the simulations to progress. These low flows, or dummy flows, should be low enough to not affect results associated with the flood wave.
- Gradually input 1D structures into the main channel.
- Gradually add out-of-bank flow areas (1D2D), along with any floodplain structures, and test for larger flow events.
- Add appropriate rules to any gates, pumps, orifices and other structures
Your approach to addressing instability will vary depending on model type, model software and local characteristics. You could:
- apply dummy flows
- add interpolated cross-sections or pipe nodes
- reduce the timestep
- increase the number of iterations available to the model
- add a localised area of increased 2D roughness, known as a ‘stability patch’ - they should not exceed a Manning’s n value of 1
- reposition of 1D2D boundary lines to improve the location of the 1D2D transition - it’s helpful to avoid very narrow 2D flow paths near to 1D2D boundaries
Some stability fixes will result in a less realistic representation of the area of interest. You should consider if the benefit of removing instability exceeds costs of losing local detail. You need to record all the fixes in the project report.
You should regularly run the model with both low and high magnitude events. The high flows you use during development should be the maximum flow the model needs to accommodate. This allows you to address instabilities during the build process. The application of high flows will only be possible once floodplains are added in point 4.
Stability reporting is different for each model software platform. You need to be familiar with the measures of your chosen software. All models can produce flow and level times series and you can often see instability in these plots. As a minimum, you should check the graphs and report your findings because an unrealistic spike in peak water levels can affect flood mapping outputs.
Other indicators of instability include:
- periods of non-convergence recorded when results between timesteps change beyond default tolerances - default tolerances vary between model software and you should not increase them as it can mask instability
- error and warning messages, such as negative depth warnings produced by ESTRY and TUFLOW
- erratic velocity vectors for 2D models
- mass balance errors that indicate water volume in the model is being artificially increased or decreased
Model outputs: what to include
You should run models for all events and scenarios that are requested within your project scope. The outputs you need to provide with your model will be different depending on the project.
For EA projects, you’ll often need to include:
- defended scenario
- undefended scenario - you should use this as you baseline if no defences are present
- climate change simulations
- structural blockage
- siltation or sediment removal scenarios
- breach analysis
- what-if scenarios
Examples of what-if scenarios could include:
- the altered operation of a moveable structure
- construction of a new flood defence
- inclusion of natural flood management (NFM) measures in the catchment
Your scenarios may form the basis of a more in-depth options appraisal project. For NFM, your scenarios may need some more background analysis to determine the impacts on modelled flows.
Hydraulic models can produce a large range of outputs, although many are not generated as default models. Check project needs before you carry out final model simulations. This is particularly important for models where runs can take multiple days to complete.
Project reporting
Project reporting is an essential part of hydraulic modelling projects. A comprehensive report can:
- engage project stakeholders
- support the model review process
- justify decisions made during the modelling process
Reporting requirements for EA projects are set out in the LIT18686: minimum technical requirement for modelling (MTRM). As a minimum, you should include a:
- modelling method statement
- model user report
- deliverables inventory
- model log and versioning
- model passport or summary report
Model passport or summary reporting is often not completed before hydraulic model technical approval is given. This should not result in the model being considered unsuitable for further use but may prompt a request for more information.
Your summary report should include details of your hydrological analysis even though this is not mentioned in the MTRM.
Your model reporting may be different if it’s for a flood risk assessment for a planning application. You still need to justify any decisions you make about new modelling or model updates. Your model findings should also be reported clearly.
Provide a model user report
A model user report (MUR) is a technical document that should accompany all hydraulic models.
The MUR provides reviewers and end users with the information needed to understand your model. It also allows them to adopt and utilise the outputs of your model. You can add an MUR as an appendix to your summary report. It should include the following sections as a minimum:
- brief summary of the agreed method statement and model purpose
- data review and data sources, including discussion of any assumptions needed to compensate for missing data
- software versions
- an overview of model build including a model schematic, discussion of hydraulic roughness (including photographs) and representation of any defence networks or use of non-standard elements
- a decision log in an appendix
- discussion of hydraulic structures (including photographs of non-standard structures) with more information if you’re using non-standard modelling techniques
- details of model proving (calibration, verification, validation and sensitivity analysis) and model performance
- changes to model default parameters
- comment on model stability and measure taken to improve stability
- justification of any remaining errors and warning messages produced
- record of model runs
The MTRM also suggests that conclusions and recommendations should be included in your MUR. However, you may not be able to provide any conclusions or recommendations until you have completed your modelling and post-processing of flood extents are approved. It may be more appropriate to cover these in the model passport or summary report only. This will also prevent unnecessary repetition in your report.
Specify your model’s project deliverables
You should specify your model’s deliverables in the project scope at the beginning of your project. You can find a list of minimum modelling project outputs in the Represent buildings and infrastructure (receptor) part of this guidance.
Most EA projects now use building information modelling (BIM) as a standard. You should include a master document index (MDI) as part of your report. Your MDI should outline deliverables in your model.
You should review the scope of your project (and MDI if you have included one) once the project is completed. This will allow you to check that all deliverables are provided.
Development log and version control
You should include a model development log as part of your hydraulic model.
You may want to include a record of superseded development versions if you have used a number of iterations. This shows that you have tried to address stability problems.
In some cases, confirmation of the correct model version should be sufficient if it’s accompanied by logical version control. Your model versioning should allow a user who is familiar with the relevant modelling software to establish the final model version. It will also help them work out any associated scenarios without the need to examine your report in detail.
Model passport or summary report
A model passport acts as a summary project report. You should include:
- an overview of modelling and hydrological methodologies including software
- what data you used
- model extent and inflows
- model scenarios
- model proving
- receptors at risk
- assumptions, limitations and recommendations
- hydrology and hydraulics method statement, FEH calculation record and MUR as appendices, if appropriate
Modelling to support flood risk assessments for planning applications
All planning applications in England must be accompanied by a site-specific flood risk assessment (FRA).
If your application needs a more detailed FRA to help the local planning authority make a decision, you may need to carry out more hydraulic modelling.
Find out more about using modelling for flood risk assessments to support a planning application.
Build in quality assurance (QA)
Errors in your data, hydrological analysis or model schematisation can have a major effect on your study’s results. If you fail to identify errors, there is the possibility that investment decisions could be made based on incorrect results. For example, errors could:
- permit development in areas at flood risk
- lead to a failure to represent a development’s impact on downstream flows
- see flood defences built at the wrong level
Quality control and assurance should be built into all stages of your modelling project. This will help to identify any errors during your project. Errors identified after a project is finished are significantly more costly and time consuming to address.
Modelling organisations and end users should carry out QA procedures.
Model review process
SEPA (2016) includes a suggested timeline for the model review process. This activity closely follows the EA process.
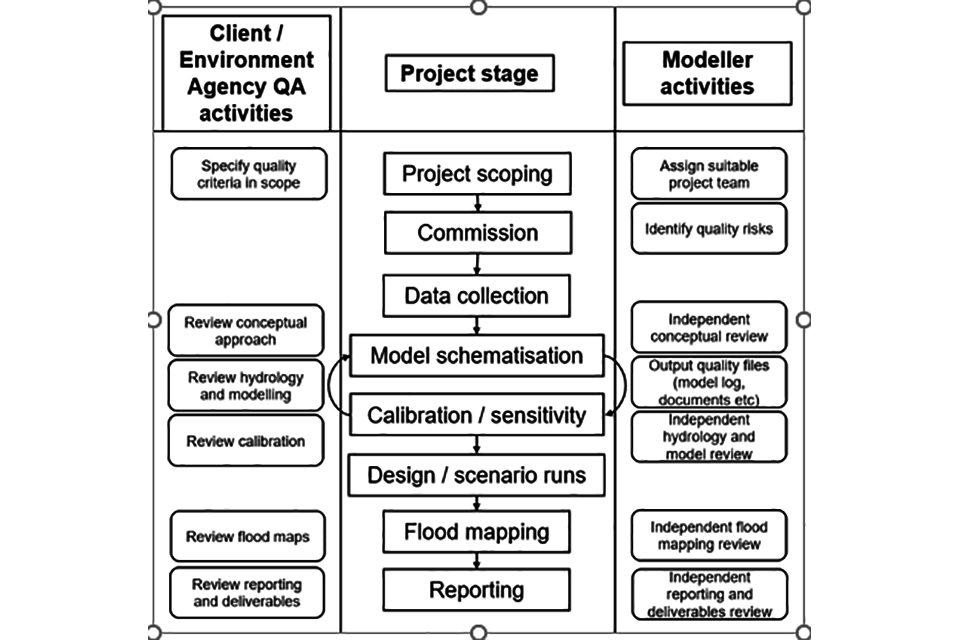
The figure shows the suggested timeline for the model review process.
Request referenced documents
To get a copy of a document referenced in this guidance or a copy of the full PDF version of this guidance and the Microsoft Excel-based Fluvial Model Assessment Tool, email enquiries@environment-agency.gov.uk.
You should quote the reference number of the document you need, for example, LIT11327.