How to load adjustments
Published 5 August 2025

© Crown copyright 2025
This publication is licensed under the terms of the Open Government Licence v3.0 except where otherwise stated. To view this licence, visit nationalarchives.gov.uk/doc/open-government-licence/version/3 or write to the Information Policy Team, The National Archives, Kew, London TW9 4DU, or email: psi@nationalarchives.gov.uk.
Where we have identified any third party copyright information you will need to obtain permission from the copyright holders concerned.
This publication is available at https://www.gov.uk/government/publications/oscar-guidance-for-budgeting-plans-and-outturn/how-to-load-adjustments
1. Overview
This guidance covers how to load the following adjustments within the data input book.
1.1 Disaggregation adjustments (to allocate data loaded centrally by GEP, or received via MOGs or BCTs):
- Budget Measure Disaggregation
- Reserve Claim Disaggregation
- Spending Review Settlement Disaggregation
- Budget Exchange Disaggregation
- BCT Disaggregation
- MOG Disaggregation (Budget Neutral)
1.2 Other adjustments loaded by departments for approval by spending teams
- Final Outturn
- Budget Regime Change
- Discount Rate Change
- Internal Departmental Change (Budget Neutral)
- Annually Managed Expenditure
- Non-Budget
- General Provisions
- Capital Provisions
- Capitalised Provisions
There is separate guidance which covers loading donating BCT and MOG adjustments, and Vote on Account adjustments.
For more information about the adjustment types please see the ‘How OSCAR works’ page, or for more information on what codes to use, visit the plans or outturn recording guidance pages all available on the homepage.
For any issues logging onto OSCAR, please visit the OSCAR Users & User Authorisers page on OneFinance or contact oscar.support@keysource.co.uk
2. Accessing the Budgeting homepage on OSCAR
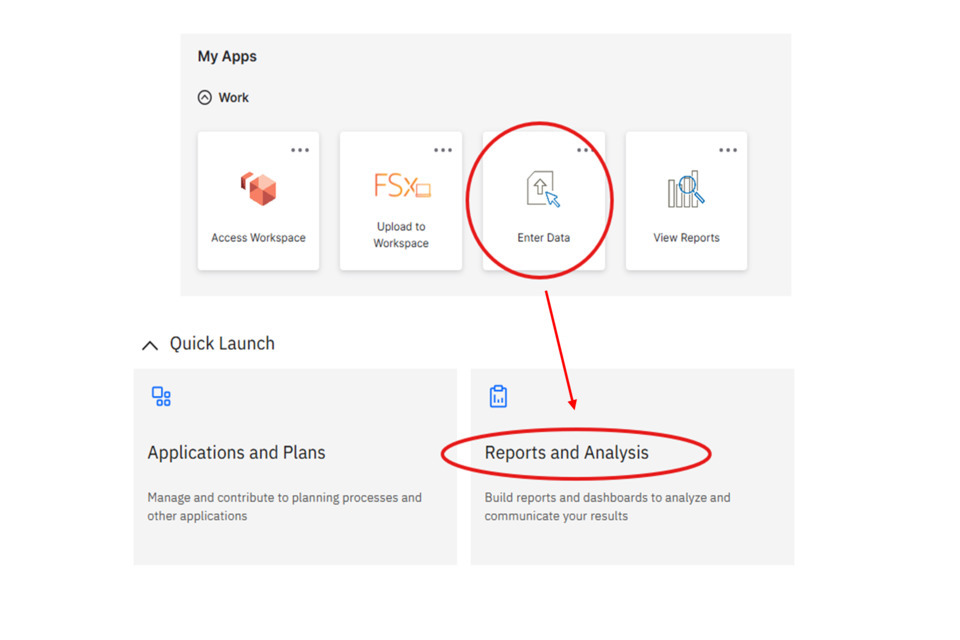
1) Once logged onto OSCAR, click ‘Enter Data’, followed by ‘Reports and Analysis’:
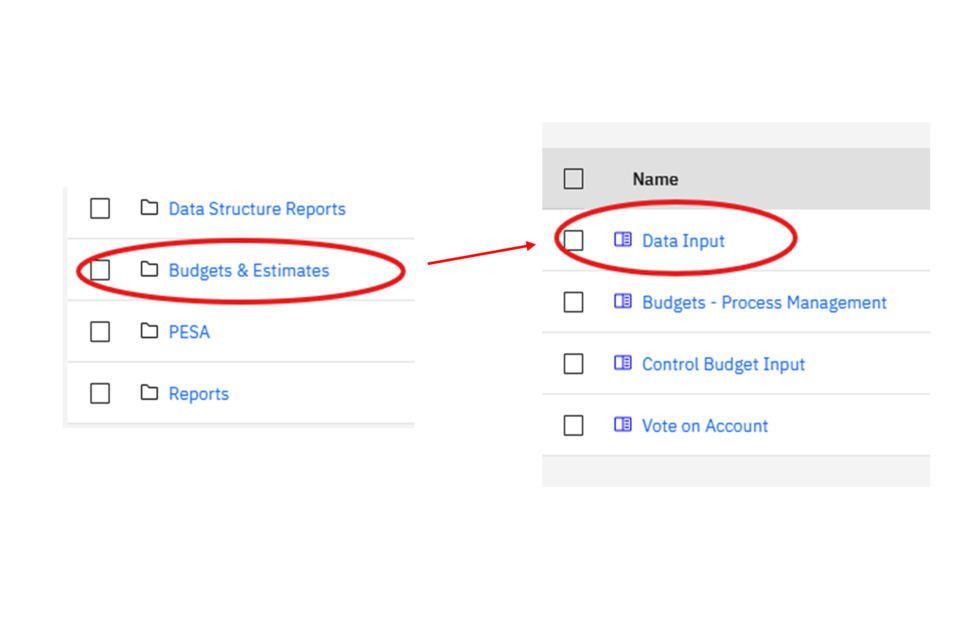
2) Click ‘Budgets & Estimates’, followed by ‘Data Input’:
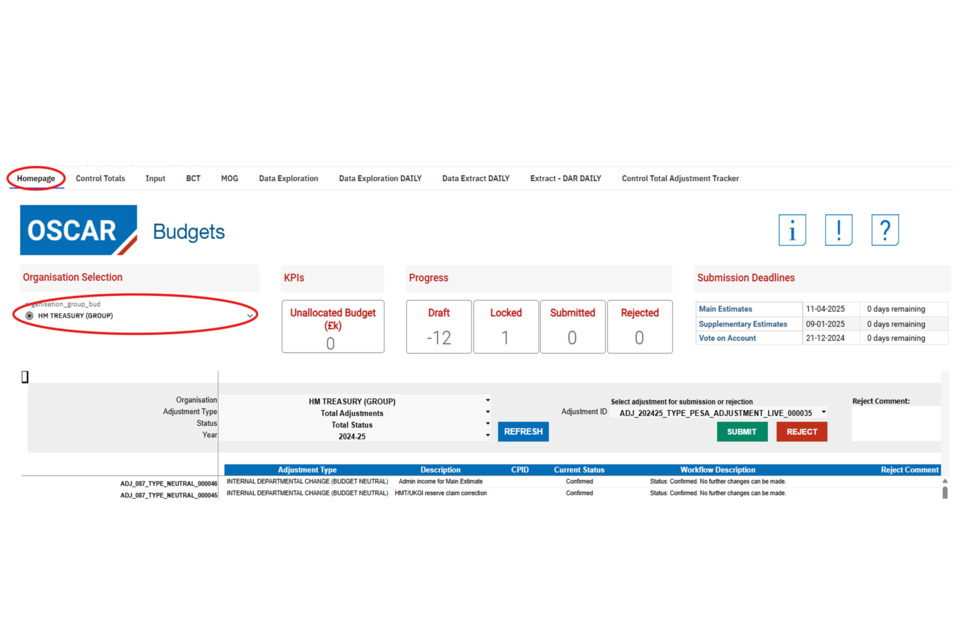
3) This will take you to the budgeting Homepage tab. Your department should be automatically selected in the ‘Organisation Selection’ dropdown. In this example, HM Treasury is selected as the department. If you have access to multiple departments, you can click the dropdown to make the correct selection:
3. Creating adjustments and adjustment types
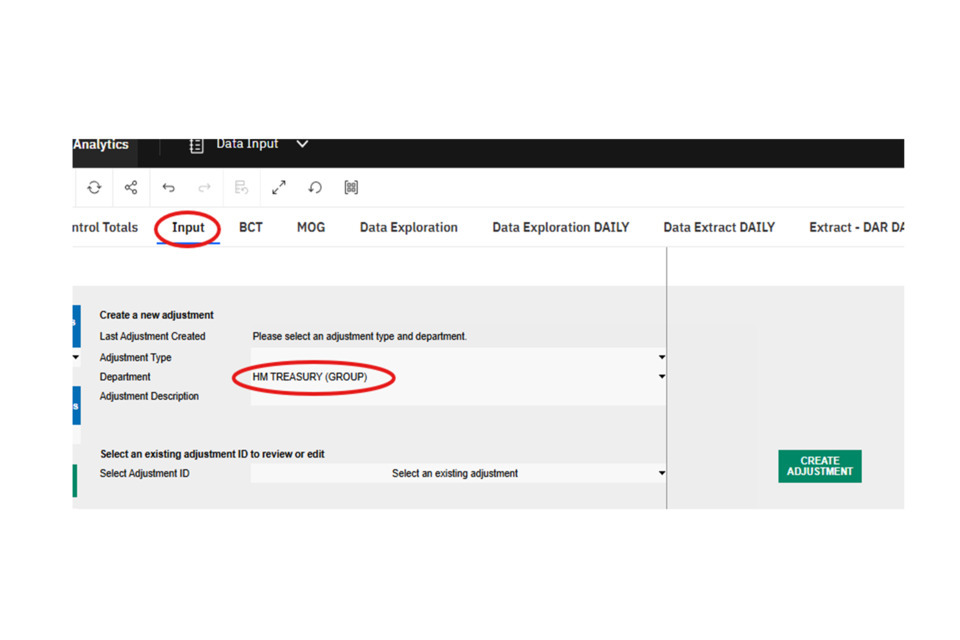
4) Navigate to the ‘Input’ tab. Here, the department group selected on the home page should also be listed in the organisation dropdown:
5) If you click in the adjustment type dropdown, there are several options to choose from:
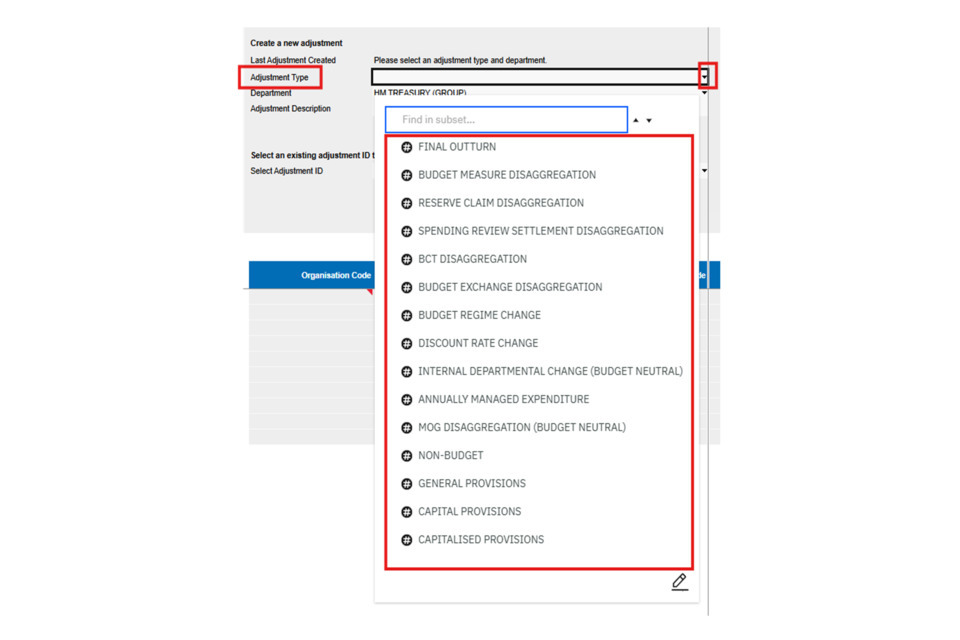
You can review a brief summary of what each adjustment type is for at the top of this page.
Disaggregation adjustment types, and internal departmental change (budget neutral) adjustments do not require spending team approval. These will become confirmed as the step after locking. All other adjustments can only be submitted by department users. It is then for spending teams to confirm or reject the adjustments.
For disaggregation adjustments, they need to match the amount for that specific upload type. For example, if 100,000 RDEL was loaded as a budget measure, and 50,000 RDEL was confirmed as a BCT, users would need to load one Budget Measure disaggregation type for the 100,000, and another separate BCT disaggregation adjustment for the 50,000. If a user tried to disaggregate the entire 150,000 as a Budget Measure disaggregation, or another different disaggregation type, validation errors would prevent the adjustment from being loaded. More information about disaggregation adjustment types is available here
4. Creating adjustments
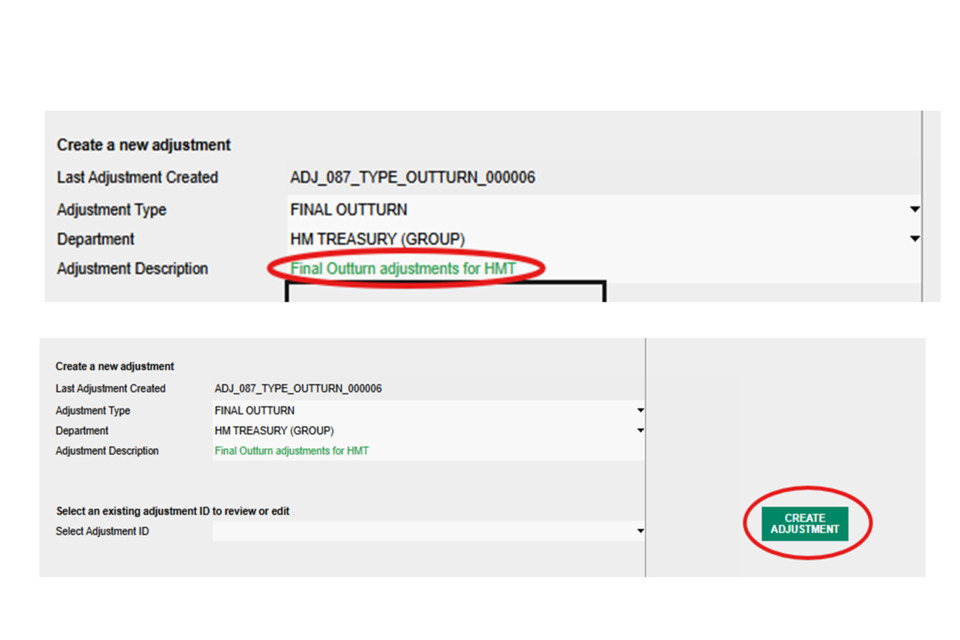
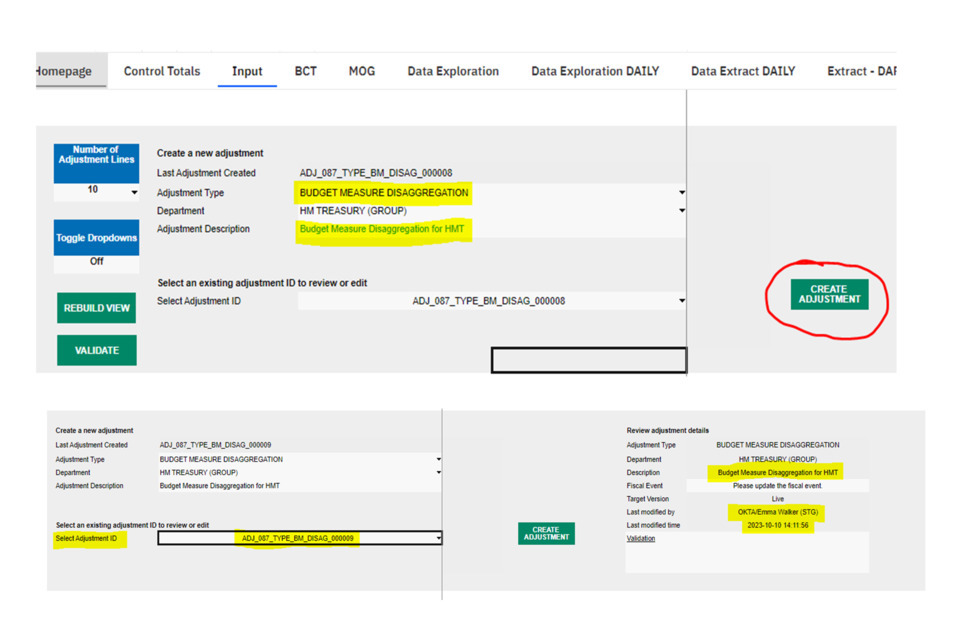
6) Click on the ‘Adjustment Type’ dropdown and select the adjustment type required:
Note: this may result in any previously submitted or adjustments for that type and for the selected organisation populating the view below.
7) Create an ‘Adjustment Description’ by entering text into the box as shown in the picture below (here we have given a title of ‘Final Outturn adjustments for HMT’). Then click ‘Create Adjustment’:
Note: once the adjustment description has been created it won’t be able to be edited.
8) The following message will appear. Click ‘Continue’.
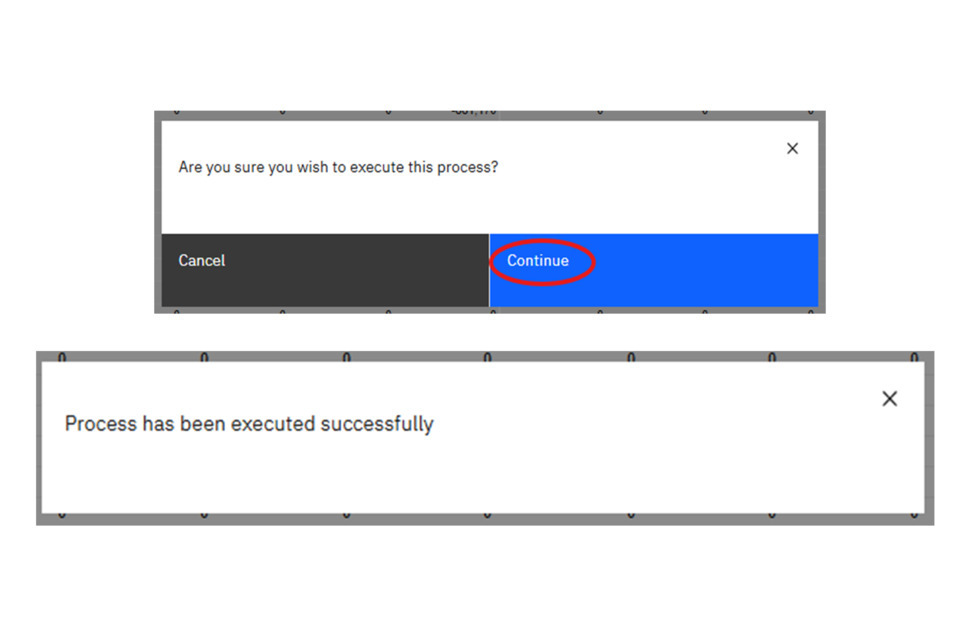
The adjustment may take a few moments to load. It should result in the creation of a new adjustment and the following pop-up message if successful (as shown above).
9) The newly created adjustment should now be automatically selected in the ‘Select Adjustment ID’ dropdown:

To check it is the right adjustment ID, you can view the details of the adjustment in the top centre of the middle page. This includes information such as the user who created the adjustment, the time and date it was creation, and the adjustment description (given in step 7 of the guidance).
10) If the adjustment selected does not appear to be the one you have just created, you can click in the ‘Select Adjustment ID’ box to see if it is appearing at the top of the adjustment list:
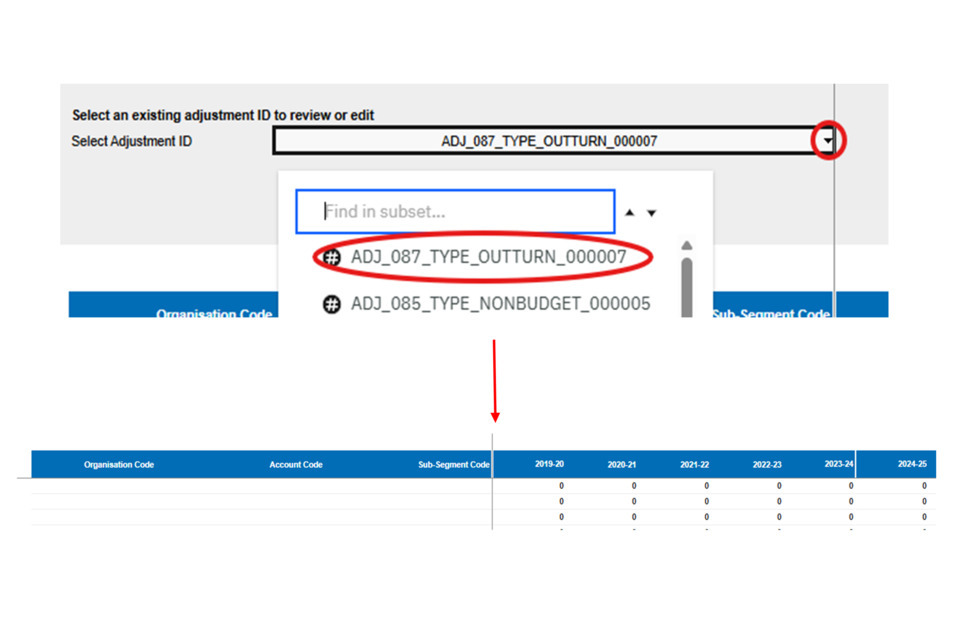
Note: you can also view previously loaded adjustments by clicking in the list and selecting the Adjustment ID you wish to view.
You should now be able to enter data into the data input grid as shown above. The five available outturn years in live, that are available to adjust, will be the years in the first five columns from the left. The next five years will be the plans years available to adjust on system.
Note: You will not be able to adjust any plans years using the final outturn adjustment type.
5. Data Entry
11) If copying and pasting data into OSCAR, it is recommended to turn off the ‘Toggle Dropdowns’ option to the left of the screen. This will remove the functionality to click a dropdown and see the available codes as you type them into OSCAR.

You can do this by clicking the dropdown and pressing the ‘Off’ option, followed by clicking ‘Rebuild View’ (as shown above).
You should now find that the dropdown functionality in the boxes has been removed. This helps to stop data from being missed in copying and pasting, where sometimes it opens the dropdown boxes and removes entries.
12) The automatic selection of adjustments row is 10. If you require more than 10 rows of data for your adjustments, you can select more rows by clicking on the ‘Number of Adjustment Lines’ dropdown in the top left corner. You can select up to 2,000 rows:
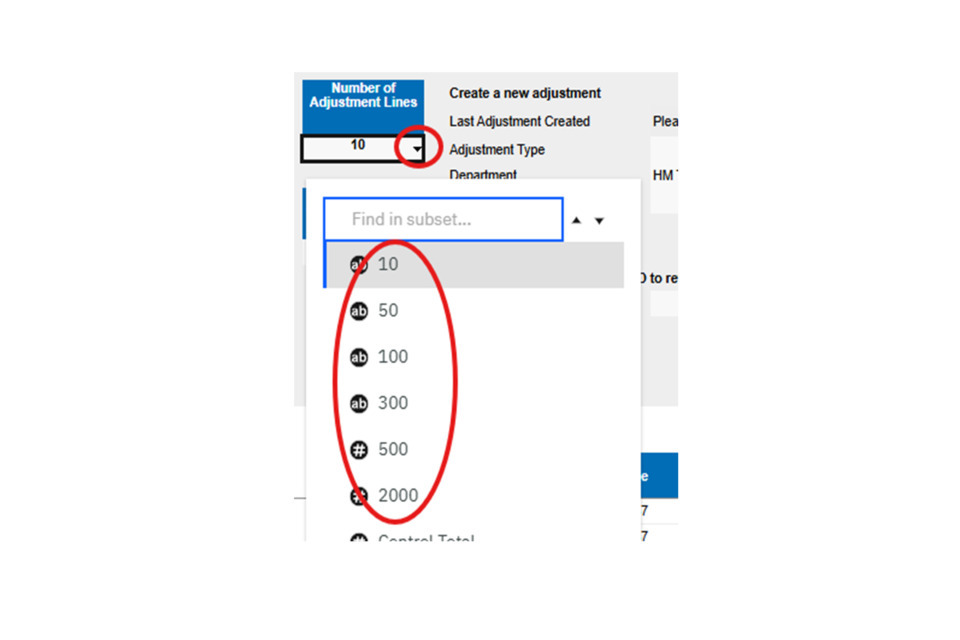
This should update automatically, but if it doesn’t click the ‘Rebuild View’ button as shown in the step above.
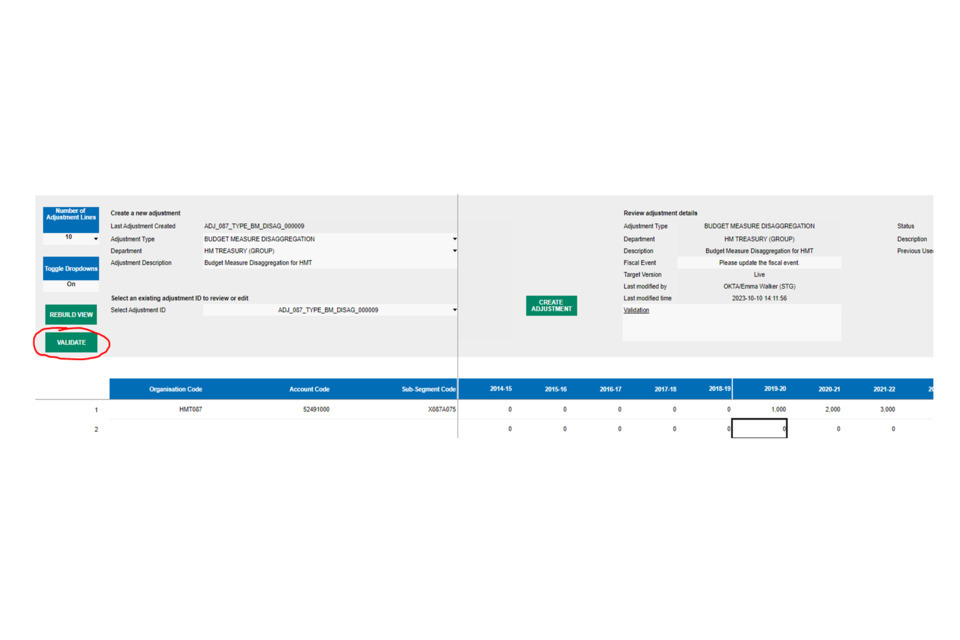
13) If copying and pasting data, or entering data by typing, the values will first appear as green on system. Click the ‘validate’ button to run a validation check, where the values will then turn black:

If there are no validation errors, no messages will appear. Once validated, users can also view the associated organisation, account and sub-segment names for the codes you have entered by scrolling to the right of the screen.
6. Common validation errors
If there are validation errors, there would be an error message in the Validation box at the top of the screen, or for the individual row where the validation issue is occurring.
-
A common validation for disaggregation adjustments is the use of the wrong adjustment type. E.g. using a budget measure disaggregation adjustment for data that was loaded as a reserve claim. In this case you would receive a validation error message (as shown below in the first screenshot), highlighting that it doesn’t match the control totals that are unallocated. Even if the total is correct, it won’t validate if loaded against the wrong adjustment type.
-
A common validation error for outturn adjustments is the use of ‘Plans’ account codes, which cannot be used for outturn years. Changing the codes to outturn account codes (or codes that can be used for both outturn and plans) should resolve the issue.
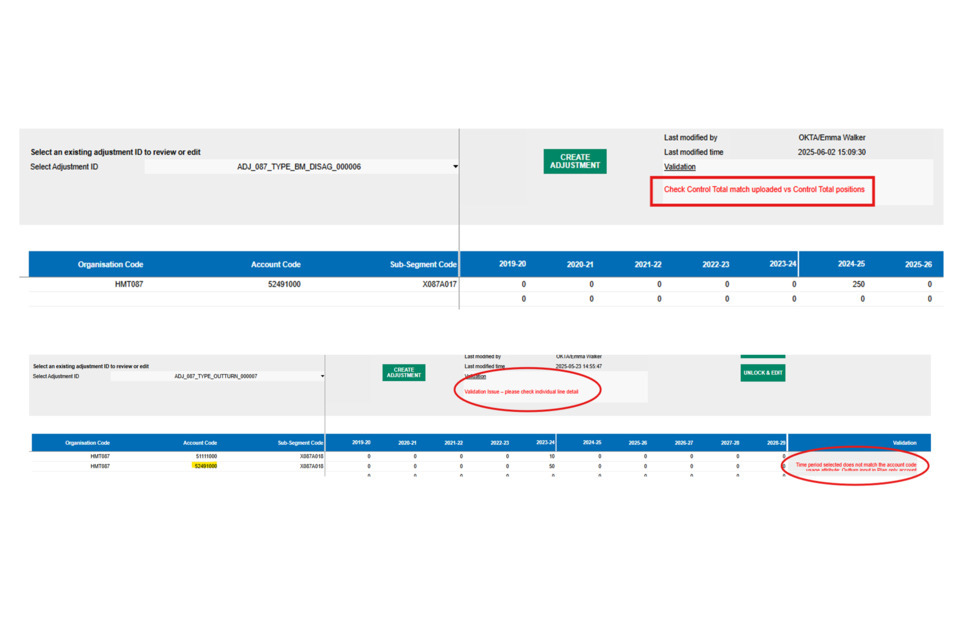
An example of these validation errors are shown in the image above.
- A common disaggregation validation error can also be that the amount doesn’t match the control totals loaded. For example, some data might have fallen into different economic ringfences, or just have differences to the overall total of the adjustment loaded. One way to check the overall total in the adjustment loaded is to follow the ‘Checking control totals within an adjustment’ section to check the adjustment contents. Additional information about how disaggregation works is available in the guidance below.
7. Checking control totals within an adjustment
14) Once all validation checks have passed, users can check the overall impact on the control totals by selecting the ‘Control Total’ option in the Number of Adjustment Lines dropdown:
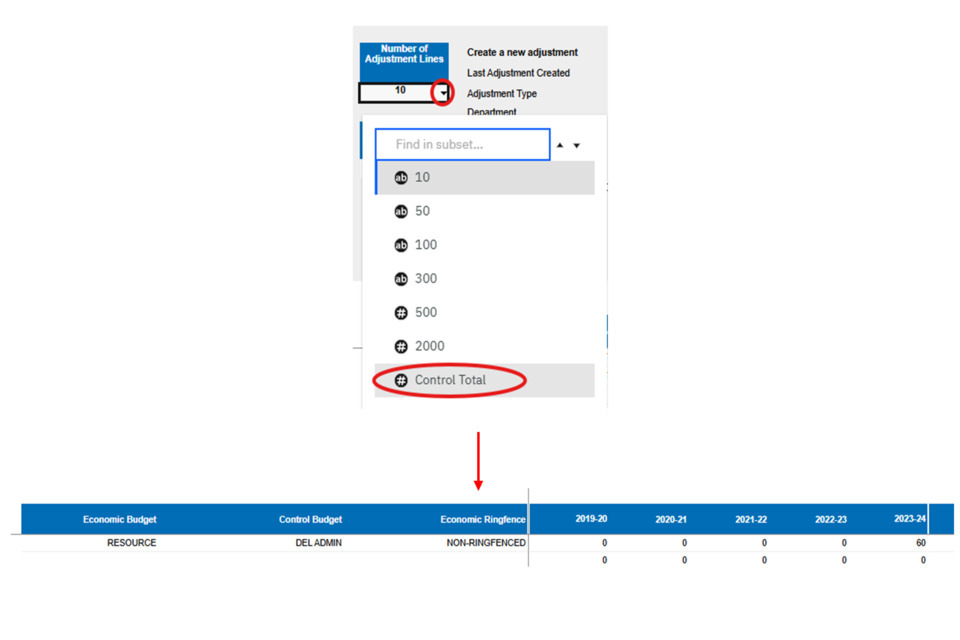
For example, the adjustments will summarise to give you the overall total of the adjustment rows loaded against the economic budget type (Resource/Capital), control budget type (DEL Admin, DEL Prog, Dept AME) and the economic ringfences.
You can switch the view back to the individual organisation/account/sub-segment codes by selecting a row number on the same dropdown as shown above.
To view how the adjustments in locked/submitted adjustments will impact your already confirmed outturn totals, follow the guidance here.
8. Disaggregation adjustments
When control totals for Budget Measure, Spending Review Settlements, Reserve Claims, Budget Exchanges are loaded to OSCAR, they need to be disaggregated using the associated disaggregation type as shown in the guidance above. The same also applies to MOG and BCT adjustments that are confirmed by receiving departments. More information on MOGs and BCTs is available below
The main difference with disaggregation adjustments is that they must meet the following conditions:
- Disaggregation adjustments must match the amount that has been confirmed against that adjustment type
- All years that contain unallocated data for that adjustment type must be disaggregated within the same adjustment
If, for example, two Budget Measure adjustments were loaded on separate dates, the amounts for both adjustments would have to be disaggregated within the same Budget Measure disaggregation adjustment. The idea is that OSCAR requires users to disaggregate everything that is unallocated on system in one go, so that nothing is left as unallocated. Departments users can move data using Budget Neutral changes at any point after disaggregation.
More guidance is available on the How to analyse budgeting data and download reports page which explains how to find out the unallocated amounts for each adjustment type.
8.1 Example for disaggregation
This focusses on Budget Measure disaggregation types, but the same process applies to all disaggregation types on OSCAR.
Follow the guidance from the Accessing the Budgeting homepage on OSCAR above to navigate to the budgeting Homepage.
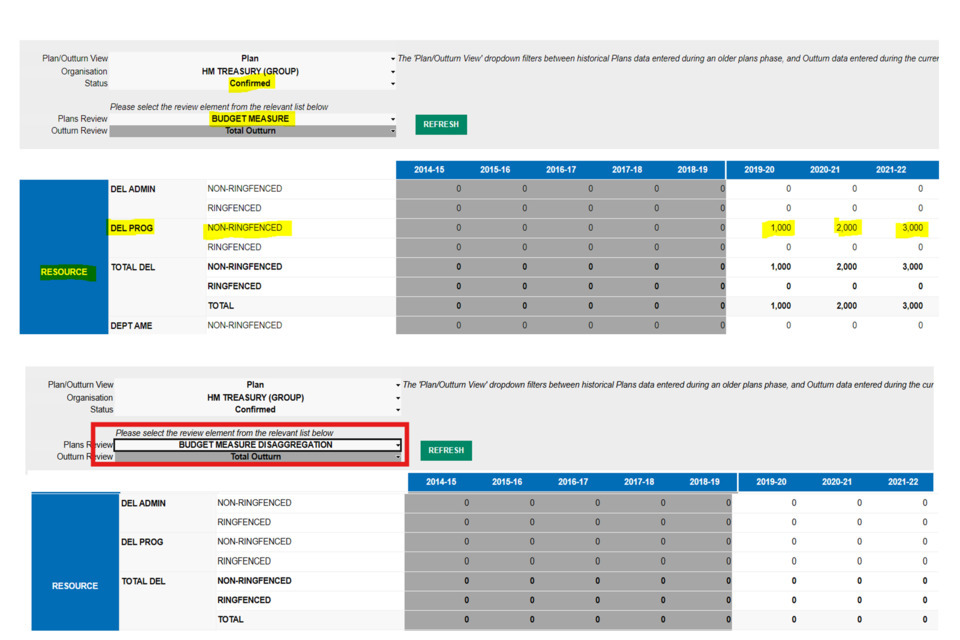
Navigate to the ‘Control Totals’ tab. On the options listed select the following from the dropdowns:
- Status = confirmed
- Plans review = Unallocated > Control Totals > Budget Measure
By selecting this view, this will show those adjustments that are unallocated, confirmed, Budget Measure adjustments.
Spending Review Settlement, Reserve Claim and Budget Exchange can also be selected here, depending on what adjustment type you are looking to disaggregate.
Data will stay in this position even after it has been disaggregated. To figure out what needs to be disaggregated, you can select the option for Unallocated > Disaggregated > Budget Measure and compare the two totals (as shown above). The difference will be those amounts to be disaggregated.
Disaggregation adjustments for Spending Review Settlement, Reserve Claim and Budget Exchange can also be selected here, depending on what adjustment type you are looking to disaggregate.
In the above example, nothing has been disaggregated for the Budget Measure adjustment type previously. This means that all data within the ‘Control Totals’ dropdown needs to be disaggregated.
If data did appear under the disaggregated dropdown, that means that data has previously been loaded and disaggregated as a Budget Measure. To find out what is remaining to be disaggregated, take the totals from the ‘Control Total’ dropdown (top screenshot) from the Disaggregated dropdown (bottom screenshot).
For example:
This is the total amount that has been loaded to OSCAR as a Budget Measure adjustment type. This can include older, already disaggregated Budget Measures:
Table 1: Unallocated > Control Totals > Budget Measure
| Budget | 2025-26 | 2026-27 | 2027-28 |
|---|---|---|---|
| RDEL Admin (Non-Ringfenced) | 150 | 150 | 150 |
| RDEL Prog (Non-Ringfenced) | 250 | 100 | 0 |
| Total RDEL | 400 | 250 | 150 |
This is the amount that has already been disaggregated for budget measures on system:
Table 2: Unallocated > Disaggregated > Budget Measure Disaggregation
| Budget | 2025-26 | 2026-27 | 2027-28 |
|---|---|---|---|
| RDEL Admin (Non-Ringfenced) | 100 | 100 | 0 |
| RDEL Prog (Non-Ringfenced) | 150 | 100 | 0 |
| Total RDEL | 250 | 200 | 0 |
To find out what is left to be disaggregated for Budget Measures, take the figures from Table 1, and subtract those from Table 2:
Table 3: Totals to disaggregate for Budget Measure adjustments
| Budget | 2025-26 | 2026-27 | 2027-28 |
|---|---|---|---|
| RDEL Admin (Non-Ringfenced) | 50 | 50 | 150 |
| RDEL Prog (Non-Ringfenced) | 100 | 0 | 0 |
| Total RDEL | 150 | 50 | 150 |
The totals above are those that need to be disaggregated for budget measure adjustments. Please note: If there are unallocated amounts for other adjustment types (e.g. MOGs, BCTs, Budget Exchanges, Spending Review Settlements, and Reserve Claims), these have to be disaggregated separately. Follow the same process as above but with the relevant adjustment type.
Once finding the exact figures for disaggregation, navigate to the ‘Data Input’ tab. Select ‘Budget Measure Disaggregation’ under the adjustment type dropdown. Make sure the right department is selected, and add a description in the ‘Adjustment Description box’. Then click ‘Create adjustment’.
When the adjustment is created, OSCAR should automatically select it. Users can check this by making sure the details to the right-hand side of the page align to what has just been created (e.g. checking the date and time, or the description). This is shown above.
Next, enter the organisation, account and subsegment codes on the left, and the data to disaggregate against each one. Note that the total of each row of adjustments should match the overall total for the unallocated Budget Measure amounts:
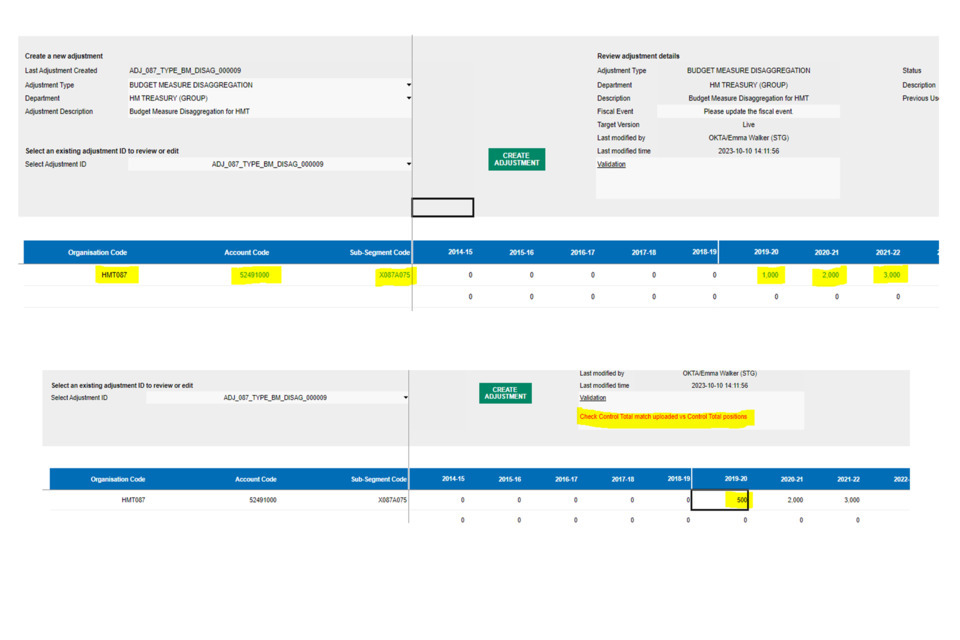
If users try to disaggregate a different amount, an error message will appear. For example, if changing the amount in 2019-20 to ‘500’ instead of ‘1,000’, this results in the above message.
Once content with the adjustments, click ‘Validate’. If the totals align to the unallocated data amounts, this should present no error messages:
9. Locking adjustments
15) Once content with the adjustment, click the ‘Lock & Report’ button to the right of the screen:
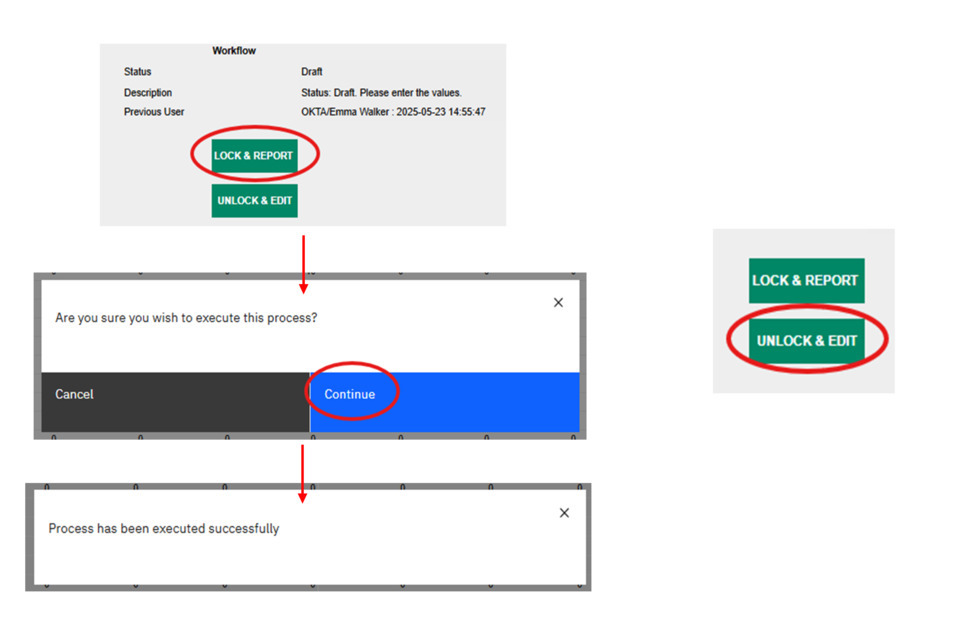
A pop-up message will appear (as shown above). Click ‘Continue’. The adjustment may take a few moments to lock. It should result in the adjustment locking and another following pop-up message if successful.
16) At this stage you cannot edit the adjustment whilst it is locked. However, you can easily make changes by clicking the ‘Unlock & Edit’ button (the button above ‘Lock & Report’). It will move the adjustment back to draft status, where departments can make changes and lock it again (as shown in the last step). Department users can do this repeatedly as there is no limit on the amount of times an adjustment can be unlocked.
10. Submitting adjustments
17) Once ready to submit/confirm the adjustment, navigate to the Homepage tab. Users should find the most recently created adjustment for the selected department at the top of the list (in ‘Locked’ status):
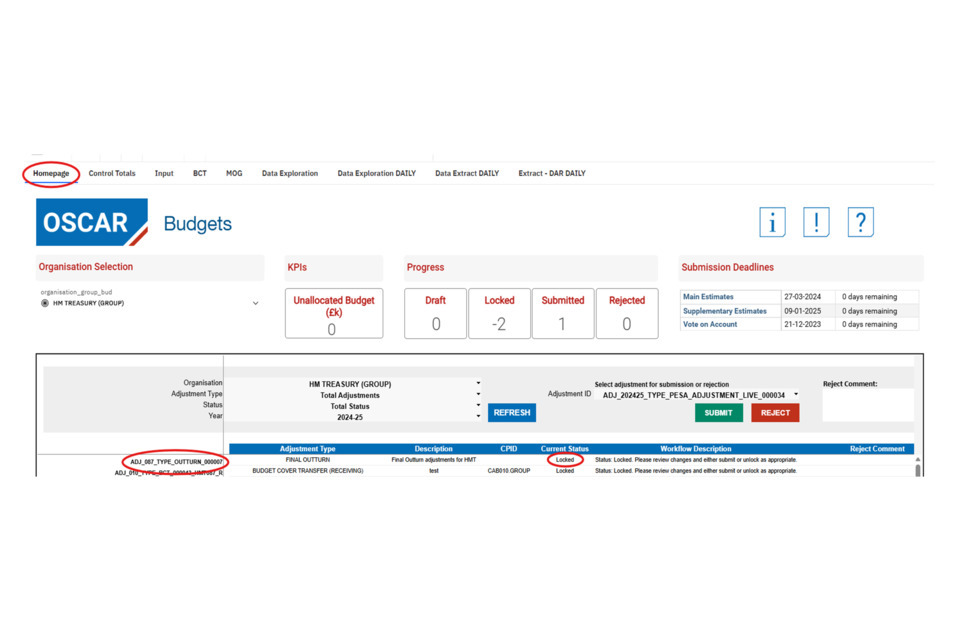
The adjustment can also be identified using the Adjustment ID and the description.
18) To submit the adjustment, double click the adjustment ID on the left to copy it. Next, paste the Adjustment ID into the ‘Adjustment ID’ box:
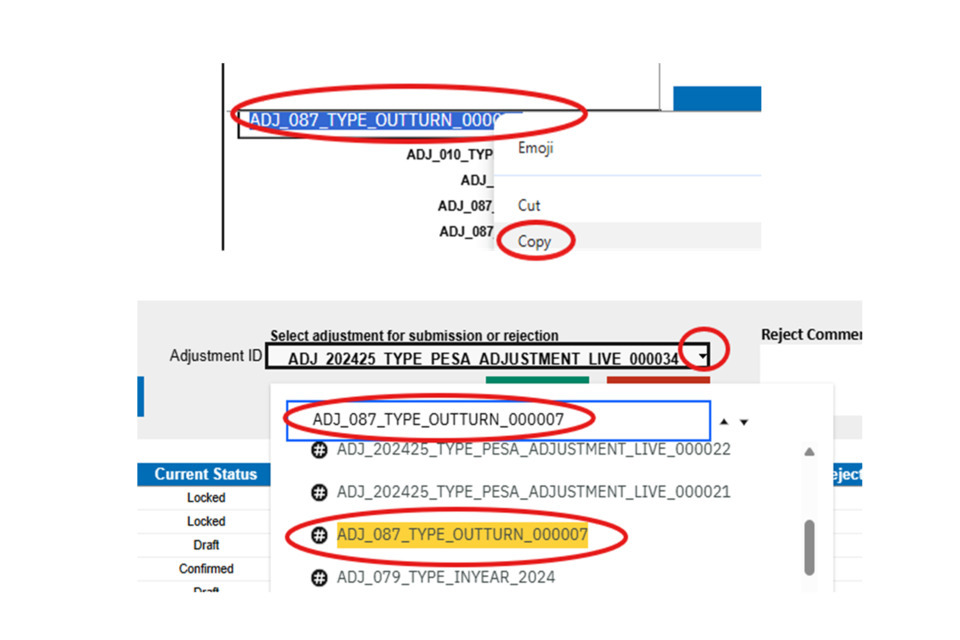
This should return the adjustment highlighted in yellow in the list of adjustments. Users can either click the highlighted yellow adjustment, or press enter to select the Adjustment ID in the box. Click ‘Submit’:
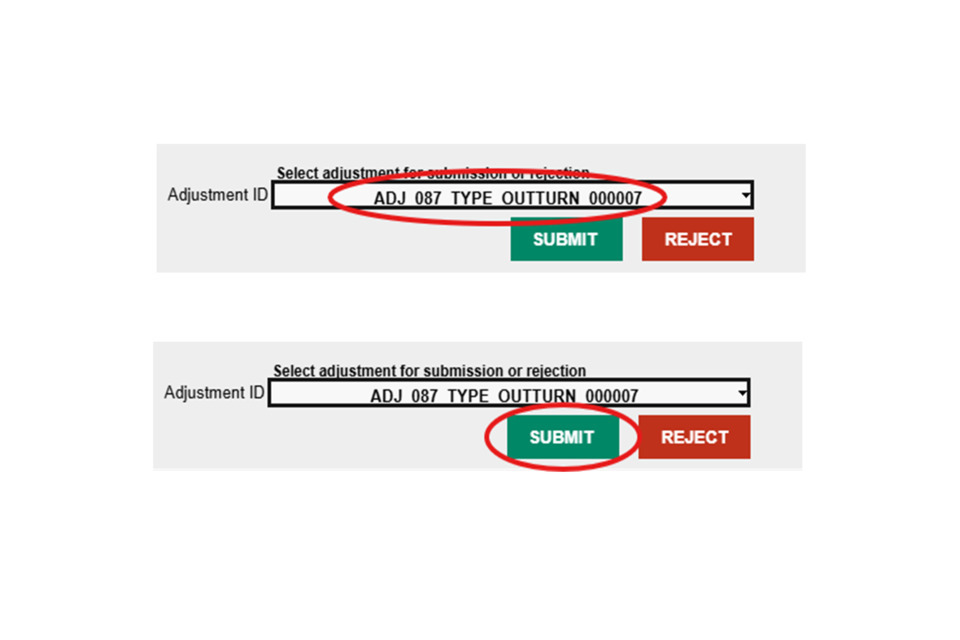
This will return the following pop up box. Press ‘Continue’:
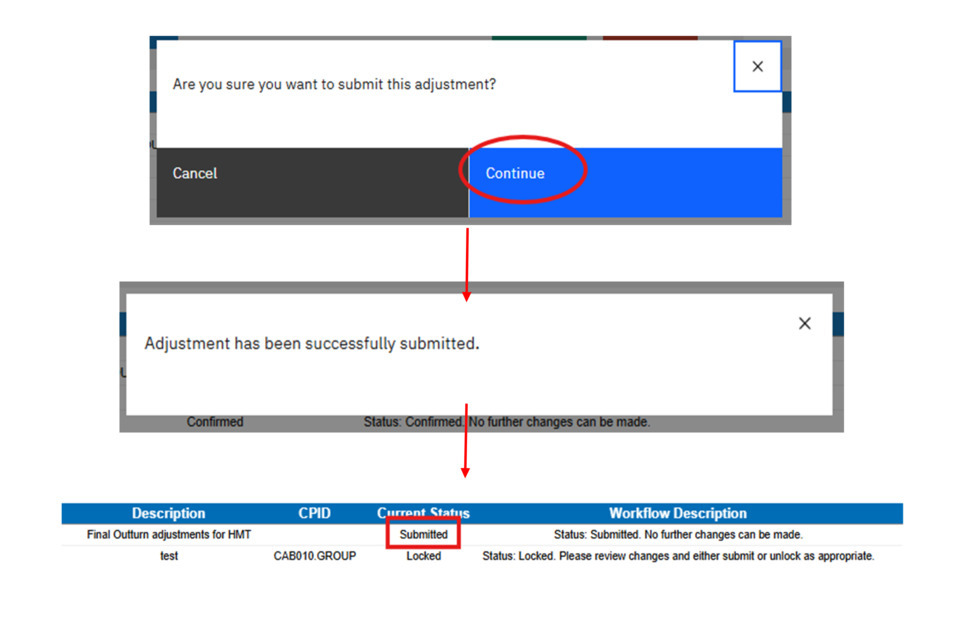
The adjustment may take a few moments to submit. It should result in the adjustment submitting and the above pop-up message if successful. Users should be able to see this updated in the ‘Status’ column on the homepage.
11. Rejected and confirmed adjustments
Adjustments requiring spending team approval can either be approved and confirmed on OSCAR, or rejected.
19) If an adjustment is rejected, users should receive an email notification. Users will also be able to see that the status has been updated to ‘Rejected’, and Spending Teams may have written a comment in the box to the right of the screen.
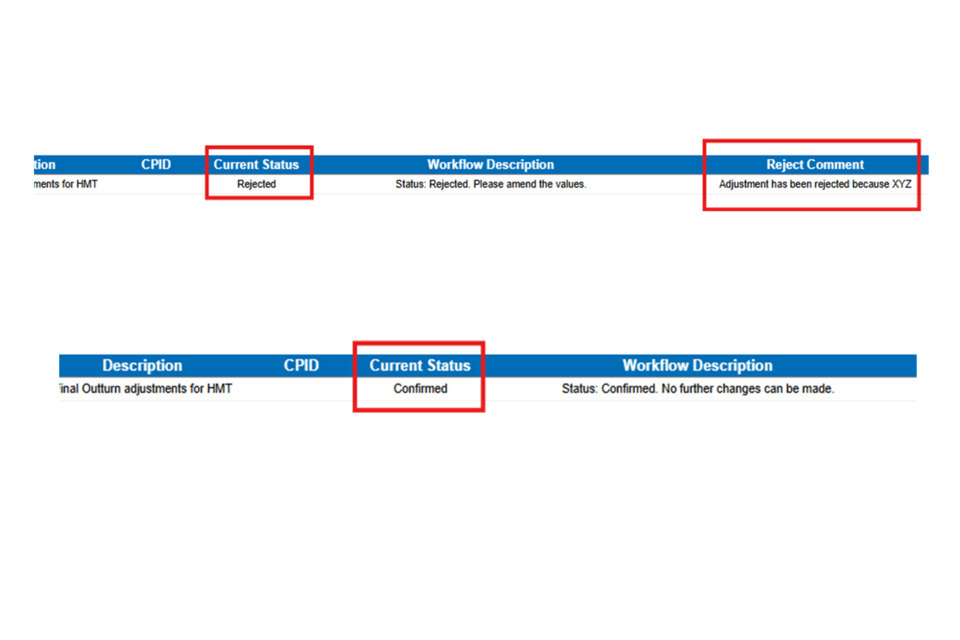
When an adjustment has been rejected, it can be edited (if required), and the locked/submitted again as normal. This process can happen repeatedly, until the adjustment becomes confirmed.
20) When the spending team approves an adjustment, it will become confirmed.
At this point users can no longer edit the adjustment, but users can load a new outturn adjustment to make any further corrections or additions.
12. Loading BCT and MOG adjustments
To donate a BCT or a MOG adjustment (i.e. send or move budget to another department), first follow the steps from Accessing the Budgeting homepage on OSCAR to navigate to the data input tab.
The BCT and MOG tabs will look largely similar and work in the same way. The main difference is that BCTs are only available for plans years, and they may have different validations in place (e.g. users cannot donate a BCT that contains income).
MOG adjustments include the option to donate plans and outturn data. If loading a MOG, care should be made to move data from all relevant sub-segments and codes for all years related to the programme being transferred.
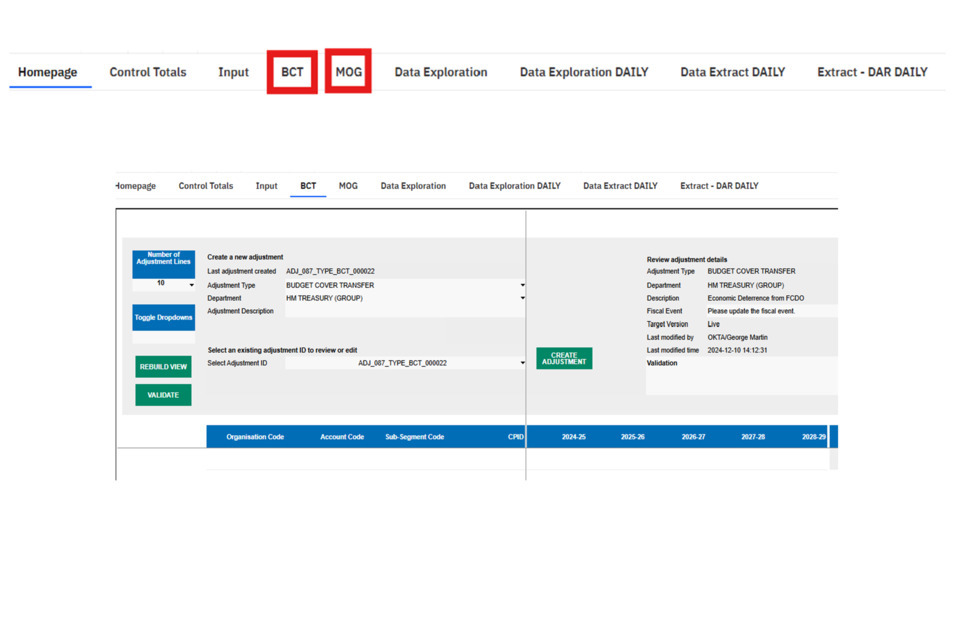
To create a BCT or MOG adjustment, click in the relevant BCT or MOG tab, and follow the instructions as set out in the Creating Adjustments section above.
Tip: If no adjustment rows appear, click on the ‘Number of adjustment rows box’ (as set out here) and click on an option for row numbers. This should prompt the screen to display the empty rows to submit data.
Enter the codes for the rows of data that are to be transferred or have expenditure donated from. For BCT adjustments, this number should always be negative. Figures should also always be negative for MOG expenditure, unless the value is income (and needs to be submitted as a positive number to remove the budget from the department totals).

The main difference within the BCT and MOG tabs is the field to enter a ‘CPID’. This should be the organisation code for the department that are receiving the budget. Once the adjustment has been validated, you can check the department name by scrolling to the right hand side of the page (as shown above).
12.1 BCT and MOG validation errors
As mentioned above, a common validation error for BCTs will be the entry of positive values against expenditure codes. This will produce a validation error that reads ‘Sum of input must be negative or zero’ as shown in the first example of the image below
For BCT adjustments, attempting to donate income adjustments will also result in validation errors as shown in the middle example of the image below.
For both MOGs and BCTs, if the amount loaded for that set of codes exceeds the amount that is already on OSCAR, it will ask for the control totals to be checked. For example, if a department only has 100 loaded against an organisation code, account code and sub-segment code combination, but tries to donate more than 100 (e.g. 200), this error as shown in the third example will appear.
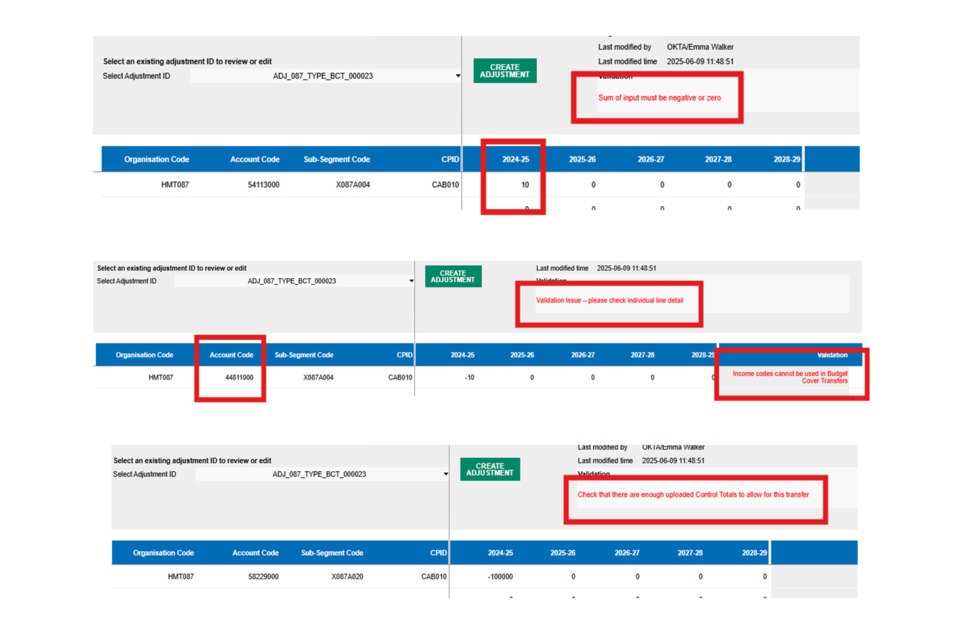
Another common validation issue will be the use of organisation codes that are not the core department codes. Users should not donate MOGs or BCTs to ALBs or other organisations within departments.
12.2 Locking BCT and MOG adjustments
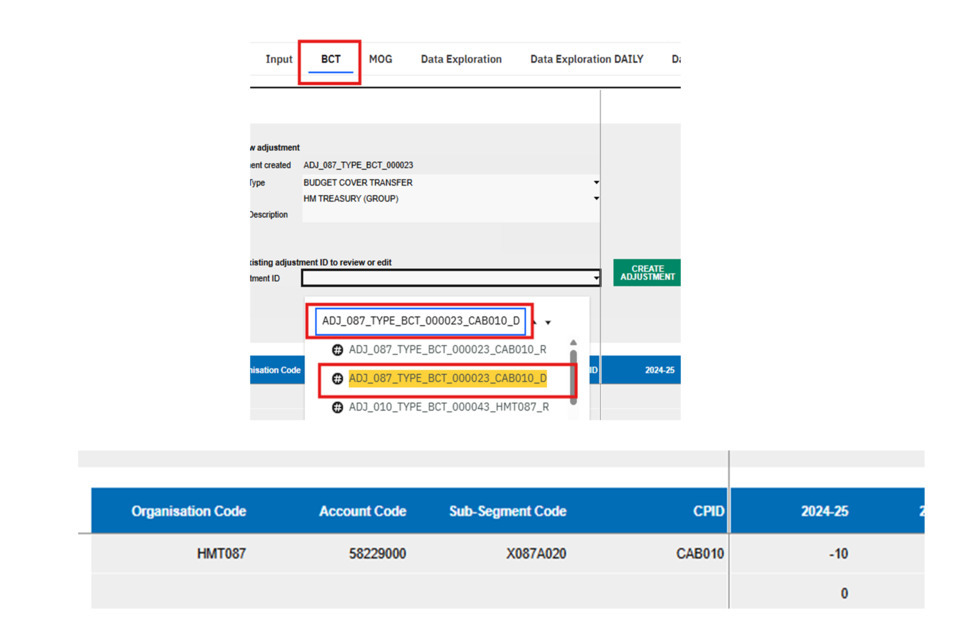
When a BCT or MOG adjustment is locked (the same process as shown here) this will result in the creation of two new adjustments: a donating adjustment and a receiving one.
E.g. the ‘parent’ adjustment is ‘ADJ_087_TYPE_BCT_000023’. The donating adjustment is ‘ADJ_087_TYPE_BCT_000023_CAB010_D’ and the receiving adjustment is ‘ADJ_087_TYPE_BCT_000023_CAB010_R’.
After this point, the ‘parent’ adjustment is no longer in use on system. If a BCT or a MOG is donated to different departments within the same adjustment, then several receiving adjustments would be created.
As the donating department, only the donating adjustment ID (ending in ‘D’) will be listed on the Data Input homepage:

At this stage, the receiving department will also have an adjustment ID listed on their homepage (ending in ‘R’). The receiving department cannot reject, confirm, or disaggregate the BCT or MOG adjustment whilst it is still in ‘Locked’ Status’.
Users can still review and unlock and edit locked donating adjustments ahead of submitting them. As shown here in step 18, copy the adjustment ID and navigate back to the BCT or MOG tab. Click in the select adjustment ID dropdown box and paste in the ID. This should return the ID highlighted in yellow. You can either click the ID to select it, or press enter. This will return the data as locked within the ‘parent’ adjustment:
Users can unlock and edit the data as shown in step 16. When no further changes are needed, donating adjustments can also be submitted on the homepage, as shown in step 18.
Once donating adjustments are submitted, it is for the receiving department to review and then confirm/reject the adjustment. Users should receive an email notification once a BCT or MOG has been received. It will also show with a status as ‘Submitted’ on the homepage:
To review the adjustment, copy and paste the Adjustment ID from the homepage into the BCT or MOG tab ‘Adjustment ID’ selection box. For receiving adjustments, the overall control totals that will be received are shown, and not the organisation/account/sub-segment codes as shown for the donating department. This is because when a BCT or a MOG is received and confirmed, the data will need to be disaggregated:

The receiving adjustment will also show the donating department organisation code within the CPID column, and the value as a positive/reverse of what has been submitted within the donating adjustment.
If there is an issue with the BCT or MOG adjustment, and it needs to be edited or deleted, the adjustment can be rejected (whilst it is in submitted status). The adjustment cannot be rejected once confirmed, or when still in ‘Locked’ status. If an adjustment has been incorrectly confirmed, options are either to disaggregate the data and then create a BCT/MOG and donate the amount back, or surrender the amount confirmed (and have the donating department add the expenditure back in). Your estimates advisor should be able to help with further guidance in this situation.
To reject an adjustment, navigate to the homepage and paste the receiving adjustment ID in the selection box. Users can also leave a comment to give a brief summary as to why the adjustment is being reject (e.g. if it is the wrong amount).
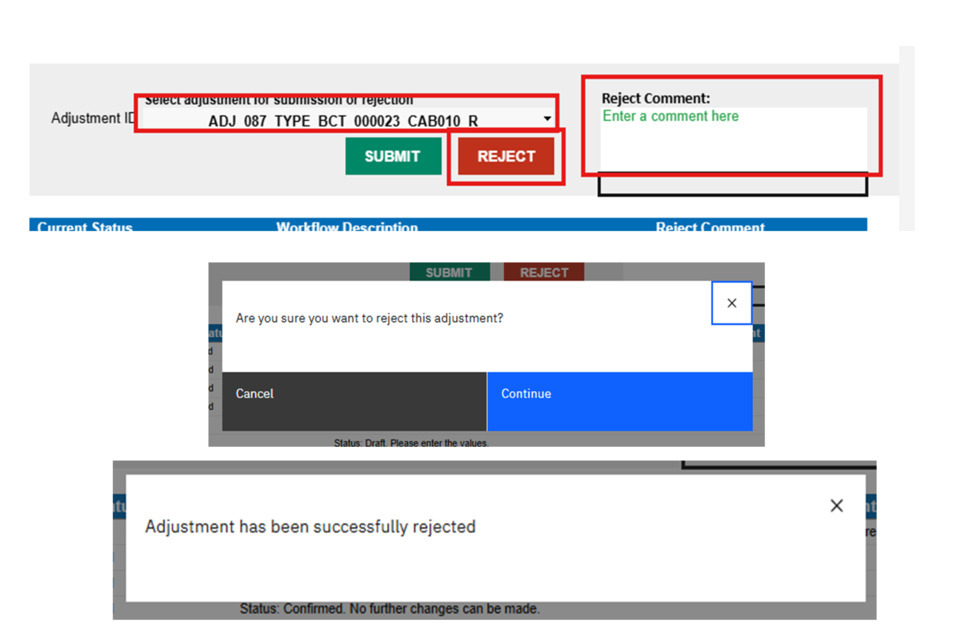
Once ready, click ‘Reject’, followed by ‘Continue’ for the pop-up shown above. This may take a few minutes to process, but should result in the above message to say the rejection has been successful.
The Adjustment ID on the homepage for both the donating and receiving department should now show as ‘Rejected’. Once in rejected status, the donating department can edit the adjustment and lock/submit repeatedly until it becomes confirmed.
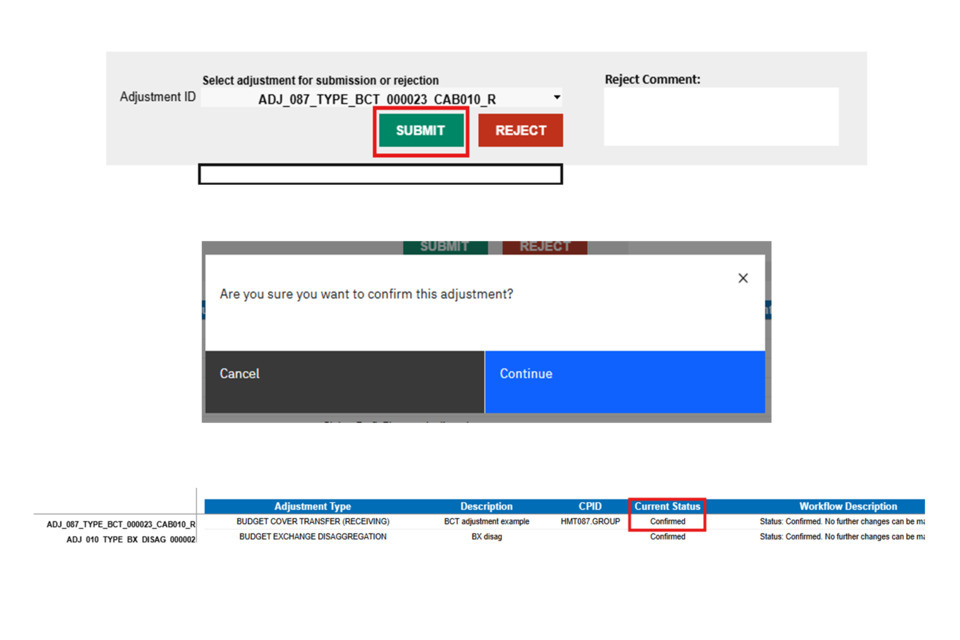
To confirm a receiving adjustment, users can follow the step as shown above for rejection, but instead clicking ‘Submit’ and without leaving a comment. After clicking ‘continue’ a pop-up message should display to say it has been successfully confirmed, and the status on the homepage should’ve adjusted also.
For the receiving department, the adjustment now needs to be disaggregated using the ‘BCT Disaggregation’ or ‘MOG Disaggregation’ adjustment types as shown in the guidance above. Users can also view the Disaggregation Section using the same process for identifying amounts to disaggregate for MOGs and BCTs.
13. Entering Vote on Account (VoA) Data
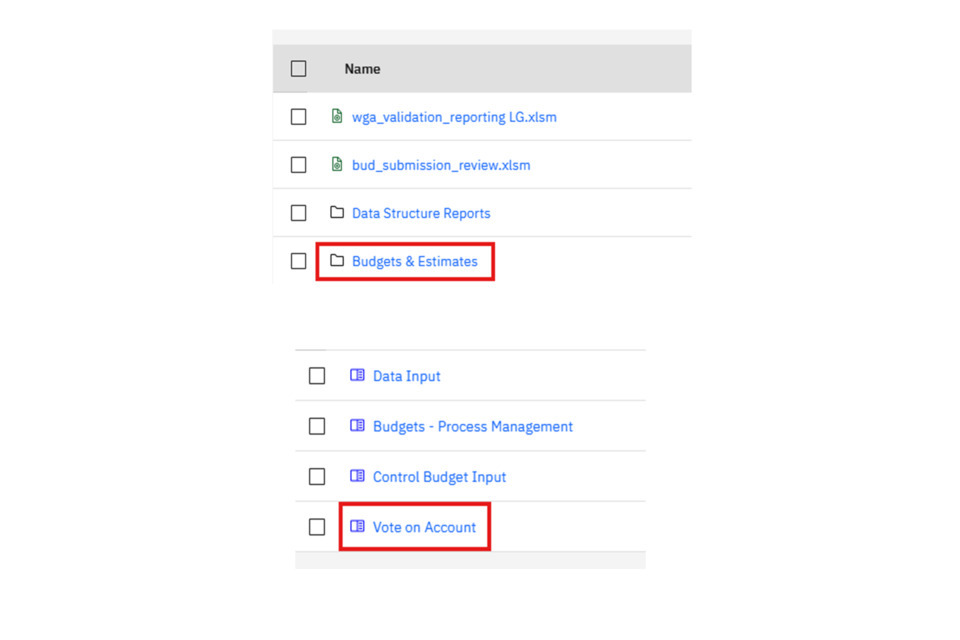
1) Once logged onto OSCAR, click ‘Enter Data’, followed by ‘Reports and Analysis’:
2) Click on ‘Budgets & Estimates’, followed by ‘Vote on Account’:
3) This should then open the Vote on Account homepage. Your department should be automatically selected. In this example HM Treasury is shown as the department. If users have access to multiple departments, you can select these by clicking in the Organisation Selection box and changing the option.
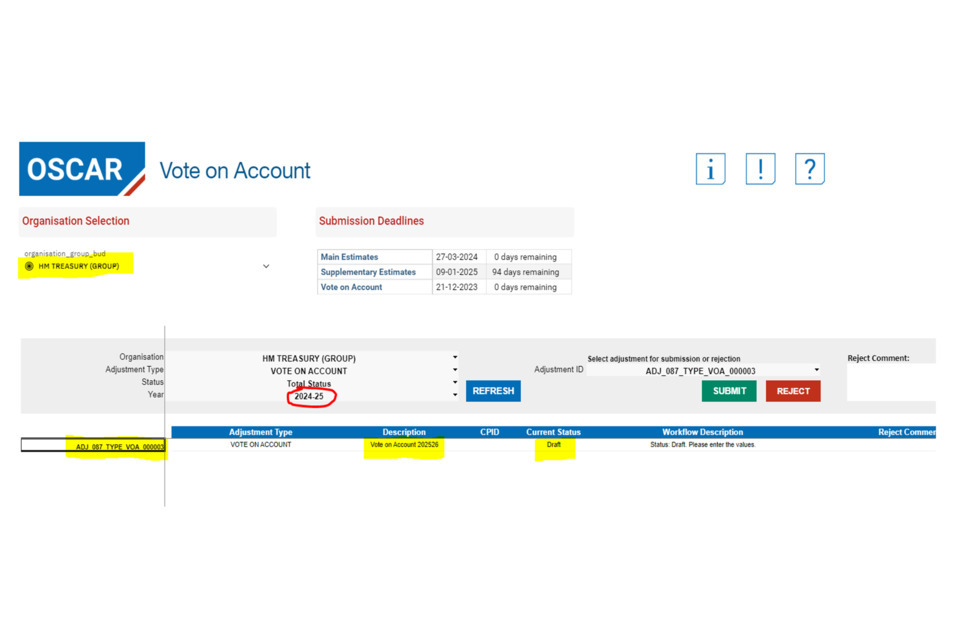
For the department selection there should be a VoA adjustment ID generated for the selected department, which should be in draft status. If there is no VoA adjustment displaying, or it is in confirmed status, that suggests the latest VoA adjustment is not yet available. In the above example, the description is ‘Vote on Account 202526’ for the year 2025-26. The year selection (circled in red above) is displayed as 2024-25. This is correct, as it refers to the system year on OSCAR. The Adjustment displayed above will be for Vote on Account 2025-26. The system year on the homepage will always be the year behind the VoA adjustment for submitting.
4) Double click on the adjustment ID to the left hand side of the screen to copy it (by right clicking and selecting copy, or pressing ctrl + C).
Click on the ‘Vote on Account Input’ tab and select the dropdown to select an Adjustment (circled in red below):
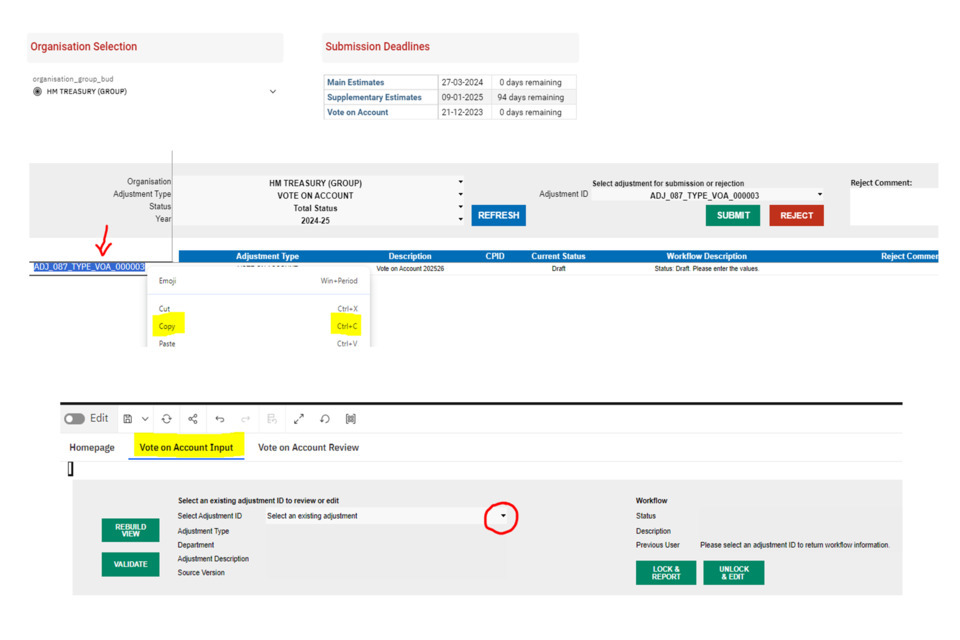
5) Paste the adjustment ID into the box. This should result in the adjustment appearing in the list, highlighted in yellow. Users can either press the enter button or click on the adjustment in yellow highlight to select it:
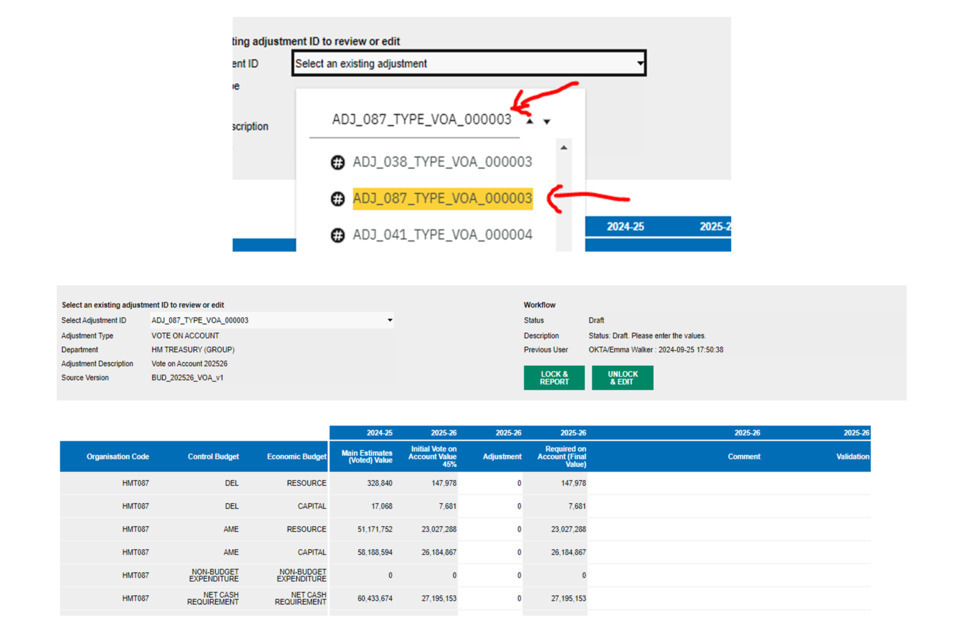
This should then populate the Vote on Account screen with the adjustment (as shown above).
Based on the example of VoA 25-26, this should include:
- Column 1 [2024-25 Main Estimates (Voted) Value]: These are the voted values for Main Estimates 2024-25 (the last available main estimate figures)
- Column 2 [2025-26 Initial Vote on Account Value 45%]: This is a 45% calculation of the amount in the first column for Column 1. If the voted value was negative at Mains estimate, the calculation should result in a 0 value.
- Column 3 [2025-26 Adjustment]: This column is for user input to add any additional budget to the value calculated in Column 2. Note that this will be added/taken from the 45% value, it should not replace the value as a new total.
- Column 4 [2025-26 Required on Account (Final Value)]: This will generate the total amount for the Vote on Account, summing both figures from Column 2 and Column 3.
- Column 5 [2025-26 Comment]: This is an option input box to add a comment to any rows to explain the submission of additional adjustments.
6) If you require an adjustment to the 45% calculation, add the amount to Column 3 and click validate. If users don’t require an adjustment, still click the option to validate. Write any comments against adjustments in Column 5.
This is an example based on the STG environment. 200 was added to the CDEL value, along with a comment. When clicking validate ‘circled’ the amount in Column 4 updated (487,840 + 200 = 488,040). The other columns remained the same as no adjustments were added:
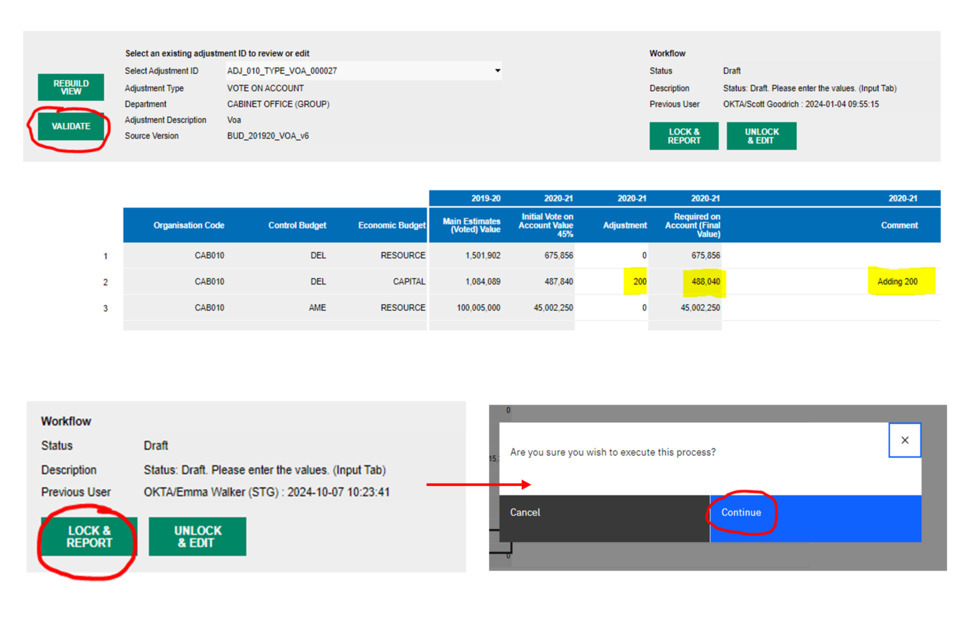
7) Once content with the final Vote on Account values in column 4, press the ‘Lock & Report button’ as shown above. Click ‘Continue’.
8) When finished locking, the following pop up should appear:

This will result in the adjustment becoming locked. The status should update in the highlighted section as shown in the screenshot above.
If users wish to edit an adjustment to make a change, this can be done by unlocking the adjustment by pressing ‘Unlock & Edit’. This will result in the adjustment returning to draft status, where users can follow from step 6 of the VoA guidance to relock the adjustment.
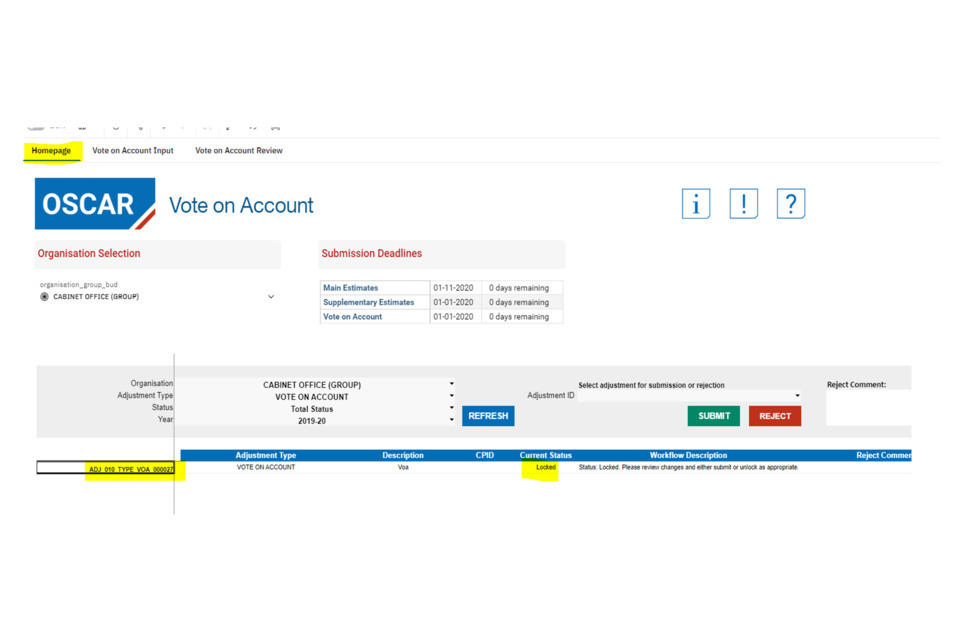
9) Navigate back to the homepage. The adjustment ID should now also be displaying in ‘Locked’ status on the homepage (as shown below):
10) If there are no further changes to make to the VoA figures, users can submit the adjustment by copying the adjustment ID (as shown in step 4). This time, paste the adjustment ID into the ‘select adjustment ID’ box on the homepage, as shown in the screenshot below:
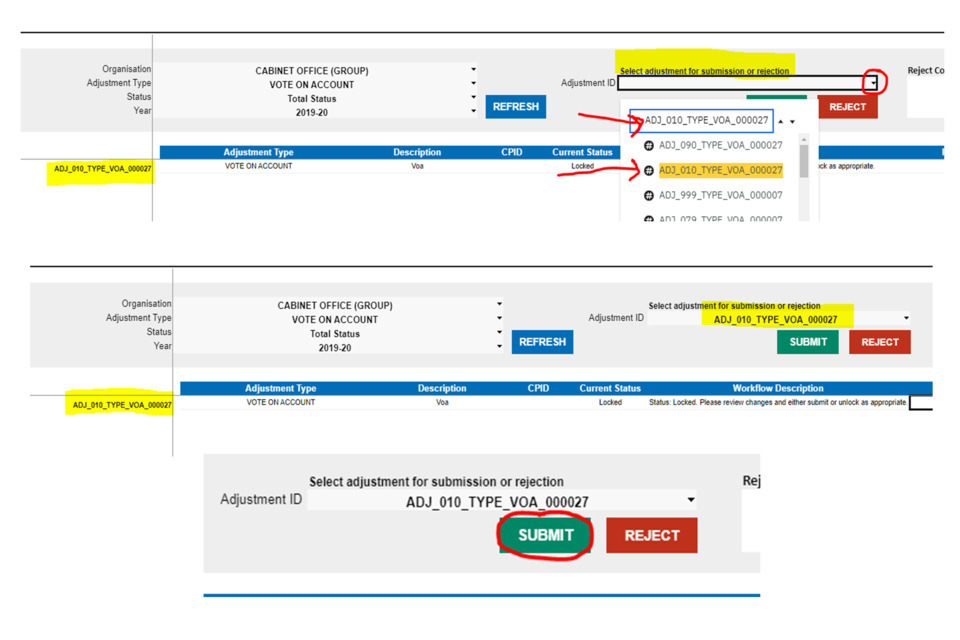
Similar to step 5, users can select the adjustment ID by pressing enter or clicking the adjustment that highlights in yellow in the list. When selected correctly the adjustment ID should appear in the box, and match the adjustment ID on the homepage that is shown in locked status.
11) Click the ‘Submit’ button (as shown in previous screenshot).
Click ‘Continue’, and when the adjustment has finished processing the following message should appear:
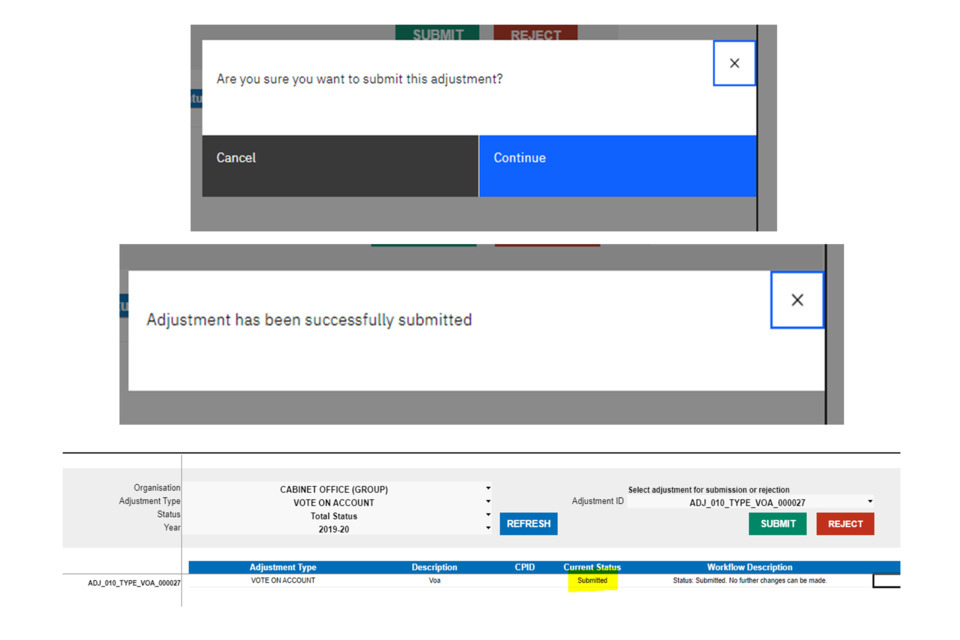
This should also update on the homepage to show as ‘Submitted’.
12) There is now no further action required from department users once in Submitted status. The adjustment now needs to be confirmed by the Spending Team. If the Spending Team rejects the adjustment, this would result in the adjustment being moved to ‘Rejected’ status. The Spending Team may also note why the adjustment was rejected in the comment section. For example:
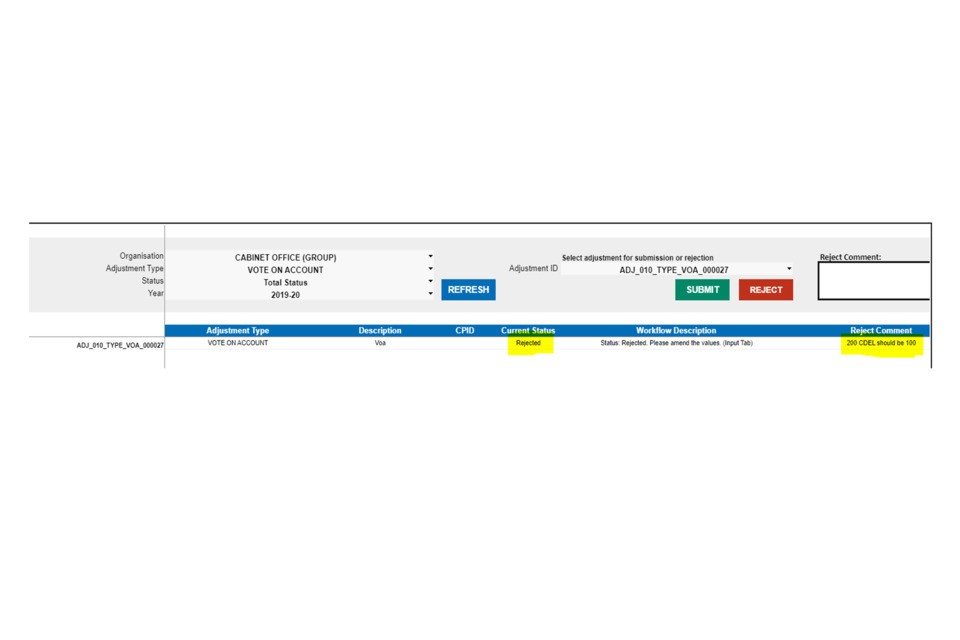
In this scenario, ‘Rejected’ Status acts in a similar way to draft status. Users can edit the adjustment by starting from step 6 of the adjustment, making any required edits and pushing the adjustment through to locked status, and resubmitting.