Adding locations: guidance for professional users of the get flood warnings service
Updated 25 June 2026
Applies to England

© Crown copyright 2026
This publication is licensed under the terms of the Open Government Licence v3.0 except where otherwise stated. To view this licence, visit nationalarchives.gov.uk/doc/open-government-licence/version/3 or write to the Information Policy Team, The National Archives, Kew, London TW9 4DU, or email: psi@nationalarchives.gov.uk.
Where we have identified any third party copyright information you will need to obtain permission from the copyright holders concerned.
This publication is available at https://www.gov.uk/government/publications/get-flood-warnings/adding-locations-guidance-for-professional-users-of-the-get-flood-warnings-service
1. Overview
You should read this guide if you have a professional (organisation) login for the Get flood warnings service. You are likely to be an administrator for your organisation’s Get flood warnings account.
Administrators for an organisation can add locations of interest and then link contacts to these. This allows organisations to tailor which flood alerts and flood warnings each of their contacts receive.
This document explains how you use your professional (organisation) Get flood warnings account to:
- view, add and remove contacts
- link them to locations
You can also read separate guides explaining how to add contacts and link these to specific locations.
2. Locations overview
The ‘Live flood warnings’ page will display any flood alerts or flood warnings currently in force for locations that you have added to your organisation.
If there are no flood alerts or warnings in force, or no locations associated with the account, the map display will be empty.
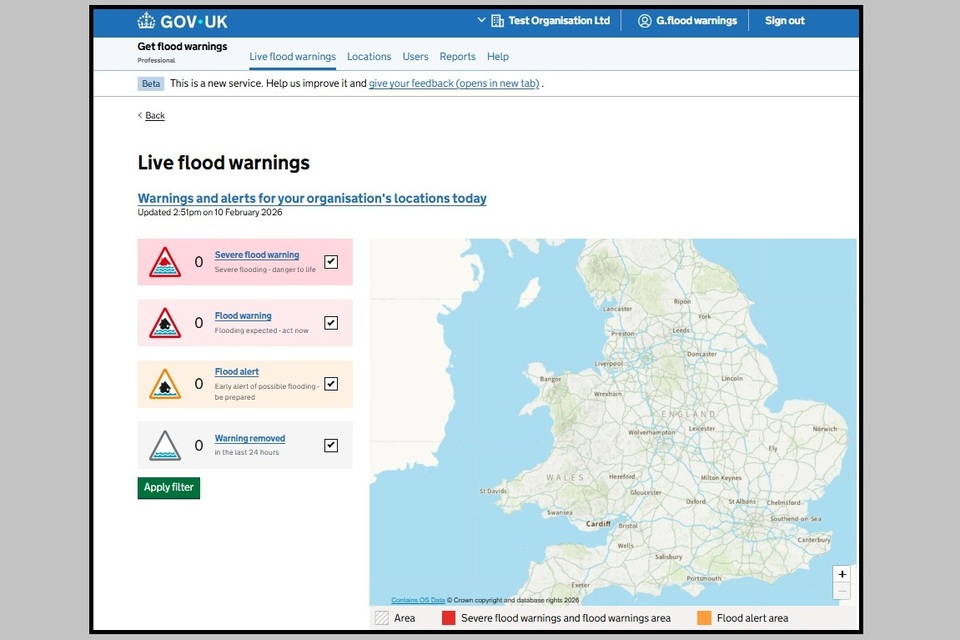
Image 1: Live flood warnings page. Image courtesy of the Environment Agency.
3. Adding locations
To add locations select the ‘Locations’ tab then select the ‘Add locations’ button.

Image 2: Locations page with add locations function. Image courtesy of the Environment Agency
There are several ways you can add locations to your account. The most appropriate method for your organisation will depend on the number and type of locations being added.
You can:
- add locations one at a time
- bulk-upload multiple locations using a postcode or X and Y coordinates in a CSV file
- choose areas, like local authority or police force areas
- upload a location as a polygon or line in a shapefile
3.1 Add locations one at a time
This allows you to add locations one at a time by:
- searching with a post code
- using X and Y coordinates
- dropping a pin on a map
This method is suitable for manually adding a small number of locations.
Step 1: Select ‘Add locations one at a time’ and ‘continue’.
Step 2: Enter a name for your location and select ‘continue’.
Step 3: You can add the location by one of these 3 methods:
- use a post code – enter the postcode in the search box and select the address from the list, If the address is not listed, you can select a point on map by selecting ‘I cannot find the address’
- use X and Y coordinates – you will need the X and Y coordinates (also known as easting and northing) for your location, enter these in the separate fields, for example 123456 and 654321 - there are online converters available if your data is in latitude and longitude
- drop a pin on a map – search for a town or place name and select continue, then pan and zoom on the map to find your location. Select a location on the map to drop a pin and then select ‘Add location’
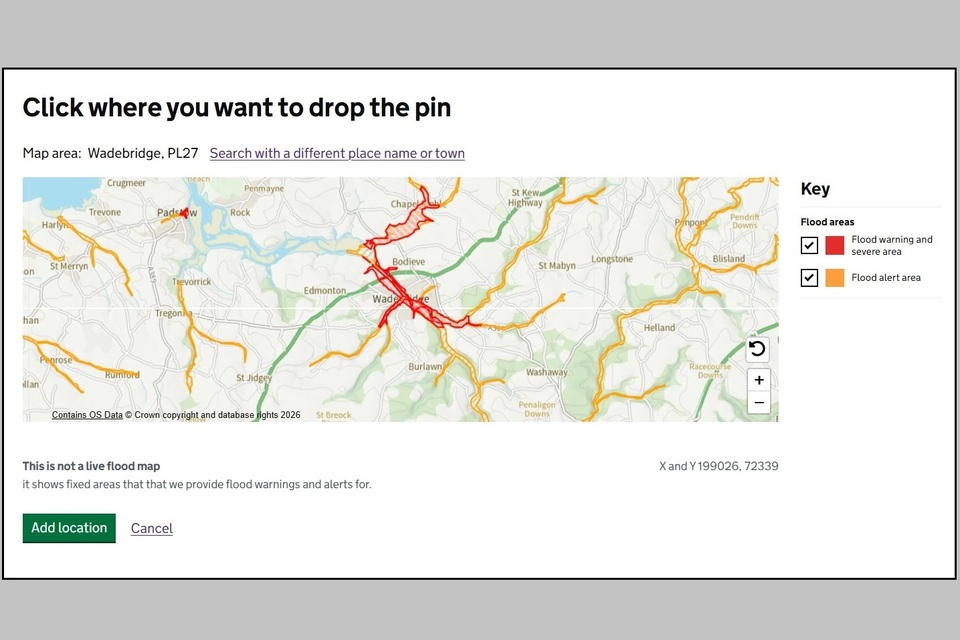
Image 3: Click where you want to drop the pin when adding a new location. Image courtesy of the Environment Agency.
Step 4: Add useful information to this location which will help identify the location in your account and make it easier to add contacts to later. This information could include:
- address
- internal reference – how your organisation refers to this location internally
- importance to your organisation
- location type – this can be used to filter and group locations later
- keywords – you can add up to 50 keywords per location - keywords will make it easier to filter and link contacts to locations later, for example you can add keywords to link a location to regions or teams
- notes – add any useful notes relevant to this location
- action plan – add any actions from your flood plan here
Step 5: Once the location has been added, you can then link it to contacts in your account. Further instructions are provided for linking contacts to locations.
3.2 Bulk upload multiple locations in a file
You can download a template CSV file from the ‘Bulk-upload multiple locations in a file’ page. You should use this option if you need to add many point locations.
Note:
- data must only be entered on one tab
- each location should be added into its own row
- the final data must be saved as a .csv file, and no formatting will be retained in this file type, as the content is text only
- do not delete any columns in the template file as this will cause the upload to fail, instead you can leave unwanted columns blank
The following must be included:
- a location name – how you refer to the location
- a full address and postcode, or X and Y coordinates – or you can add both options
- do not include the post code in the address column - enter this separately in the post code column
- X and Y coordinates - these are numbers representing a location, also known as easting and northing, they should each be 6 digits long, for example, 123456 and 654321 - they should not include decimal places
Note: If you add X and Y coordinates, they will be used to add the location, not the postcode.
You can also include the following as additional information to help you identify the location:
- internal reference – any internal identifiers your organisation uses to name/identify locations
- importance to your organisation – is this location high, medium or low importance for your organisation
- location type
- action plan
- notes
- keywords – keywords can be used to search, filter and group your locations, this will make it easier to add contacts to multiple locations at once - a maximum of 50 keywords can be added per location
The template can be downloaded, opened and edited in Excel, but must be saved as a .csv file to upload to your locations.
Step 1: Select ‘bulk-upload multiple locations in a file’ and ‘continue’.
Step 2: Download the template file and select ‘Continue to instructions on how to fill in your CSV file’.
Step 3: Fill in the location name, address and postcode, and or X and Y coordinates. Do not change the column names, order or structure.
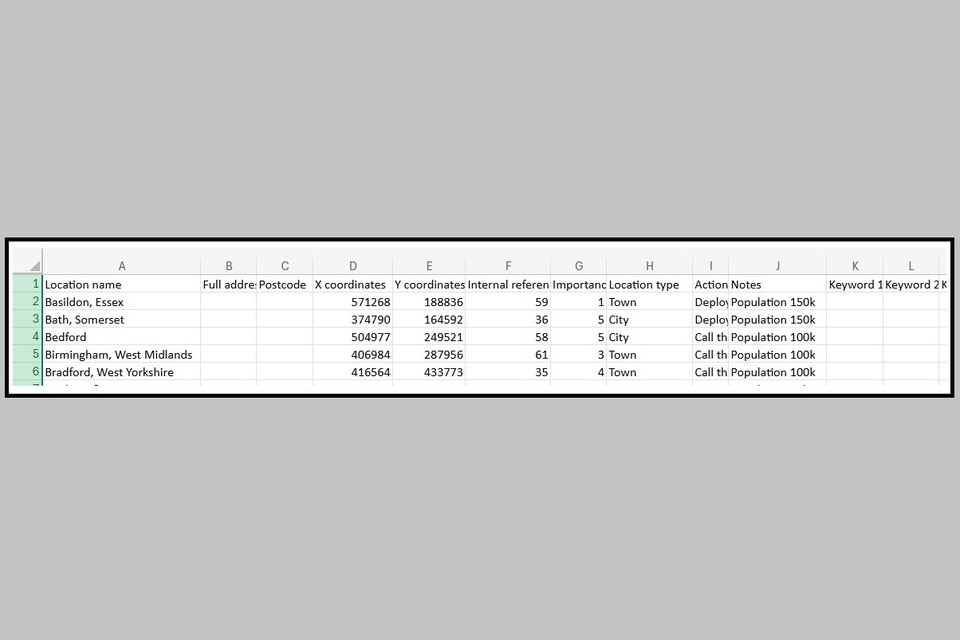
Image 4: Example of a completed template. Image courtesy of the Environment Agency.
Step 4: Save the file as .csv.
Step 5: Select ‘Continue to upload’, then when prompted to upload file choose the file and then select ‘Upload file’.
Step 6: Your file will be scanned for locations. Select ‘Add and continue’.
Step 7: Once the location has been added, you can then link it to contacts in your account. Further instructions are provided for linking contacts to locations.
3.3 Choose areas, like local authority or police force areas
Several areas are available to add as a location. These are pre-loaded into the system and are maintained by the Environment Agency. They are suitable for organisations which cover the same areas as:
- Environment Agency areas
- local authorities
- local resilience forums
- NHS areas
- parliamentary constituencies
- police force
When you add an area as a location, contacts linked to this location will receive all flood warnings and/or flood alerts that:
- fall within the boundary
- touch the boundary
You can only add one area at a time. To add a predefined area:
Step 1: Select ‘Choose areas, like local authority or police force areas’.
Step 2: First, select the area type, then from the second drop down, select the area you would like to add as a location. When selecting an area from the boundary drop down it will highlight on the map.

Image 5: Add predefined boundary page. Image courtesy of the Environment Agency.
Step 3: Select ‘add area’. For larger areas, it may take time to load the next page.
Step 4: Add any useful additional information to the location, or you can skip this step and add this later. You can add additional information to help you identify the location.
This includes:
- internal reference – any internal identifiers your organisation uses to name/identify locations
- importance to your organisation – is this location high, medium or low importance for your organisation
- location type
- action plan
- notes
- keywords – keywords can be used to search, filter and group your locations, this will make it easier to add contacts to multiple locations at once - a maximum of 50 keywords can be added per location
Step 5: Once the location and additional information has been added, you can then link it to contacts in your account. Further instructions are provided for linking contacts to locations.
Step 6: You will have the option to add another area, which will repeat the steps above, or finish.
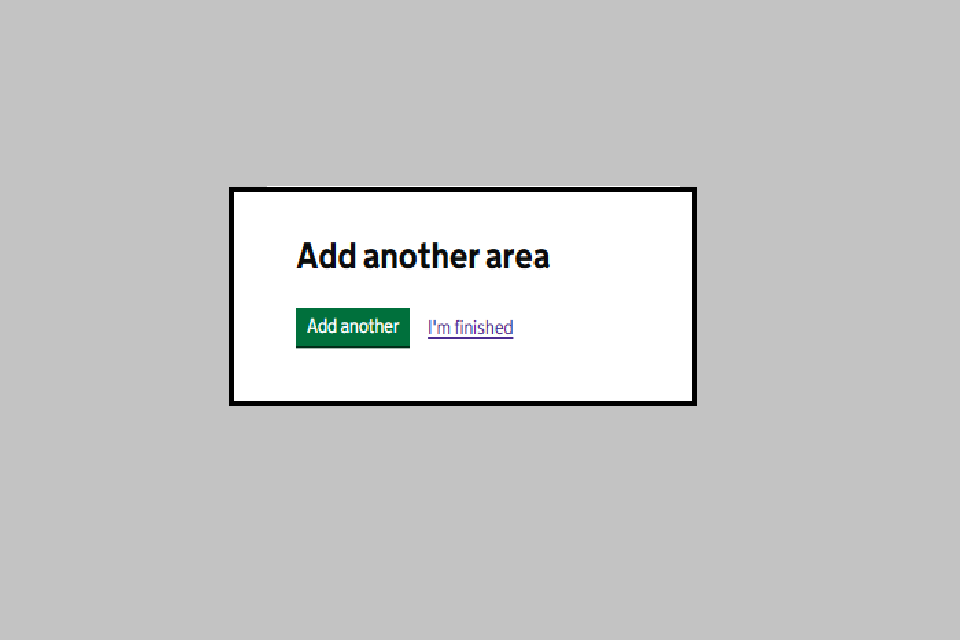
Image 6: Option to add another area. Image courtesy of the Environment Agency.
Area locations will show a ‘mixed’ level of long term flood risk when viewing the summary of locations in the locations tab. The long term flood risk can be viewed by selecting the location and on the location details tab selecting the link ’may have mixed risk ratings’ which will open in a new tab.
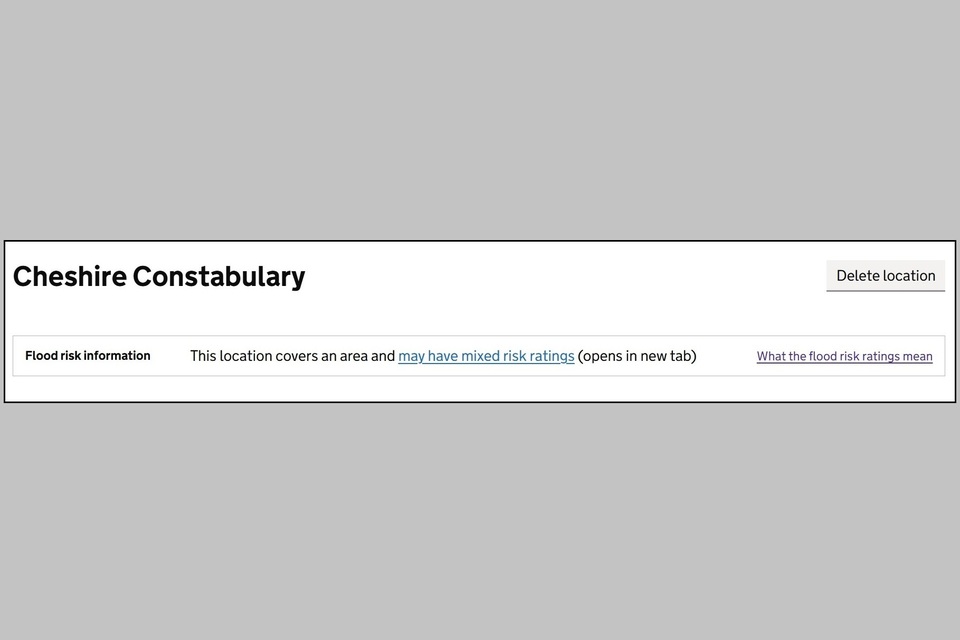
Image 7: Area location with mixed risk ratings and link to further information in a new tab. Image courtesy of the Environment Agency.
3.4 Upload a location as a polygon or line
Shapefile uploads can include either polygon or polyline spatial data.
This option is most suitable for organisations which have:
- multiple assets within an area or a region
- linear assets extending over large distances
When a shapefile is added as a location, any contacts linked to that location will receive all alerts and warnings that:
- fall within the area
- touch any points of the polygon or line
For this option, you should already have the shapefiles available in a zip file format. Shapefiles can be drawn using GIS software such as ArcGIS.
Note that:
- only one shapefile can be uploaded at a time
- the shapefile must be included in a single zip file which must include the .shp (main file), .shx (index file) and .dbf (database file) - all the files should have the same prefix (or name)
- the shapefile is considered one location, even if it covers multiple flood alert and flood warning areas
- if the shapefile contains multiple polygons, these must be stored in the shapefile as one feature or record, or divided into separate shapefiles for each feature
- more complex shapefiles will take longer to load and may affect system performance – this includes dashboards and reporting as well as the upload process
By uploading different shapefiles, organisations can have one location per region or area and assign users to each of these.
To add a location as a shapefile:
Step 1: Select ‘Upload a location as a polygon or line in a shapefile’ and ‘Continue instructions on how to create your shapefile’.
Step 2: You must already have a shapefile saved in a ZIP format, containing the .shp (main file), .shx (index file) and .dbf (database file). They must all have the same prefix, for example, “location_01”. Select ‘continue to upload’.
Step 3: Select ‘choose file’ and navigate to your zip file, then select ‘upload file’.
Larger shapefiles will take time to upload and process. Files that are too large may cause the web page to stop responding. If the problem persists, you should:
- simplify your polygon
- split the shapefile into smaller areas and uploading these as multiple locations
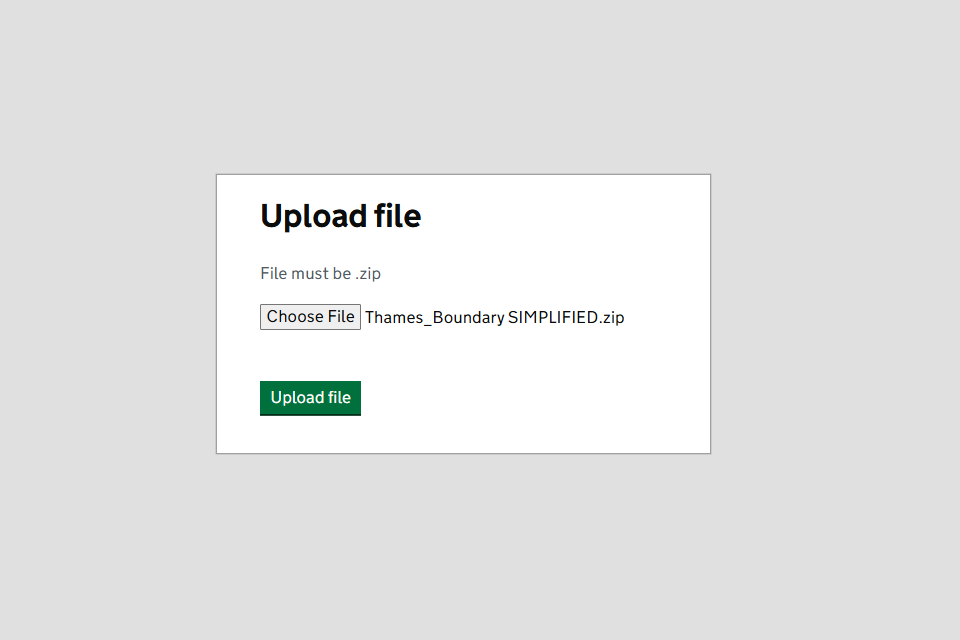
Image 8: Upload zip file page whilst adding shapefile. Image courtesy of the Environment Agency.
Step 4: Once your file is uploaded a summary map will display all flood alerts and flood warnings that will be included for this location. If the location covers the correct area select ‘Add and continue’. Select ‘Cancel upload’ to return to the upload page.
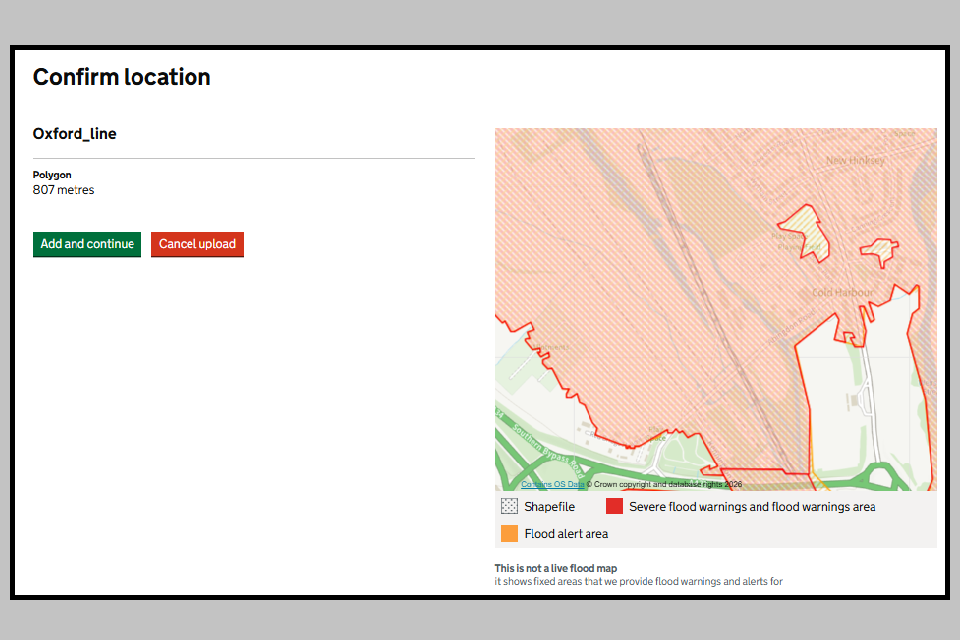
Image 9: Confirm location page whilst adding shapefile. Image courtesy of the Environment Agency.
Step 5: Once the location has been added, you can then add optional information about this location and link it to contacts in your account. You can find out more about linking contacts.
Uploaded shapefile locations will show a ‘mixed’ level of long term flood risk when viewing the summary of locations in the locations tab. The long term flood risk can be viewed by selecting the location and on the location details tab selecting the link ’may have mixed risk ratings’ which will open in a new tab.
4. Locations where flood messages are not available
Not all locations are in places that you can get flood warnings or flood alerts. When you upload your location you will be notified if flood messages are not available. You may be able to link to a nearby flood area to still get messages for this location.
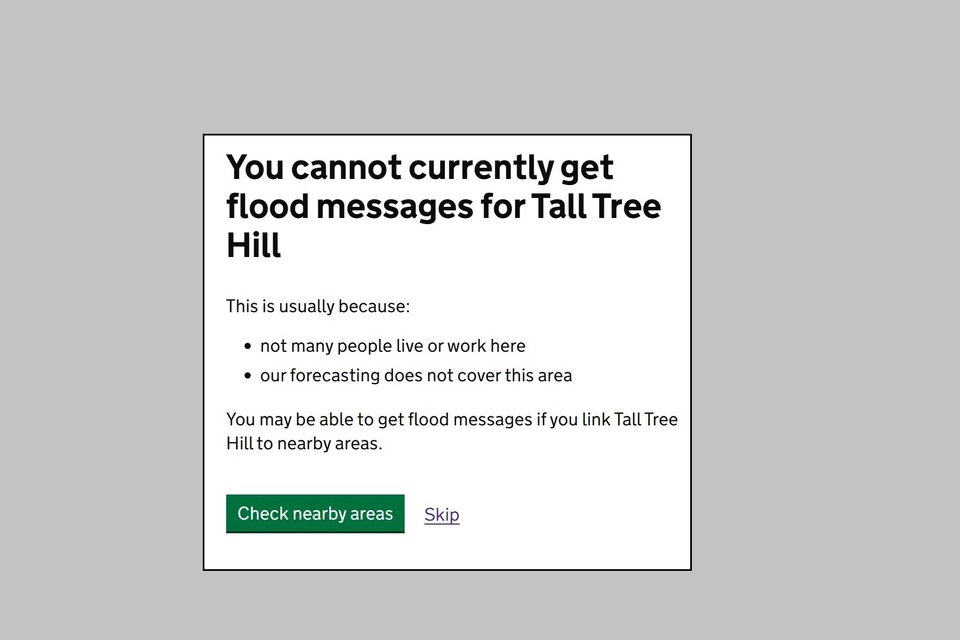
Image 10: Notification showing flood messages are not available for the location. Image courtesy of the Environment Agency.
5. Searching for locations
You can search for your locations and filter by:
- name
- type
- keywords
- other attributes you have filled in when adding locations
You can add these attributes later if they were not entered when the location was added.
Select the ‘Locations’ tab and view the locations table. Select ‘Open filter’ and a filter menu will open to the left of the locations table. Select the drop downs for each section and select the attributes you would like to filter by. Use this menu to filter by:
- location name
- location type
- importance to your organisation
- keywords
- groundwater long term risk
- rivers and sea long term risk
- gets flood messages
- flood messages available
- flood messages turned on
- linked to users
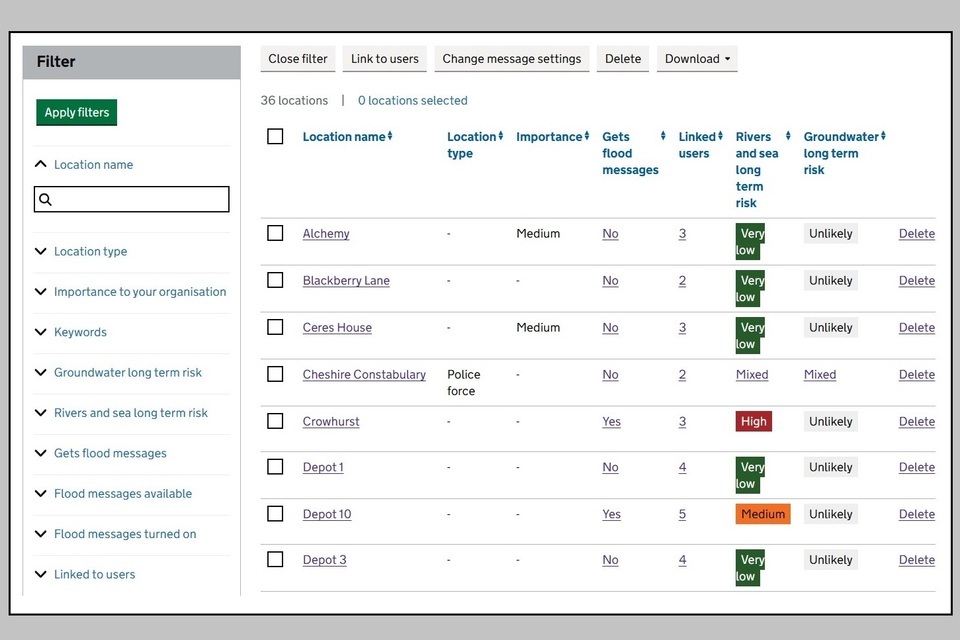
Image 11: Filters on your organisation’s locations page. Image courtesy of the Environment Agency.
You can apply multiple filters at a time. Once the attributes have been selected, select ‘Apply filters’. The locations table will be updated to only show locations that meet the criteria set in the filter menu. Select ‘Clear filters’ and ‘Close filter’ to return to the full table.
6. Removing locations
You can remove locations that are no longer needed by your organisation using the locations tab.
You can remove individual locations by selecting ‘Delete’ in the last column of the locations table. Alternatively, you can delete multiple locations at a time by using the tick boxes and then selecting ‘Delete’.
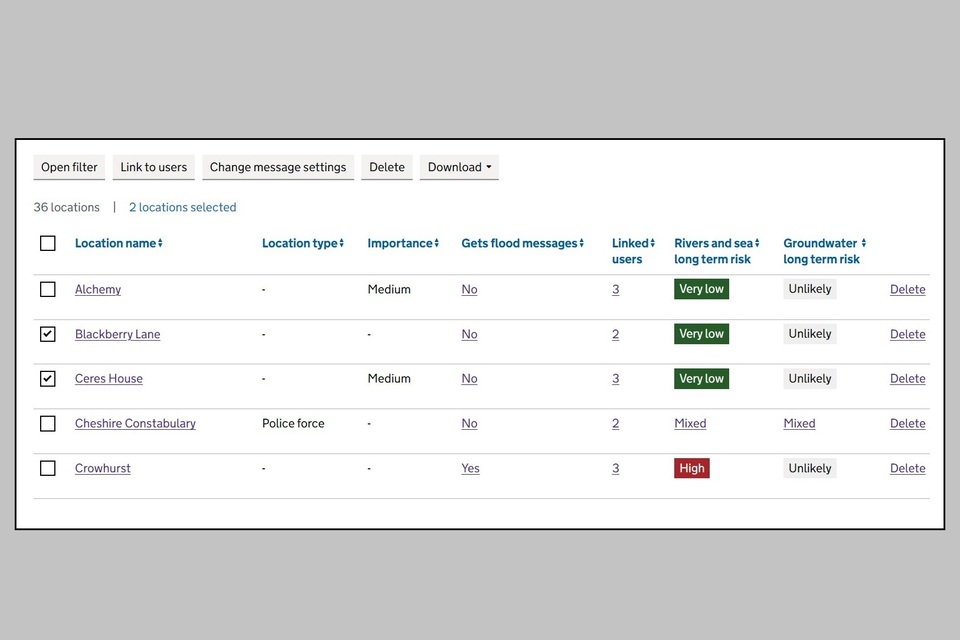
Image 12: Deleting locations on your organisation’s locations page. Image courtesy of the Environment Agency.
Deleting locations will remove them from your account and you will no longer receive flood alerts or flood warnings for these locations.
7. Find out more
You can also watch this YouTube tutorial to find out how to add and manage locations:
- one at a time
- through a bulk CSV file
- by selecting areas
- by uploading a shape file