Budgeting Guidance for Spending Teams
Published 5 August 2025

© Crown copyright 2025
This publication is licensed under the terms of the Open Government Licence v3.0 except where otherwise stated. To view this licence, visit nationalarchives.gov.uk/doc/open-government-licence/version/3 or write to the Information Policy Team, The National Archives, Kew, London TW9 4DU, or email: psi@nationalarchives.gov.uk.
Where we have identified any third party copyright information you will need to obtain permission from the copyright holders concerned.
This publication is available at https://www.gov.uk/government/publications/oscar-guidance-for-budgeting-plans-and-outturn/budgeting-guidance-for-spending-teams
1. Introduction
Spending teams are required to review, and either approve (confirm) or reject the following types of adjustments on OSCAR.
In the data input book:
- Final Outturn
- Budget Regime Change
- Discount Rate Change
- Annually Managed Expenditure
- Non-Budget
- General Provisions
- Capital Provisions
- Capitalised Provisions
In the Vote on Account book, spending teams are also required to approve (confirm) or reject Vote on Account adjustments by departments.
The process for reviewing and confirming/rejecting adjustments in the data input book is the same for all the adjustment types. The following guidance gives an example using Final Outturn.
2. Accessing OSCAR
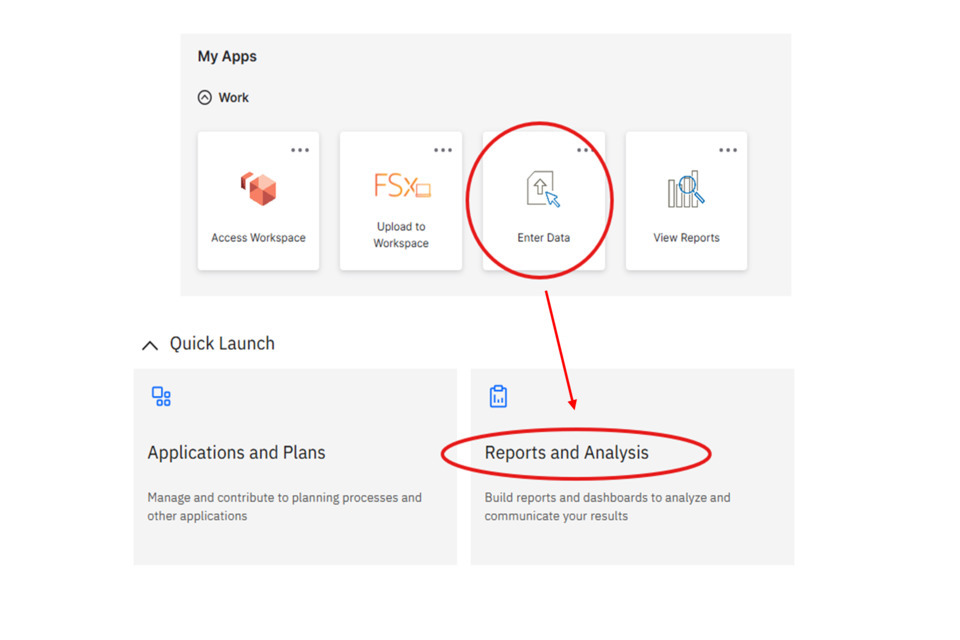
1) Once logged onto OSCAR, click ‘Enter Data’, followed by ‘Reports and Analysis’:
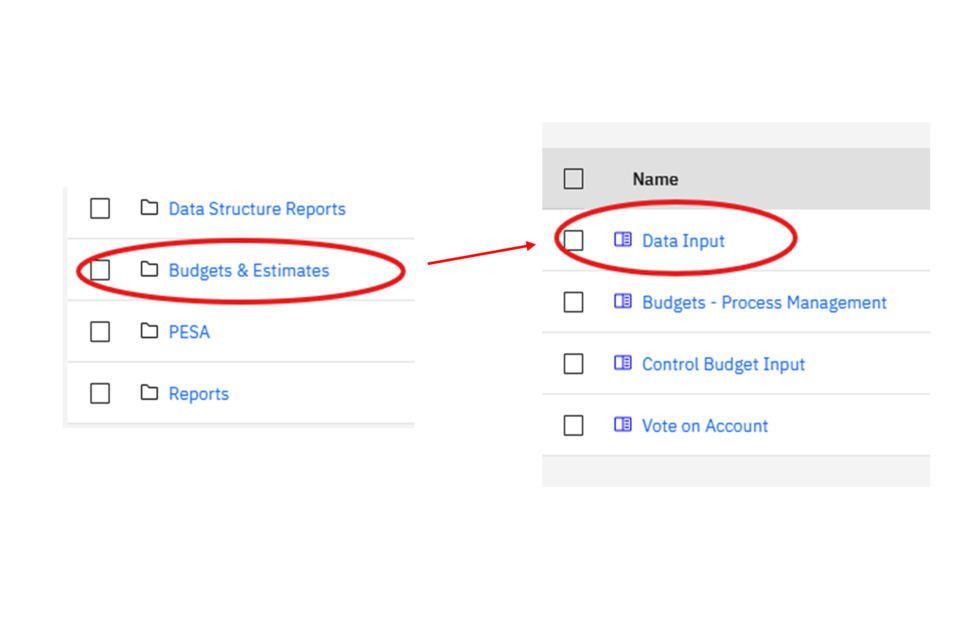
2) Click ‘Budgets & Estimates’, followed by ‘Data Input’:
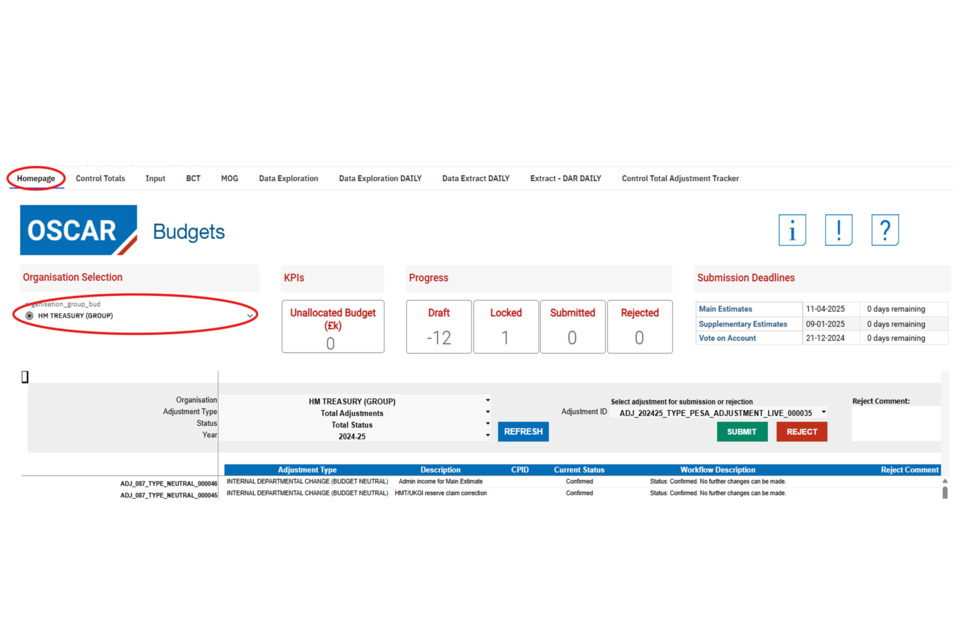
3) You should then be on the homepage tab for budgeting. Your department should be automatically selected. In this example we give the homepage for HM Treasury:
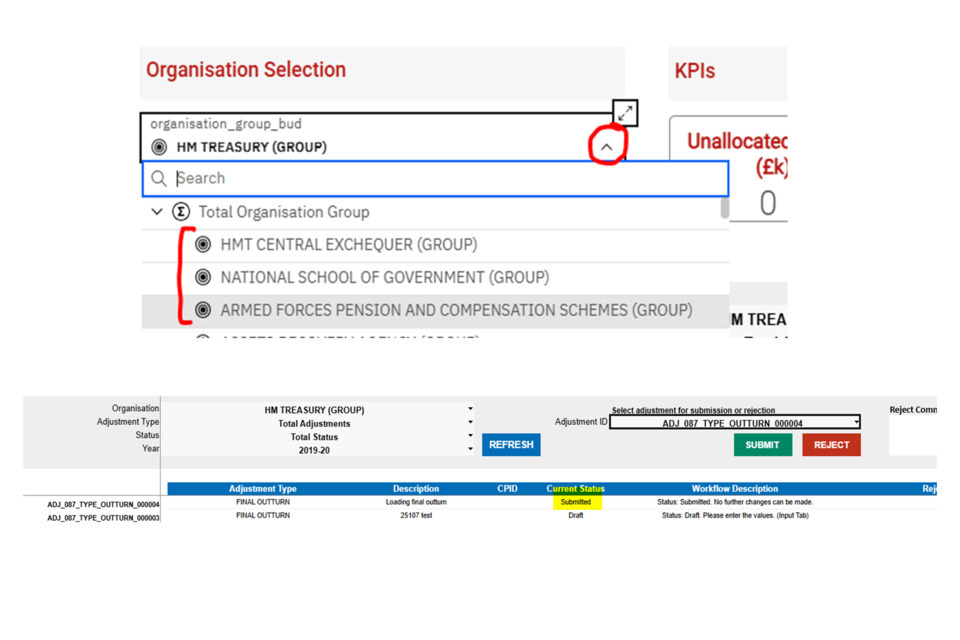
Note: if you have access to more than one department, you can select the other department by clicking into the dropdown of the organisation selection box (as shown in the screenshot below).
4) Spending teams should receive an email notification when a department has submitted an outturn adjustment. This should show on the homepage in submitted status:
3. Reviewing adjustments
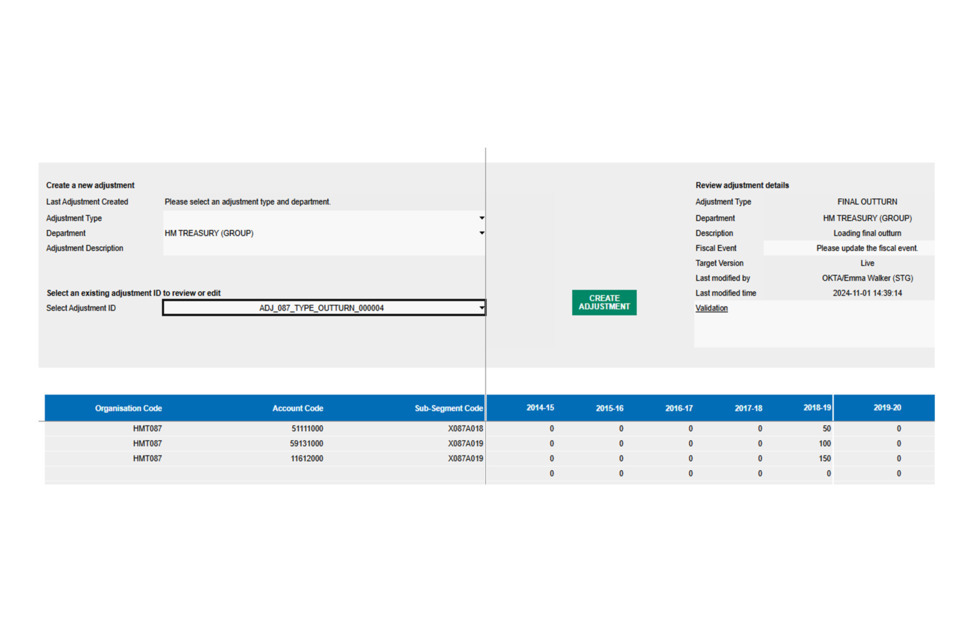
5) To view the content of the adjustment, copy the adjustment ID by double clicking the adjustment ID you wish to view and pressing ctrl + C. Navigate to the Input tab. Click in the adjustment ID selection box, and copy and paste the adjustment ID copied in step 7 into the search box. This should return the adjustment in the list in an orange highlight. Click it to select it:
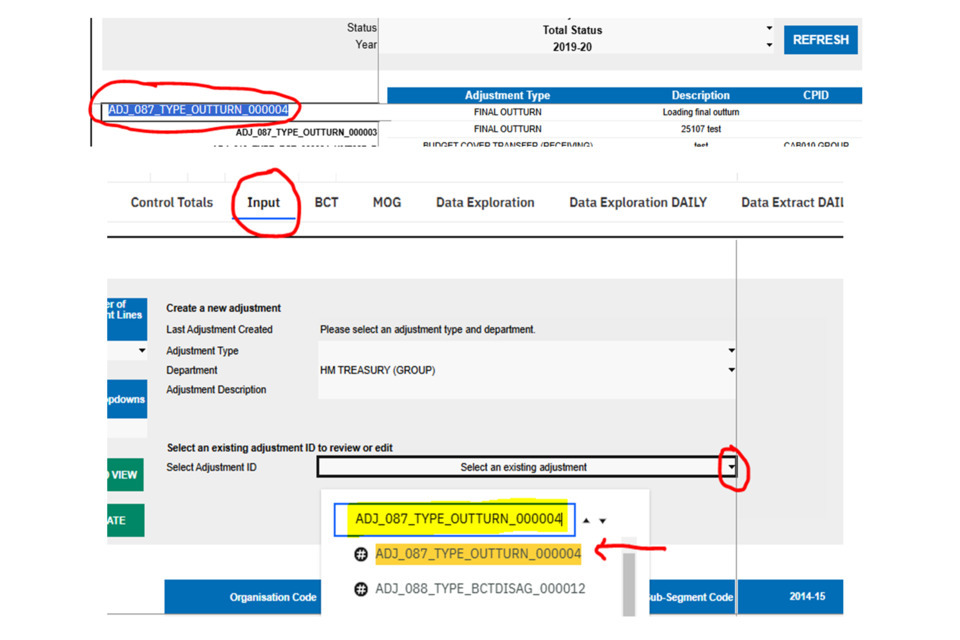
This should then return the adjustment submitted, showing the organisation code, account code, sub-segment code, and amounts loaded:
You can view the names associated to the submitted adjustments by scrolling to the right of the screen.
6) To check the overall impact on control totals, click on the box for ‘Number of Adjustment Lines’ to the top left of the screen and click ‘Control Total’. This will return the sum of the totals against the economic, ringfence and control budget categories:
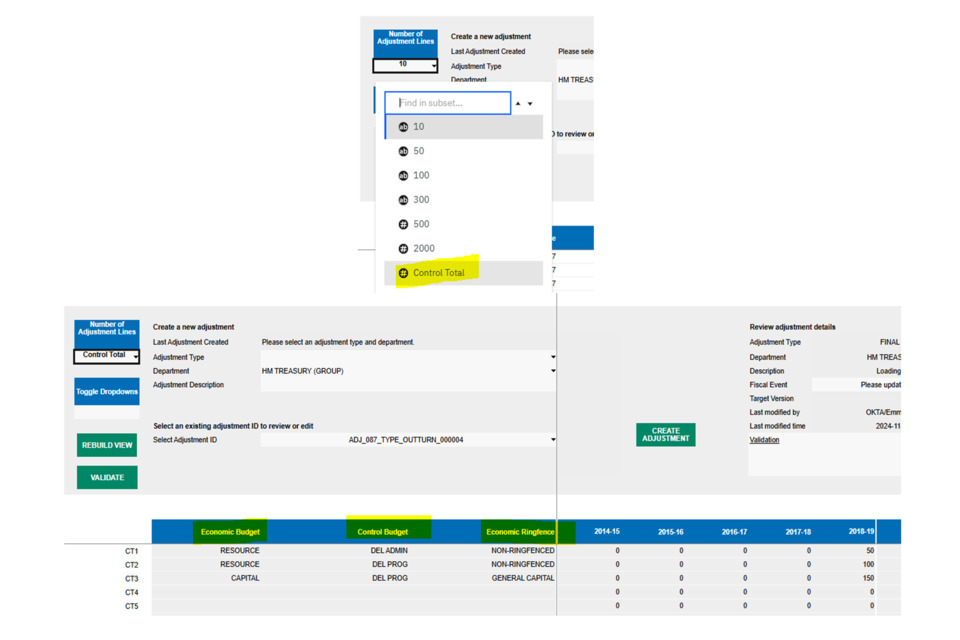
You can return to the original code view by selecting a number of rows in the ‘Number of Adjustment Lines’ box.
4. Rejecting adjustments
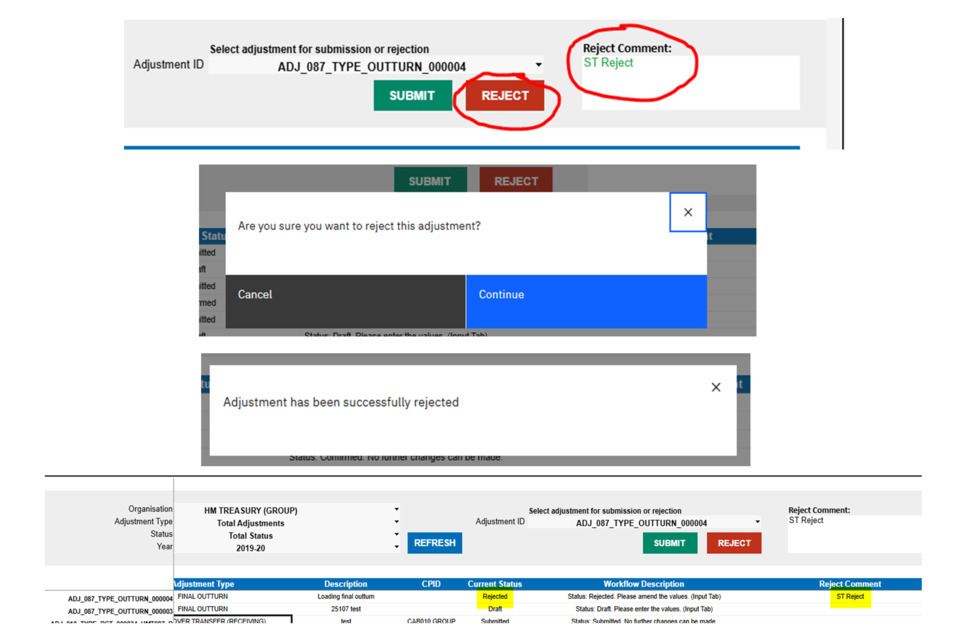
7) To reject an adjustment navigate to the homepage. Copy and paste the adjustment ID you wish to reject (following the step 5 of this ST guidance). Click in the select adjustment ID box on the homepage and select the adjustment from the dropdown list.
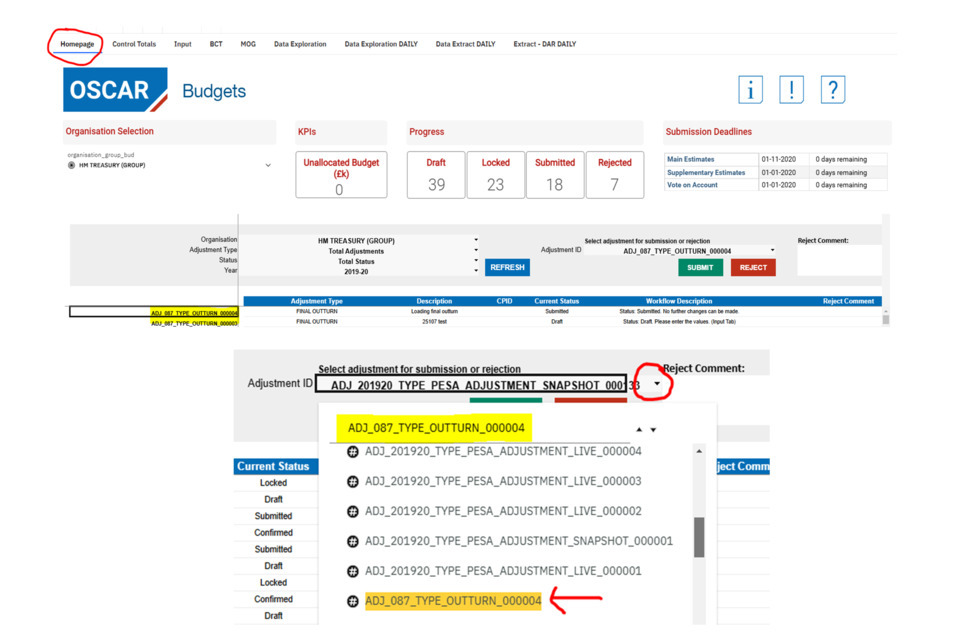
8) Once selected, a comment for rejection can be left in the ‘Reject Comment’ box to the right of the selected ID. Note: Make sure you have liaised with your department off system ahead of rejecting the adjustment. This should just be for a summary only.
When entered, press the ‘Reject’ button and press continue. This should be followed by a pop up message to say that the adjustment has been rejected successfully. Once completed the adjustment should now show with the status as ‘Rejected’ with the comment entered displayed to the right:
5. Confirming adjustments
9) To confirm an adjustment, on the home page tab, copy and paste the adjustment ID you wish to confirm (following the step 7 of this ST guidance). Click in the select adjustment ID box on the homepage and select the adjustment from the dropdown list.
To note that the adjustment status must be in ‘Submitted’ before you can confirm it.
10) When the adjustment ID is selected, press ‘Submit’. Press continue, which should be followed by a pop-up message saying that the adjustment has been successfully confirmed. The adjustment status should also then update to show as ‘Confirmed’ on the homepage:
6. Vote on Account: Spending Team approval and rejection
1) Once logged onto OSCAR, click ‘Enter Data’, followed by ‘Reports and Analysis’:
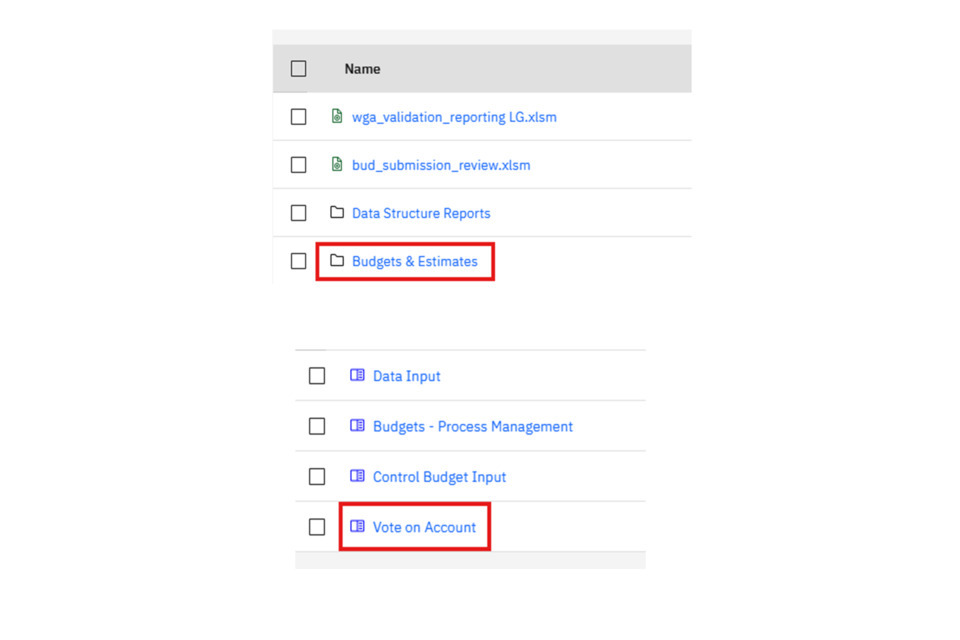
2) Click ‘Budgets & Estimates’, followed by ‘Vote on Account’:
3) This should then open the Vote on Account homepage. A department you have access to should be automatically selected. In this example HM Treasury is shown as the department. If you have access to multiple departments, you can select these by clicking in the Organisation Selection box and changing the option.
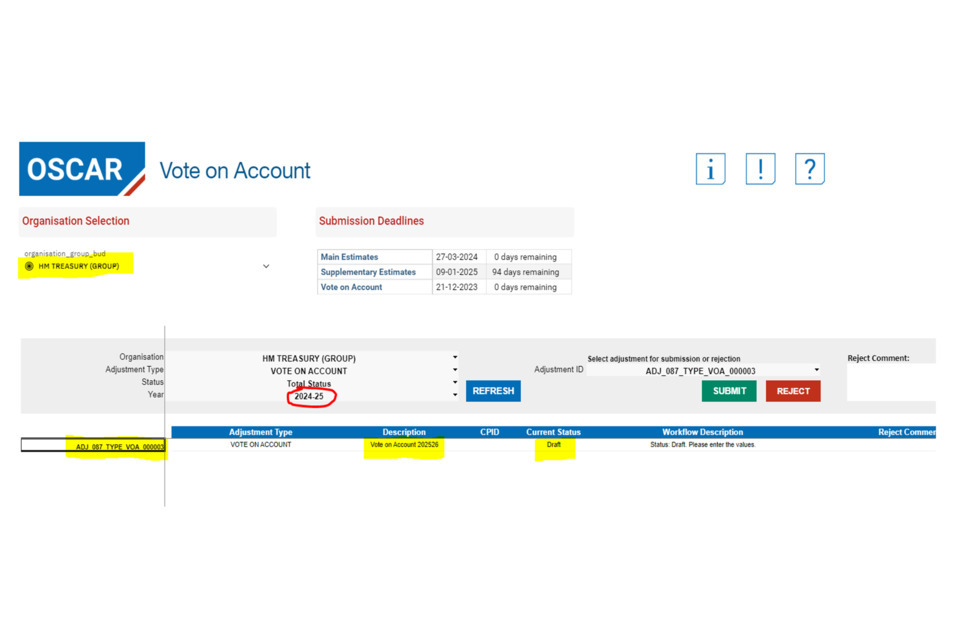
For your department selection there should be a VoA adjustment ID generated for your department. When VoA is first opened for submission these will be shown in draft status. The year selection (circled in red above) will be displayed as the year before the VoA publication in question. This is correct, as it refers to the system year on OSCAR. In the above example, the Vote on Account publication is for 2025-26. The Adjustment displayed above will be for Vote on Account 2025-26, with the system year showing as 2024-25.
4) Double click on the adjustment ID to the left hand side of the screen to copy it (by right clicking and selecting copy, or pressing ctrl + C). Click on the ‘Vote on Account Input’ tab and select the dropdown to select an Adjustment (circled in red below)
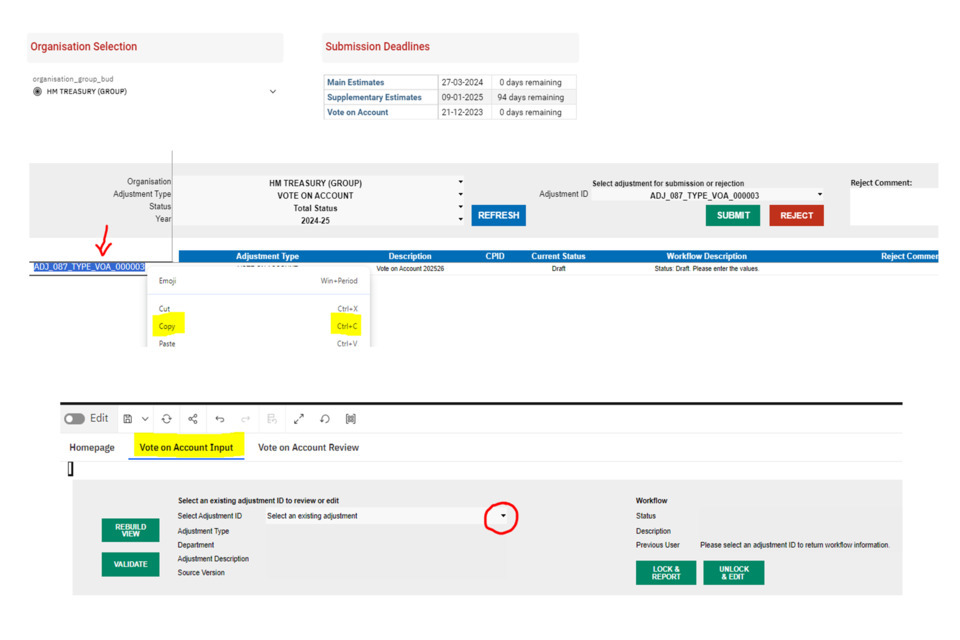
5) Paste the adjustment ID into the box. This should result in the adjustment appearing in the list, highlighted in yellow. You can either press the enter button or click on the adjustment in yellow highlight to select it:
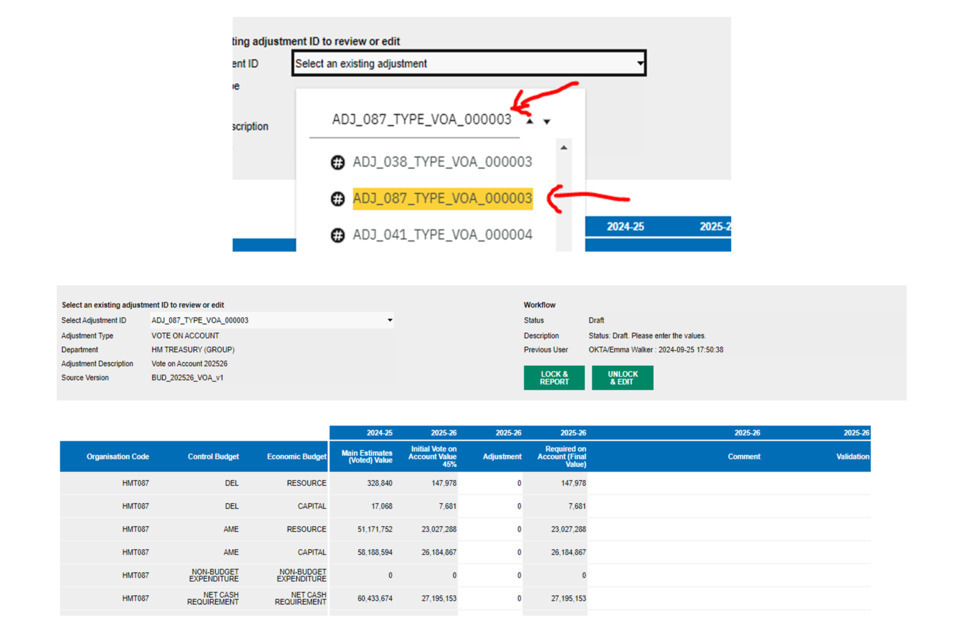
This should then populate the Vote on Account screen with the adjustment. The above adjustment is in draft status, with no additional adjustments added.
This should include (with the 2025-26 VoA publication still as an example):
- Column 1 [2024-25 Main Estimates (Voted) Value]: These are the voted values for Main Estimates 2024-25 (the last available main estimates figures)
- Column 2 [2025-26 Initial Vote on Account Value 45%]: This is a 45% calculation of the amount in the first column for Column 1. If the voted value was negative at Mains estimate, the calculation should result in a 0 value.
- Column 3 [2025-26 Adjustment]: This column is for user input to add any additional budget to the value calculated in Column 2. Note that this will be added/taken from the 45% value, it should not replace the value as a new total.
- Column 4 [2025-26 Required on Account (Final Value)]: This will generate the total amount for the Vote on Account, summing both figures from Column 2 and Column 3.
- Column 5 [2025-26 Comment]: This is an option input box to add a comment to any rows to explain the submission of additional adjustments.
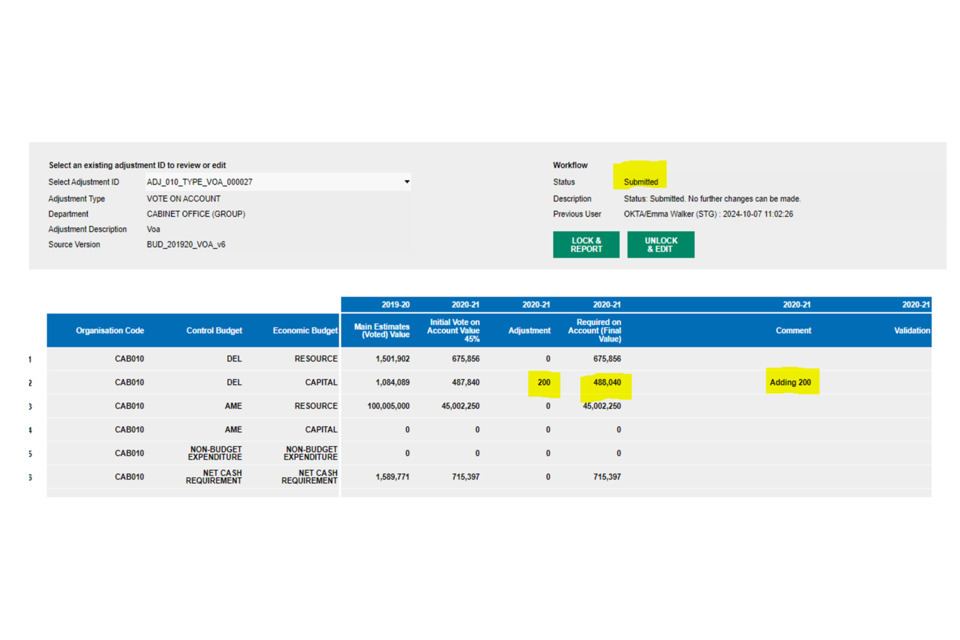
The below is an example based on the STG environment with an adjustment in Submitted status. This means it is waiting for Spending Team approval. 200 was added to the CDEL value, along with a comment. The amount in Column 4 updated to reflect this addition (487,840 + 200 = 488,040). The other columns remained the same as no adjustments were added:
6) Navigate back to the homepage. Your adjustment ID should now also be displaying in ‘Submitted’ status on the homepage. To Submit or Reject the adjustment, following the steps shown in step 6 and 8, copy the adjustment ID and select in the adjustment ID box on the homepage (shown in the screenshot below):
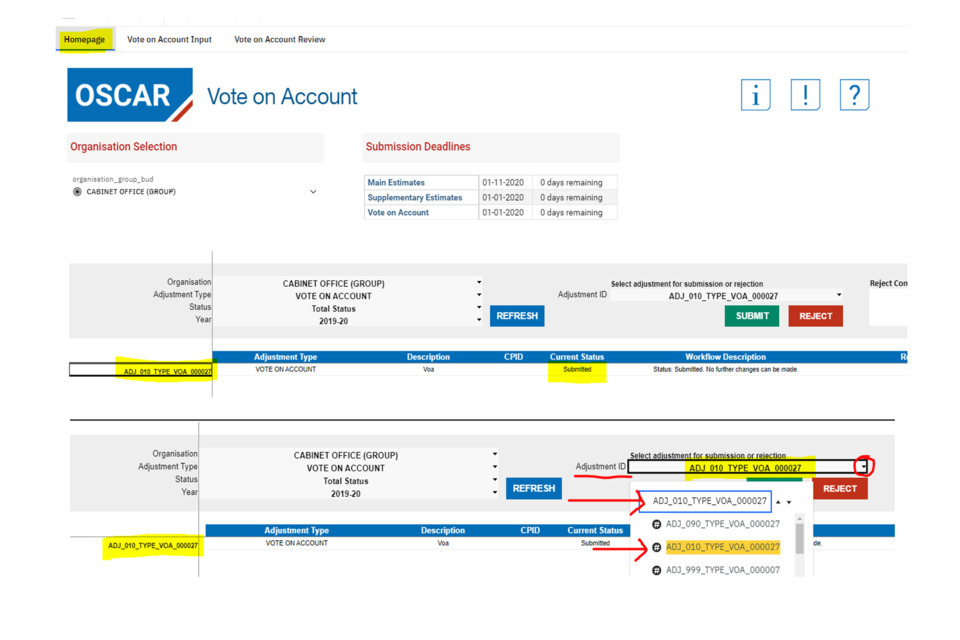
The adjustment ID selected in the box should match the adjustment ID on the homepage that you wish to reject/confirm.
6.1 Rejecting adjustments
7) You should look to reject an adjustment if you believe the submission to be incorrect, or if you know that an edit needs to be made to the adjustment. You should reach out separately to your department contact to explain the rejection, but you can also leave a comment in the following box (highlighted below) to summarise the reason for rejection. Here the comment is ‘Remove the extra CDEL’:

When ready, click the ‘Reject’ button circled above. Click continue, which should be followed by a pop-up message to say that the adjustment has been successfully rejected. The adjustment should now be shown in ‘Rejected’ status with the comment showing to the right hand side.
The department are now able to edit the adjustment, lock it, and resubmit it. At this stage you can then look to either reject the adjustment again, or confirm it.
6.2 Confirming adjustments
8) You should look to confirm the adjustment once you are content to provide Spending Team approval for the VoA adjustment. To confirm an adjustment, follow the steps in step 6 to select the adjustment ID on the homepage. Then click ‘Submit’:
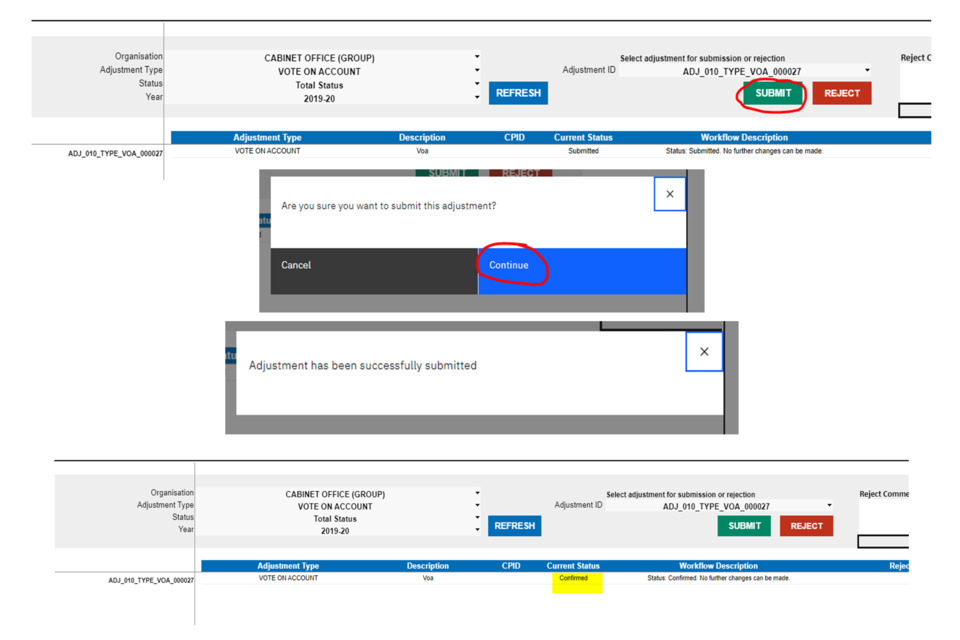
As with rejecting, click continue which should follow with a pop-up message, and result in the adjustment showing as ‘Confirmed’ on the homepage.
Note: if adjustments are required after the adjustment has been confirmed, please contact your usual Estimates advisor to request an update. Confirmed adjustments can only be reopened by the Estimates team.