Individual Vehicle Approval (IVA) for vans and light goods vehicles: help to get a pass
Updated 11 April 2017

© Crown copyright 2017
This publication is licensed under the terms of the Open Government Licence v3.0 except where otherwise stated. To view this licence, visit nationalarchives.gov.uk/doc/open-government-licence/version/3 or write to the Information Policy Team, The National Archives, Kew, London TW9 4DU, or email: psi@nationalarchives.gov.uk.
Where we have identified any third party copyright information you will need to obtain permission from the copyright holders concerned.
This publication is available at https://www.gov.uk/government/publications/individual-vehicle-approval-iva-for-vans-help-to-get-a-pass/individual-vehicle-approval-iva-for-vans-help-to-get-a-pass
Introduction
This guide shows the top 10 failure items DVSA most often sees as part of the light goods vehicle (N1) Individual Vehicle Approval (IVA) inspection:
- Headlamp aim
- General construction
- Statutory plates and Vehicle Identification Number (VIN)
- End-outline, position (side), stop and side marker lamps
- Installation of lamps
- Retro reflectors
- Rear fog lamps
- Brakes
- Direction indicators
- External projections of cabs
This guide tells you:
- how each item is inspected
- what to check before each item is inspected
- the required standard
Full compliance with this guide doesn’t guarantee a pass. You’ll need to view the IVA inspection manual for the full requirements and testing procedures needed to get your vehicle passed.
You must apply for vehicle approval if you’ve:
- built a vehicle
- rebuilt a vehicle
- radically altered a vehicle
- reconstructed a classic vehicle
- imported a vehicle
Vehicles in the N1 category are defined as vehicles designed and constructed for the carriage of goods and have a maximum mass that doesn’t exceed 3.5 tonnes.
Difference between IVA and MOT
IVA inspections are different from the annual MOT test.
The IVA inspection looks at the way your vehicle is constructed or adapted, while the annual MOT test looks at roadworthiness of your vehicle.
Your vehicle might pass the MOT test, but that doesn’t mean it will pass an IVA inspection.
1. Headlamp aim
1.1 How headlamp aim is inspected
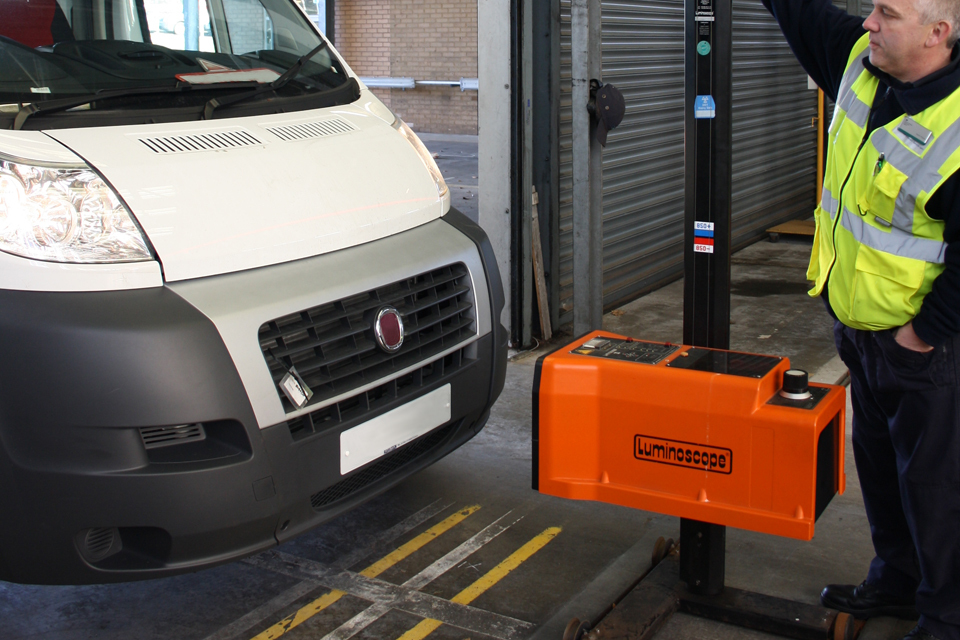
Headlamp aim will be checked using an approved head lamp aim tester.
To check the headlamp aim use an approved headlamp aim tester. As part of the inspection DVSA will check for correct:
- image
- height and horizontal aim
- dipping to the left
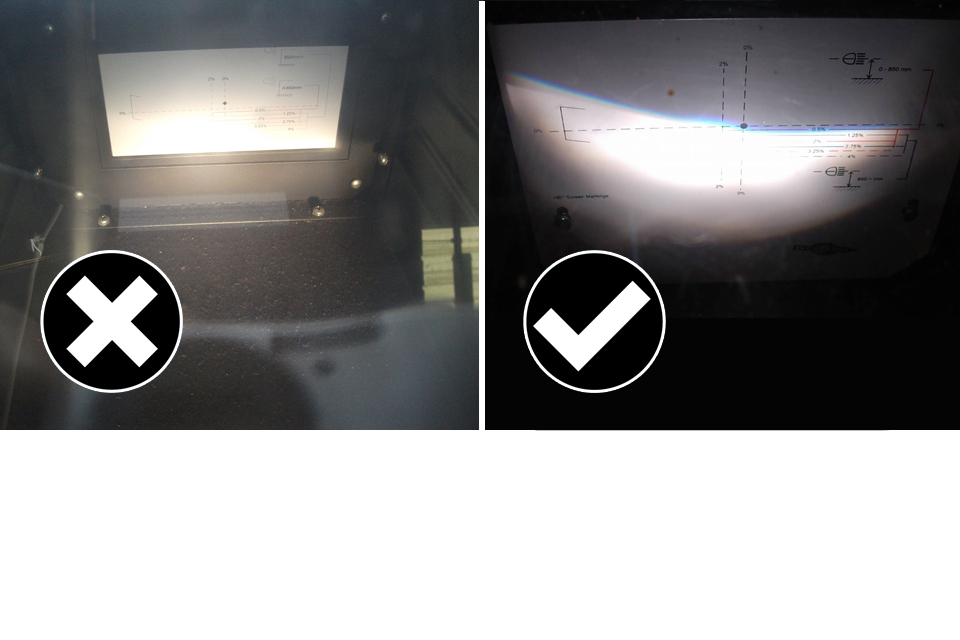
Example of a correct and incorrect headlamp output.
The images above show an incorrect and correct output.
The headlamp aim in the incorrect example doesn’t provide a clear image to allow the headlamp aim to be checked.
The correct example shows what your vehicle needs:
- a good clear image
- has the ‘cut off’ to the left
- correct alignment
1.2 What to check before headlamp aim is inspected
Make sure that your headlamps dip the correct way for driving on the left.
You might need to have headlamps on vehicles imported from countries that drive on the right converted or replaced before the inspection.
Have the headlamp aim checked with a calibrated headlamp aim tester before the inspection.
An MOT station that tests cars, vans and light goods vehicles (class 4/7) can check and adjust the headlamps if you don’t have the equipment.
The IVA inspection doesn’t allow any kind of internal or external ‘masking’ of the headlamp.
1.3 The standard headlamp aim must meet
See section 25 (headlamps) of the IVA inspection manual for the full inspection standard.
2. General construction
2.1 How general construction is inspected
All aspects of design and construction are inspected to make sure that the vehicle is of no danger to the driver, passengers or other road users.
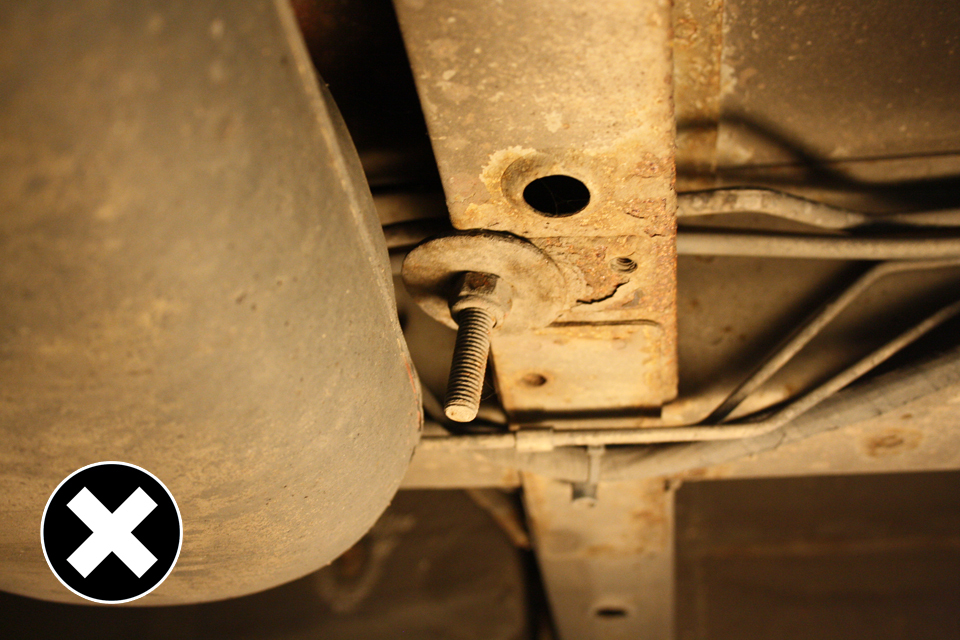
Not allowed: mounting bolt is fitted off centre.
The above image shows a poor standard of design and construction, the mounting bolt is fitted off centre and at an angle.
Not allowed: insecure wiring that will rub through on a metal edge.
The above image shows insecure wiring that will rub through on a metal edge, wiring, piping, cabling etc must be adequately clipped and secured.
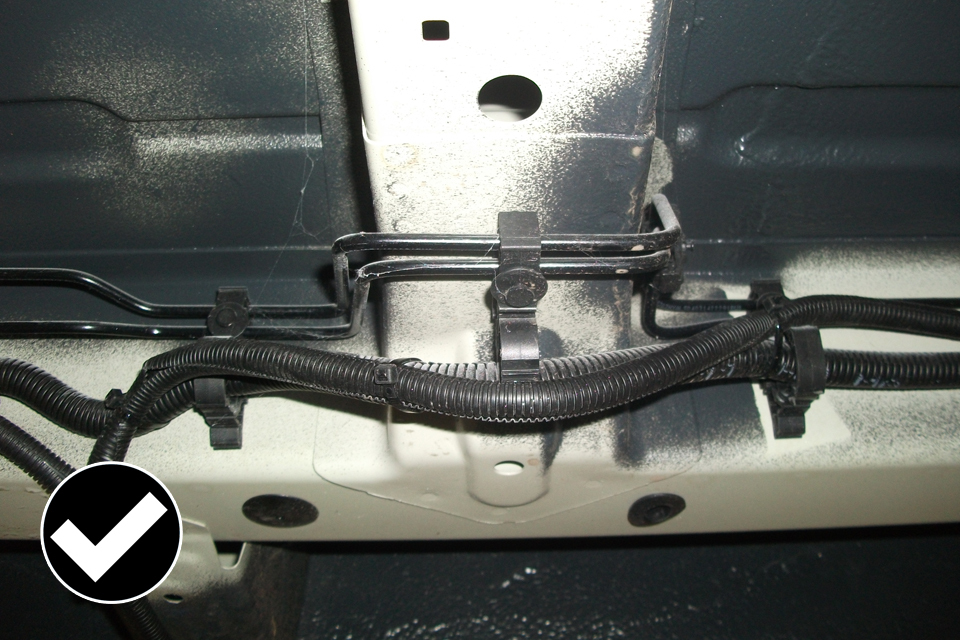
Allowed: what DVSA would expect to find.
This is an image of what DVSA would expect to find. Wiring that is:
- nicely clipped and in “conduit”
- secure and unable to chafe
- pipes clipped and secure
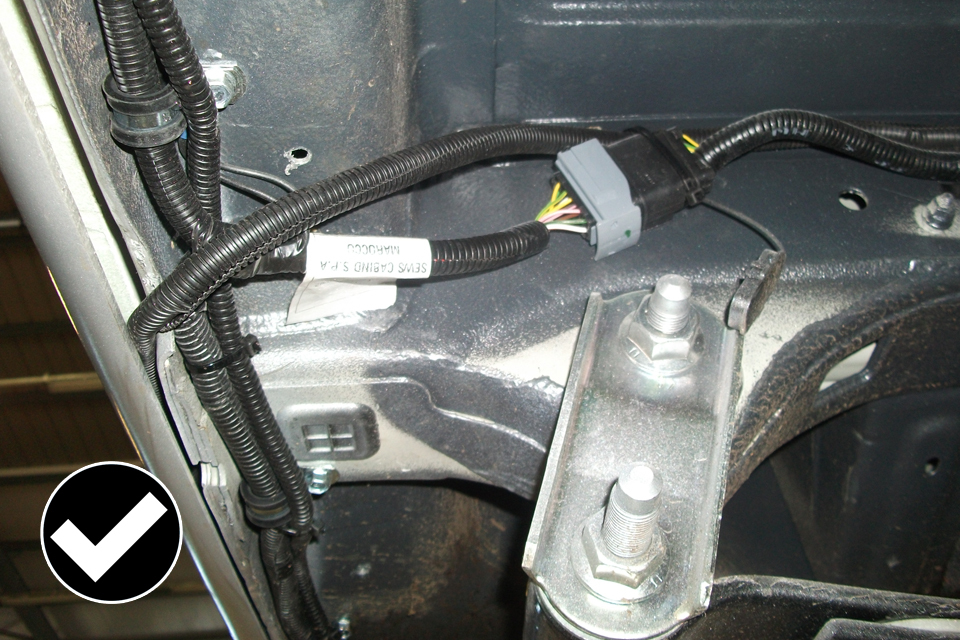
Allowed: what DVSA would expect to find
The above image shows what DVSA would expect to find:
- correct use of fixings for attachment of suspension mountings
- secure wiring, in conduit that is attached to the body as would be expected from a “major manufacturer”
- correct wiring terminals, well insulated from dirt and water
2.2 What to check before general construction is inspected
DVSA will look at how the vehicle is designed and constructed and consider all aspects of the vehicle in all the conditions it will be operated under, this includes:
- speed
- load
- vibrations
- acceleration
- cornering
- braking forces
2.3 The standard general construction must meet
See General Construction section of the IVA inspection manual for the full inspection standard.
3. Statutory plates and Vehicle Identification Number (VIN)
3.1 How statutory plates and VIN are inspected
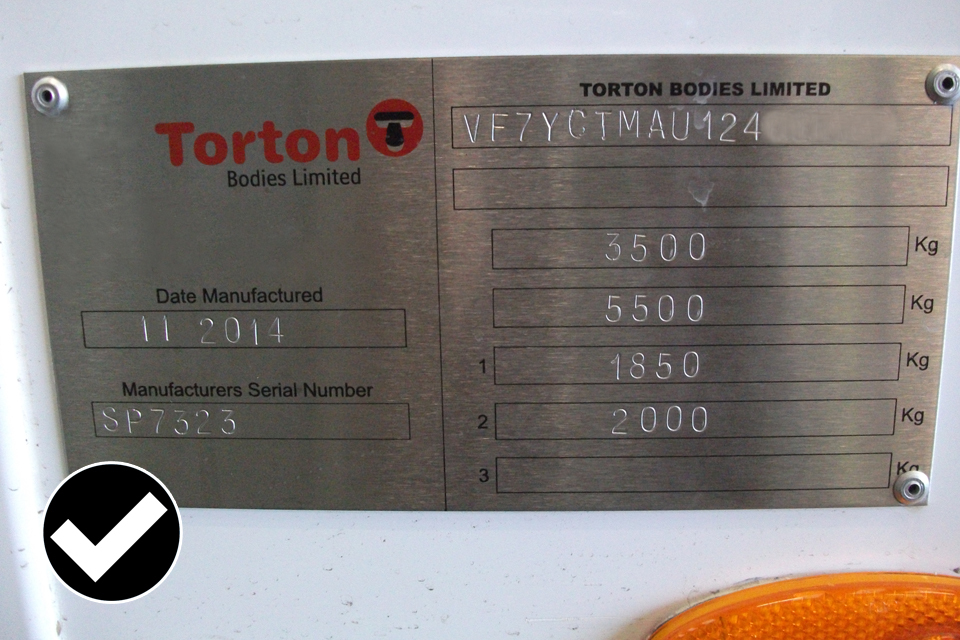
A statutory plate must be fitted for each stage of the build of your vehicle.
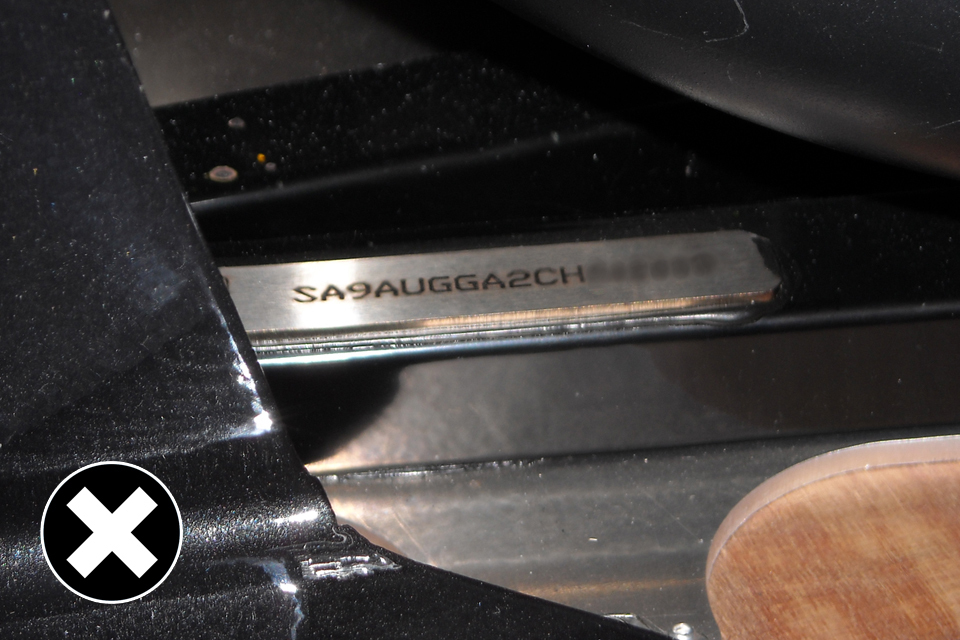
Not allowed: plate needs to be seam welded to the frame/body.
A ‘stamped in’ VIN must be:
- marked on the chassis or frame
- permanent (stamped, hammered, etched)
In the above image the VIN is stamped into a plate that is bonded to a part of vehicle. This isn’t allowed as the plate hasn’t been seam welded to the frame/body.
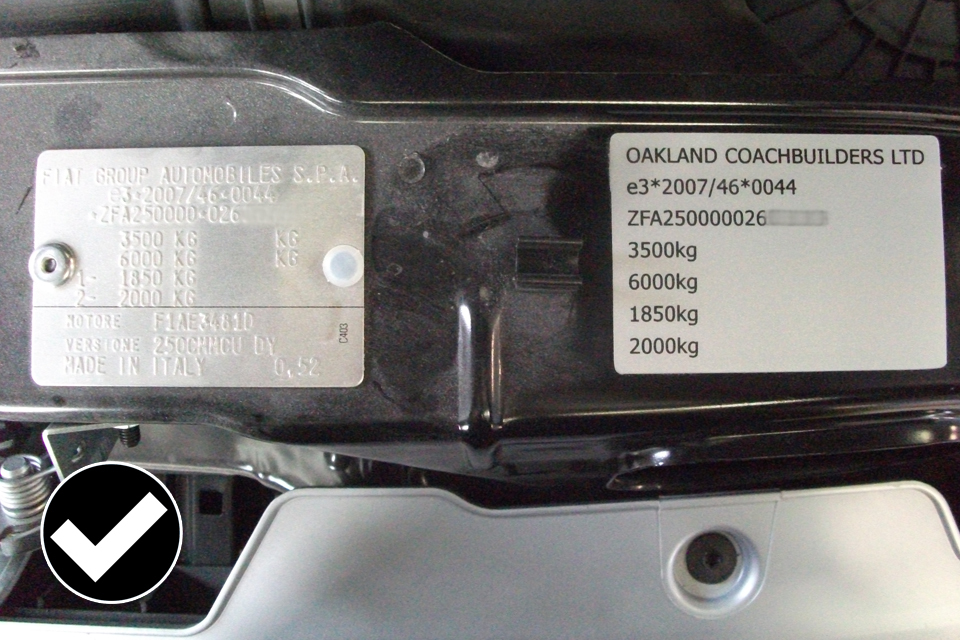
Allowed: first and second stage plates.
This image shows a second stage build. The original stage one plate on the left and the second stage on the right, one riveted in position, and the other stuck on, both are acceptable.
Allowed: second stage plate.
A second stage builder plate - more than the required information is on the plate, but the required information is in a clearly marked separate rectangle.
3.2 What to check before statutory plates and VIN are inspected
The plate must:
- be permanent
- be durable
- contain the required information in the correct order
The only information allowed on the plate must be within a clearly defined rectangle and in the correct order. The order is:
- name of manufacturer
- approval number and/or build stage (if applicable)
- VIN
- maximum permitted laden mass of vehicle
- maximum train weight (if applicable)
- maximum laden mass for each axle in order from front to rear
There may be other information on the plate but this must be outside of the clearly defined rectangle.
3.3 The standard statutory plates and VIN must meet
See section 18 (statutory plates) of the IVA inspection manual for the full inspection standard.
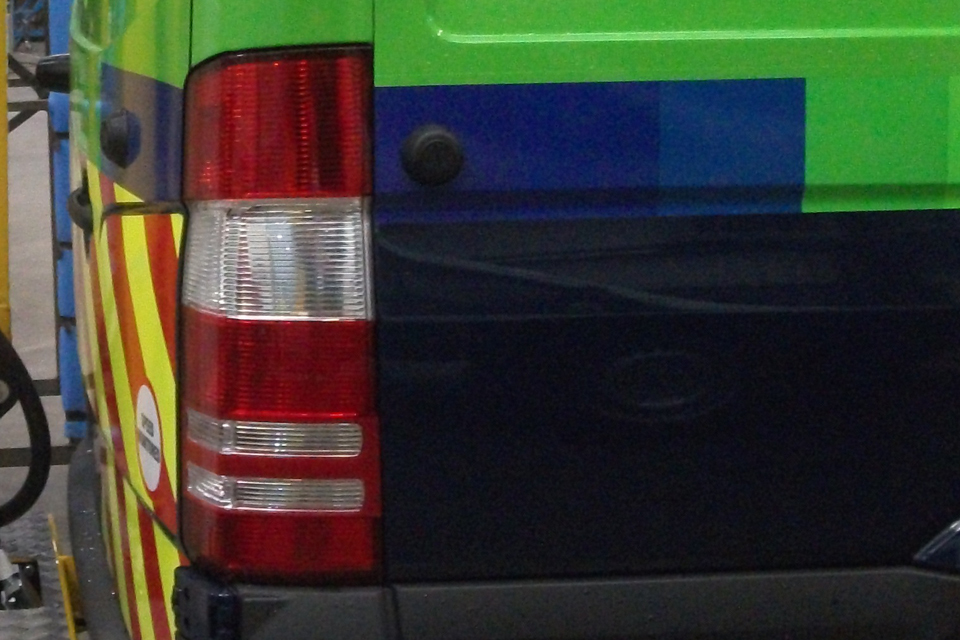
4. End-outline, position (side), stop and side marker lamps
4.1 How End-outline, position (Side), stop and side marker lamps are inspected
This section covers the lamps themselves, refer to section 20 of the IVA inspection manual for angles of visibility.

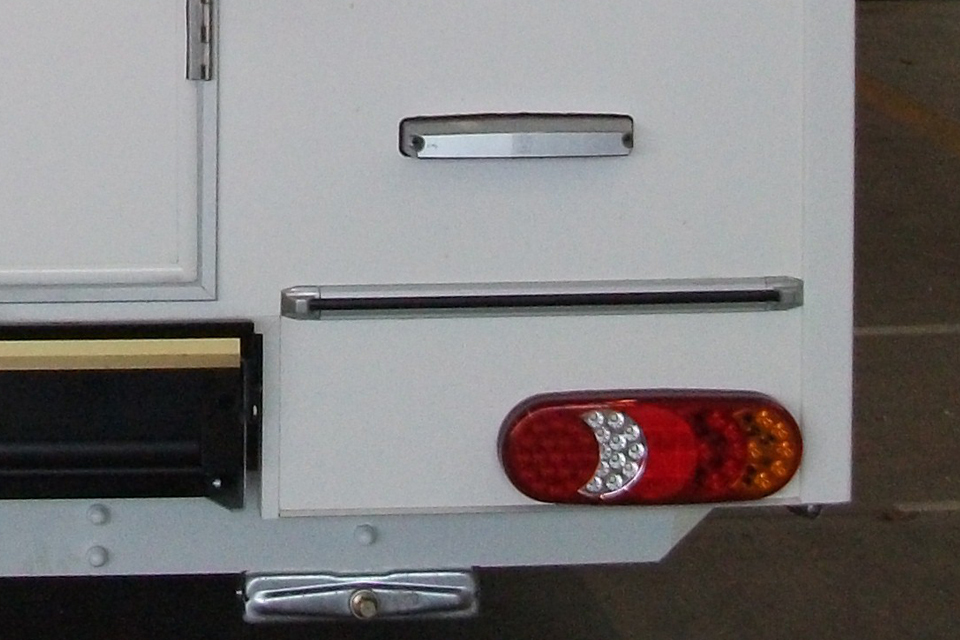
Where a reflector isn't incorporated into a lamp cluster a separate reflector must be fitted.
The image above shows that where a reflector isn’t incorporated into a lamp cluster a separate reflector must be fitted.
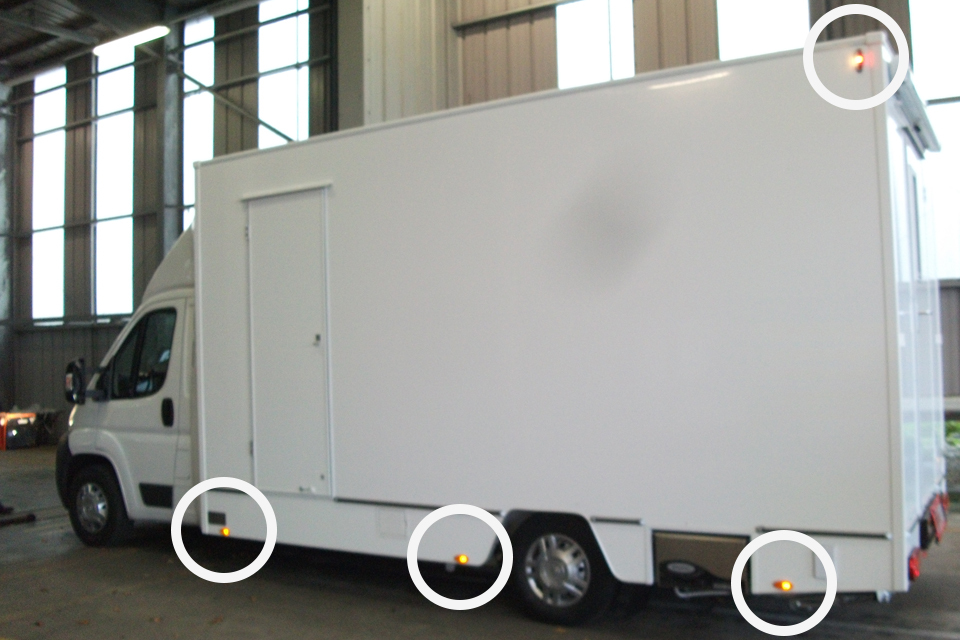
Dependant on lenght and width of the body, side and end out line marked may be required.
Your vehicle will require:
- side outline marker lamps fitted if over 6 metres in length
- end outline marker lamps fitted if over 2.1 metres wide
- side and end outline marker lamps fitted if over 6 metres in length and over 2.1 metres wide
DVSA will check for obstruction of lamps.
The image above shows how DVSA will check for obstruction of lamps by other parts of the vehicle.

Allowed: both front and rear end outline marker lamps may be combined into one lamp.
Above shows that both front and rear end outline marker lamps may be combined in one lamp.
4.2 What to check for before side lamps are inspected
DVSA will check all lamps fitted for correct:
- number
- operation
- colour
- position
Of all:
- position lamps (side)
- stop lamps
- side marker lamps (if required)
- end outline lamps (if required)
- daytime running lamps (if fitted)
All side lamps and the rear registration lamp must be operated by one switch, and have a ‘tell-tale’ fitted.
The tell-tale may be either:
- the instrument panel
- a separate lamp of any colour
There are a minimum and maximum number of lamps that can be fitted. To make sure you meet the requirements refer to the table in section 20 (installation of lamps) of the IVA inspection manual.
4.3 The standard side lamps must meet
See section 22 (side lamps) of the IVA inspection manual for the full inspection standard.
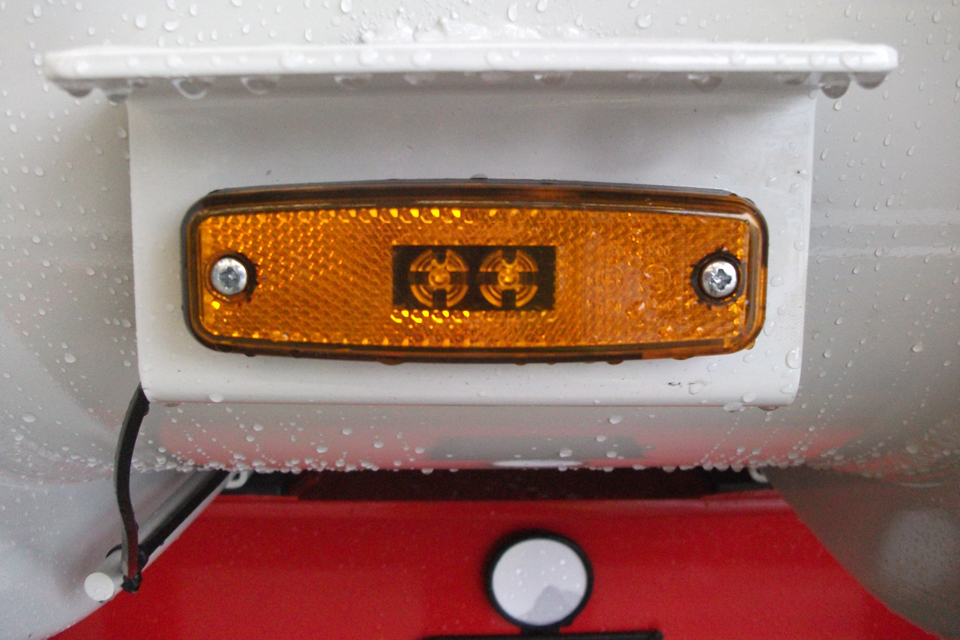
5. Installation of lamps
5.1 How installation of lamps are inspected
All obligatory and optional lamps fitted will be checked. Section 20 of the IVA inspection manual covers lamp installation and must be read in conjunction with sections 21 through to 30.

DVSA will check lamp height and distance from the outer edge of the vehicle.

DVSA will check lamp height and distance from the outer edge of the vehicle.
DVSA will check:
- lamp height
- the distance from the outer edge of the vehicle
Lights fitted to the:
- front must only show white light
- rear must only show red light (the manual gives specifics).

Angles of visibility are checked to make sure that they aren't obstructed.

Angles of visibility are checked to make sure that they aren't obstructed.
As shown in the images above DVSA will use a gauge to check for any obstruction of the angles of visibility by:
- side guards
- doors
- access panels
- tail lift
- other obstructions

Make sure that there are adequate speration between stop and fog lamps.
Where separate lamps are fitted make sure there is adequate separation between the stop and fog lamps.

Lamp cluster that contains a reflector will be marked IA or IB.
Where the lamp cluster contains a reflector it will be marked on the lamp or lens either:
- IA
- IB

Lamps and reflectors must be fitted in the correct orientation.
All obligatory lamps, rear markers and reflectors must be fitted in the correct orientation.
Lamps must be securely mounted.
Lamps must be securely mounted to the same standards as would a mass produced vehicle.
5.2 What to check before lamp installation is inspected
DVSA will check lamps for:
- correct position
- correct number
- colour
- angle of visibility - horizontal and vertical
- approval mark (if) required
You can check for obstructions to lamps and reflectors by movable components, doors, lockers, tail lifts, etc and fixed items such as tow bars etc.
Lights may be partially obscured up to 50% in this way, but reflectors must be visible at all times.
Make sure a reflector is incorporated if you have fitted a lamp cluster from another vehicle – not all lamps contain one.
5.3 The standard lamp installation must meet
See section 20 (lamp installation) of the IVA inspection manual for the full inspection standard.
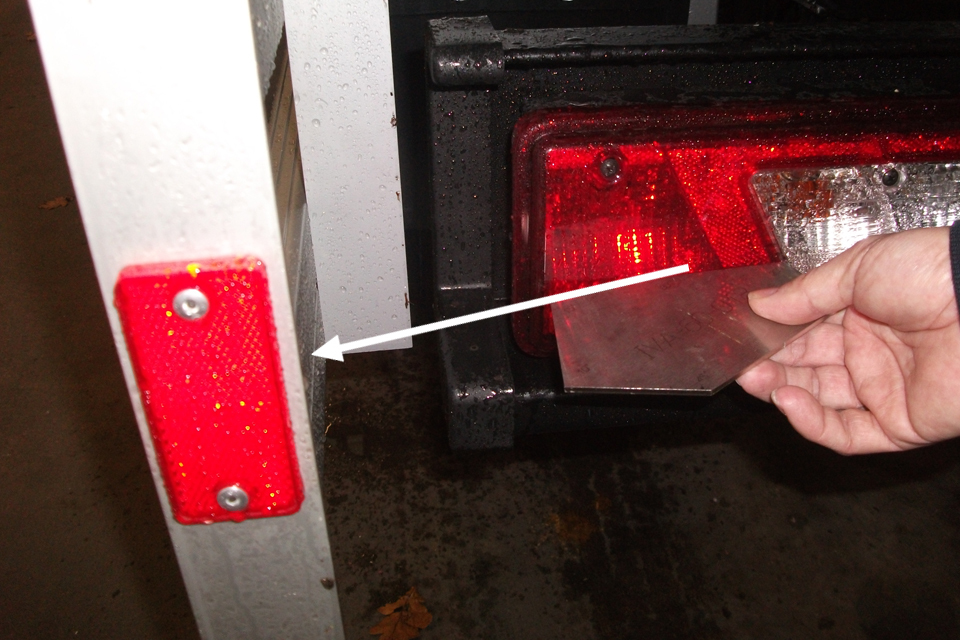
6. Retro reflectors
6.1 How retro reflectors are tested
Vans and other N1 category vehicles require rear reflectors, but don’t require conspicuity markings.

Check that the lamp cluster you're fitting contains a reflector.
Check that the lamp cluster you're fitting contains a reflector.
Check that the lamp cluster you’re fitting contains a reflector.
The lamp cluster will have an identity symbol. Don’t fit lamps that carry the symbols:
- III
- IIIA
- IIIB
The above symbols signify the cluster contains a reflector that is only suitable for a trailer.

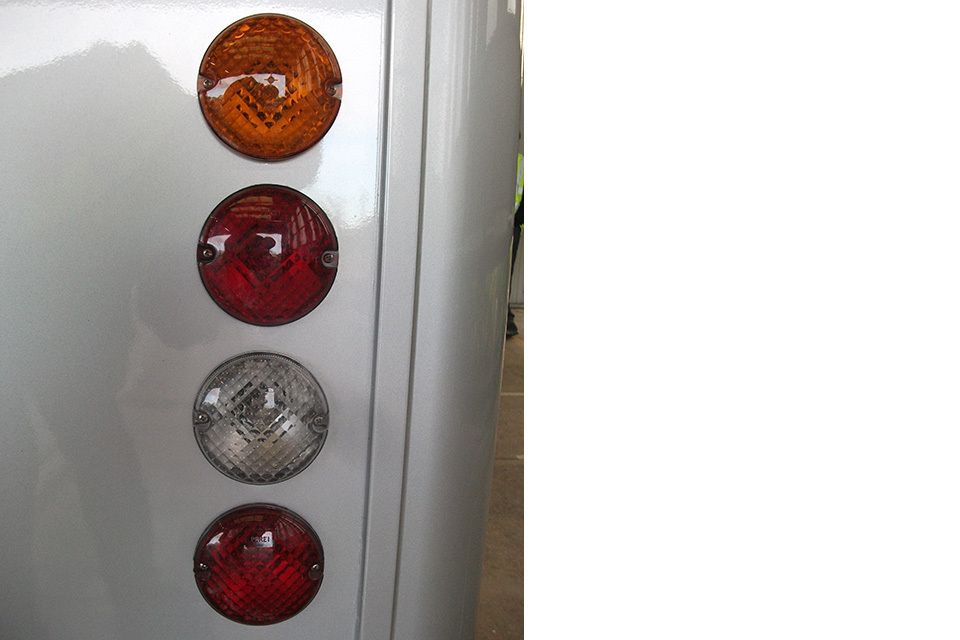
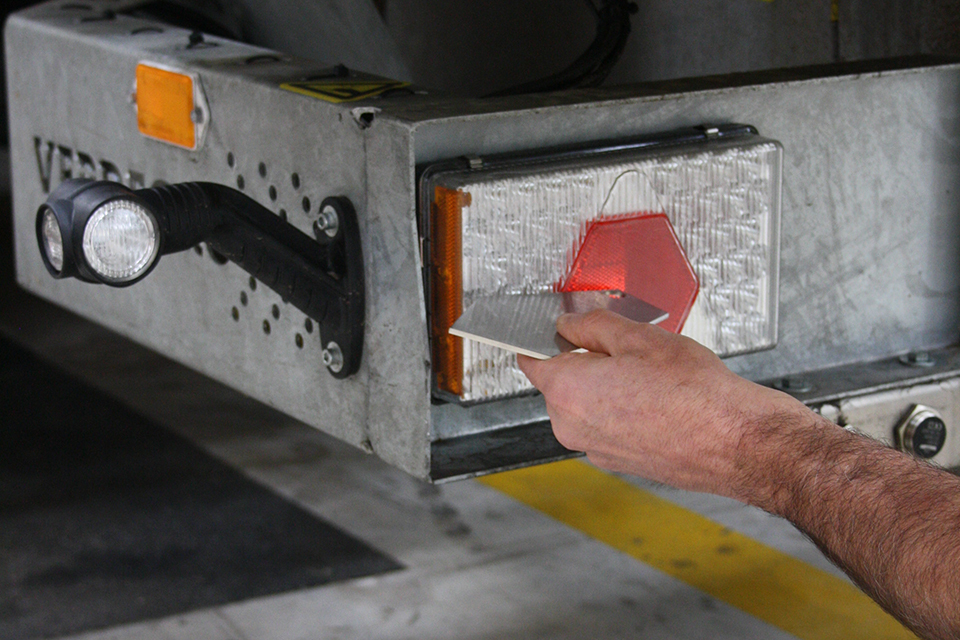
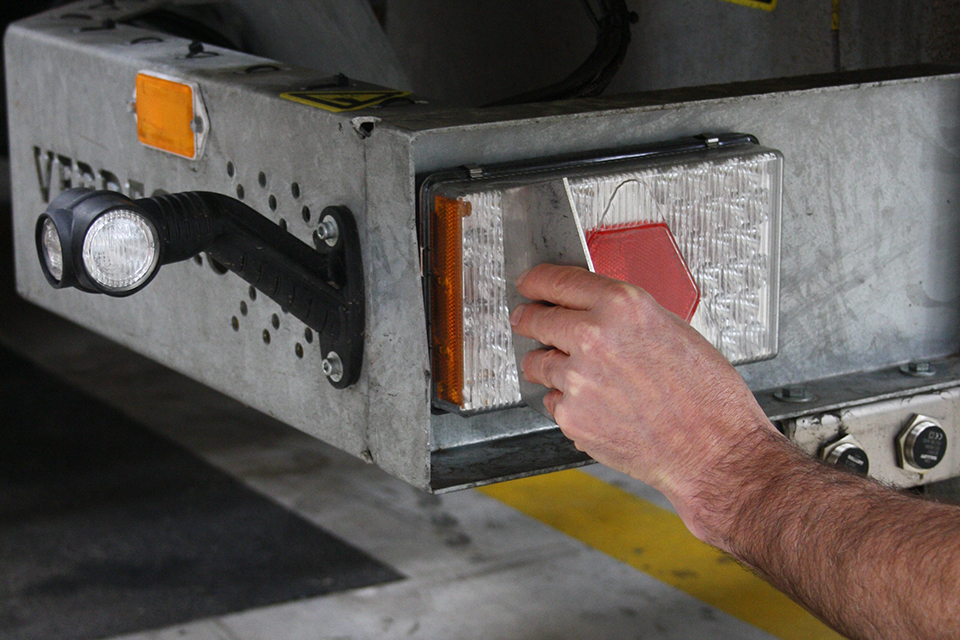
Not allowed: Lamps fitted but no reflector.
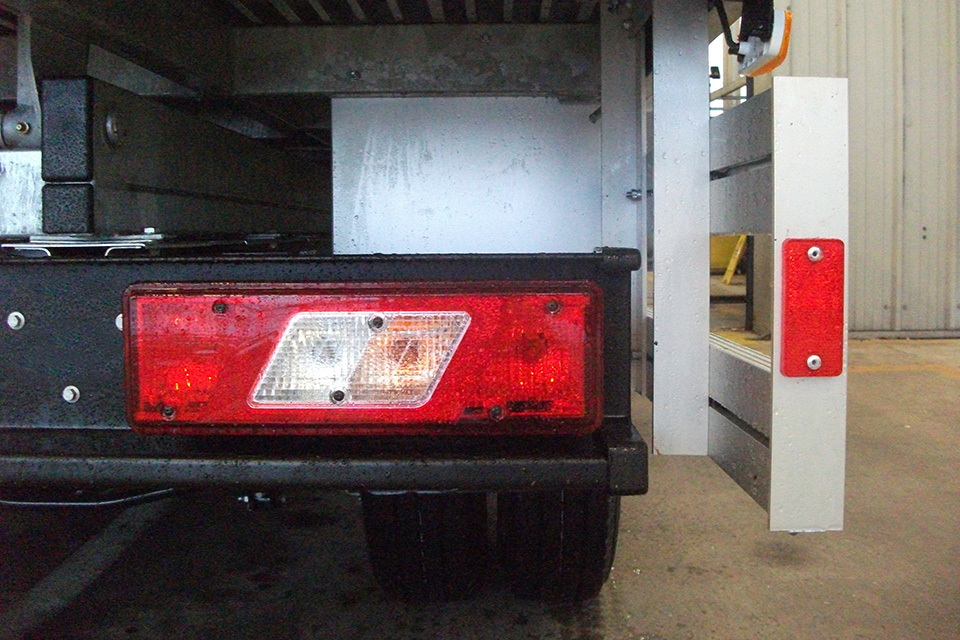
Allowed: lamp doesn't contain a reflector so a separate one has been fitted.
Individual lamps or a lamp cluster may be fitted.
The first image has lamps fitted but no reflector.
The second image the lamp cluster doesn’t contain a reflector, so a separate one will need to be fitted.
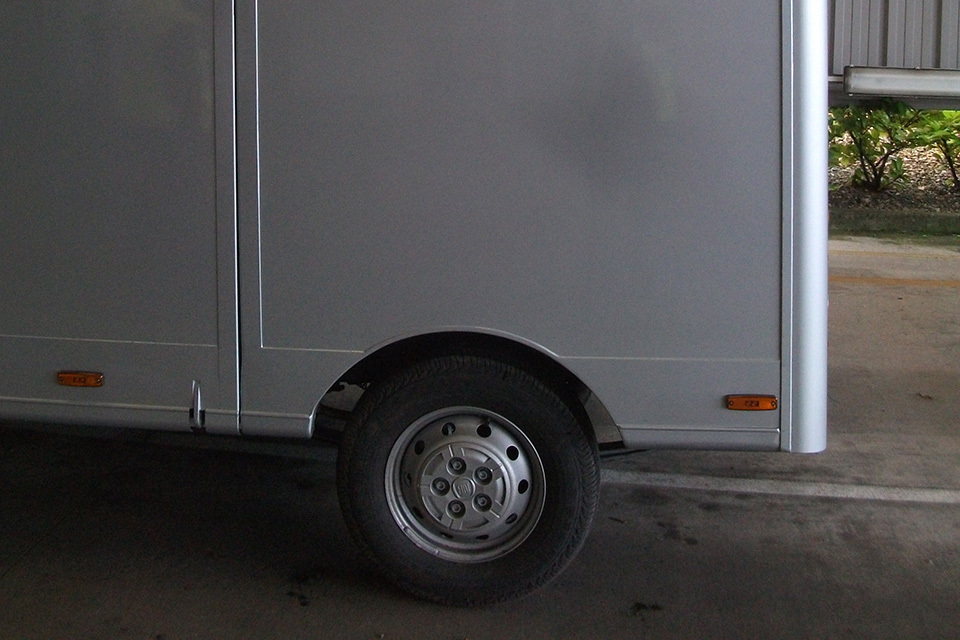
Side and front reflectors are mandatory.
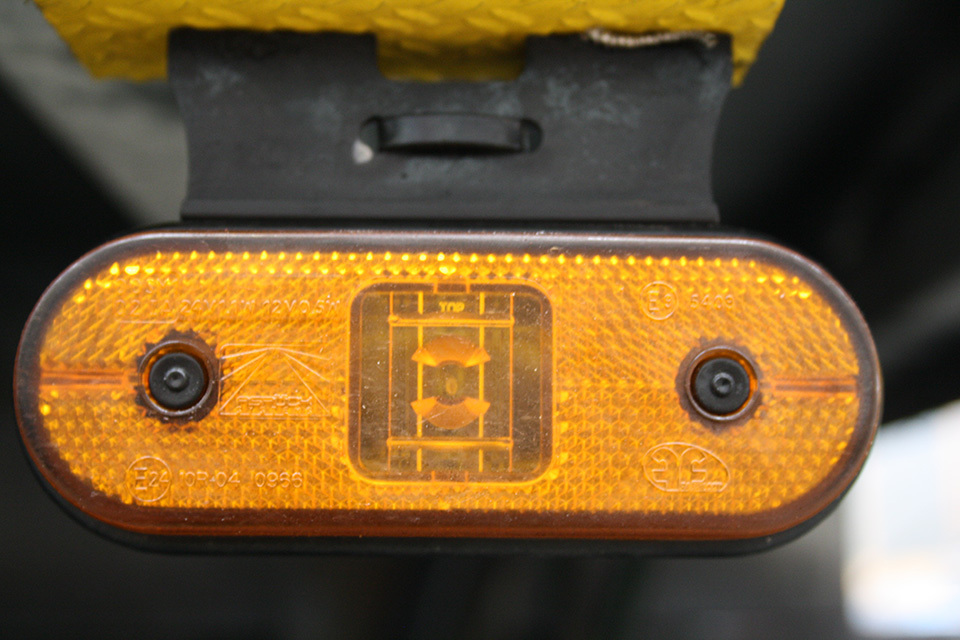
Side and front reflectors can be combined with a side or front marker lamp.
On vehicles over 6 metres in length side reflectors are mandatory.
These can be combined with a side marker lamp.
6.2 What to check before retro reflectors are inspected
The reflector must have similar characteristics’ to an “e” marked component, fit a reflector or lamp cluster that is approved.
Reflectors that are close to triangular in shape are acceptable for motor vehicles if marked with either a:
- I
- IA
- IB
- II
- IIA
- IIB
- IV
- IVA
- IVB
When fitting a lamp cluster from different vehicle, check a reflector is incorporated in it.
6.3 The standard retro reflectors must meet
See section 21 (retro reflectors) of the IVA inspection manual for the full inspection standard.
7. Rear fog lamps
7.1 How rear fog lamps are inspected
Rear fog lamps must be fitted to the centre or offside rear of a vehicle for use in Great Britain.

Example of a correct and incorrect rear fog lamp fitting.
A fog lamp is a focused beam and must be fitted squarely to the rear of the vehicle.
In the image above it shows:
- an example of a fog lamp correctly fitted squarely to the rear of the vehicle
- an example of where the required standard hasn’t been met, as the lamp is fitted at an angle and the beam wouldn’t be focused squarely to the rear

Not allowed: fog lamp not high enough from the ground.
The image above shows that the fog lamp has been fitted at an incorrect height.
DVSA will measure the:
- height from the ground
- distance in from the extreme outer edge of the vehicle

The switch must clearly indicate its use and have an operational tell-tale lamp.
The switch must both:
- clearly indicate its use
- have an operational tell-tale lamp
7.2 What to check before rear fog lamps are inspected
When you’ve imported a vehicle from:
- outside the EU it is likely that it won’t have a rear fog lamp fitted so you will need to fit a rear fog lamp or lamps
- within the EU the light will probably be just on the nearside so will need to fit an additional one to the offside
Where 2 rear fog lamps have been fitted they must be a matched pair and mounted symmetrically.
A rear fog lamp must:
- have insulated wiring, that is secure and fitted through a grommet (where applicable)
- have a switch that is securely fitted
- have a warning system
- only illuminate when dip, main or front fog lamps are lit
- display an ‘e’ or ‘E’ mark with a ‘B’ or ‘F’ (see manual for exemptions)
- ‘e’ or ‘E’ mark means that the lamp is approved and is acceptable in the United Kingdom
- ‘B’ or ‘F’ mark signifies it is a fog lamp
7.3 The standard rear fog lamps must meet
See section 28 (rear fog lamps) of the IVA inspection manual for full inspection standard.
8. Brakes
8.1 How brakes are inspected
DVSA will check the brake system for:
- suitability
- strength
- fittings
- security
- operation
The whole system will be checked for:
- its capability
- how it works
- whether it is strong enough to do the job, this takes into account speed and weight of the vehicle
- brake pipes/hoses that are twisted, kinked, rubbing against another surface and not secured

Not allowed: the brake master cyclinder not mounted on a strong enough structure.
This image shows a ‘brake master cylinder’ that isn’t suitable for a van as it’s of a ‘single line type’.

Not allowed: flexible brake hose rubbing against the suspension arms.
In the image the flexible brake hose is rubbing against the suspension arm. Eventually this hose would rub through and leak.

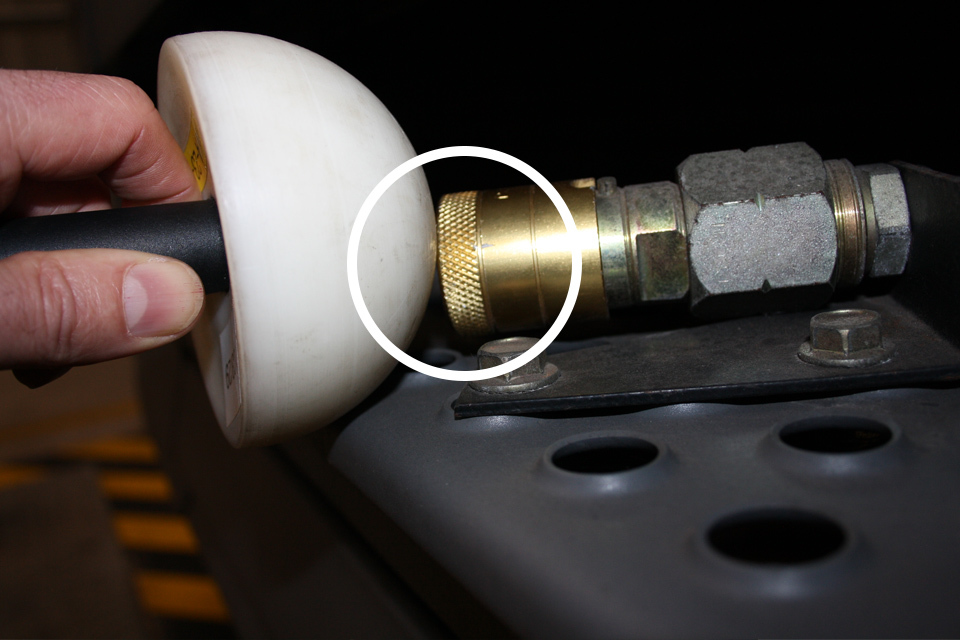
Allow: Indelible label fitted within 100 mm of the master cylinder and indentifies the brake fluid used.
An indelible label must be fitted within 100 mm of the master cylinder that identifies the brake fluid used.

A full brake test will be carried out for most vehicles.
For most vehicles DVSA will carry out full brake tests on rollers of:
- service brake efficiency
- secondary brake efficiency (if possible)
- parking brake efficiency
- servo depleted brake effort
- balance
- grab or judder
- the rate that the brake effort for each wheel increases or decreases
- whether there is little or no effort from any brake wheel
- front to rear brake effort ratio
8.2 What to check before brakes are inspected
You can have the brake efficiency tested at an MOT station before the IVA inspection.
The IVA inspection tests to a different brake performance requirement compared to the MOT but it’ll give you an indication that the brakes work as intended.
To meet the IVA required standard for brake efficiency the brakes on your vehicle must have a:
- minimum service brake efficiency of 50%
- minimum secondary brake performance of 25% (where testable)
- minimum park brake efficiency of 18%
All brake efficiencies are calculated using the design gross weight or the calculated laden weight.
The IVA inspection includes a ‘non servo’ and brake distribution test.
An imported production vehicle should meet the criteria as long as it hasn’t been modified, as should a second stage build that doesn’t alter the stage one braking approval, the vehicle braking system should have been designed to the max weight for the vehicle.
DVSA will check the whole system if the stage one brakes have been modified.
8.3 The standard brakes must meet
See section 09 (brake system) of the IVA inspection manual for the full inspection standard.
9. Direction indicators
9.1 How direction indicators are inspected
DVSA will check the indicators and hazard warning lamps fitted.
Indicators may be separate units or part of a cluster.
Indicators may be separate units or part of a cluster.
Indicators may be separate units or part of a cluster but the same required standards apply. Check the lamps for:
- operation
- correct number fitted
- flash rate
- colour
- positioned correctly
Angles of visibility are checked to make sure that they aren't obstructed.
Angles of visibility are checked to make sure that they aren't obstructed.
DVSA will check the angles of visibility for obstructions both vertically and horizontally.
The angle is always taken from the centre of the illuminated surface.
The angles are given in section 20 of the inspection manual.
9.2 What to check before direction indicators are inspected
Indicators may have a tell-tale that is either:
- audible
- visual
Hazards must have a visual tell-tale.
Hazards must work with ignition switched on and off.
You must fit only the correct number of lamps required.
When a wider than standard body is fitted make sure that the side repeater indicators meet the required angle of visibility.
9.3 The standard direction indicators must meet
See section 23 (direction indicators) of the IVA inspection manual for the full inspection standard.
10. Exterior projections of cabs
10.1 How exterior projections of cabs are inspected
DVSA will look for sharp edges that could cause injury to other road users.
DVSA will inspect the outside of the cab area for any hard parts contactable by the 100mm sphere between the floorline and two meters from the ground.
Anything that the sphere contacts will need radiusing to 2.5mm if it either:
- forms an external surface
- protrudes more than 5mm
Unmodified mass produced vehicles (cabs) shall be considered to meet the standards.

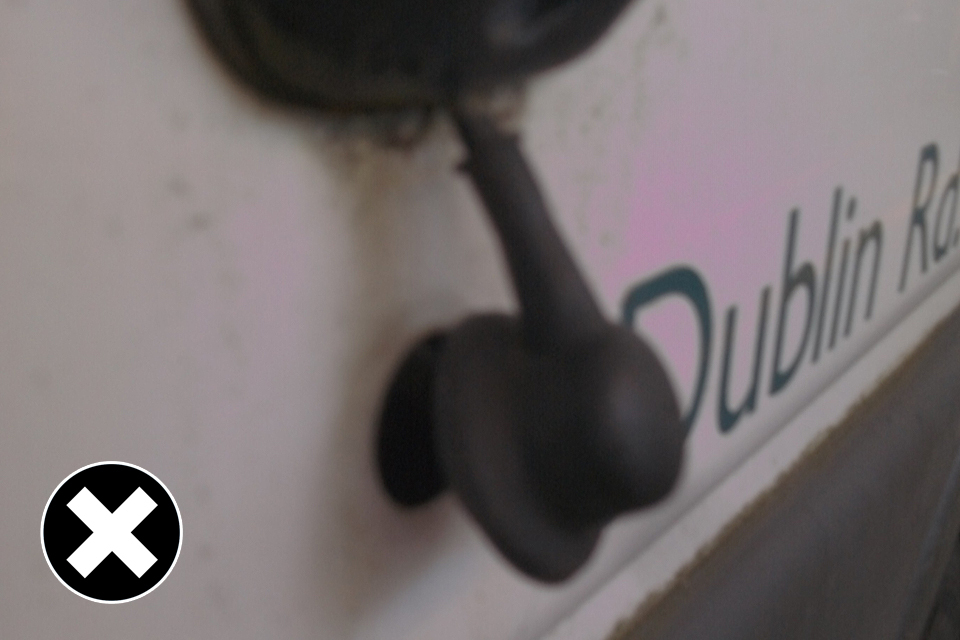
A projection is visible.
In the image above it shows that a projection is visible.
Projection contacted by the 100mm sphere.
In this image it shows that the projection is contacted by the 100mm sphere.

Measured with a radius gauge of 2.5 mm and it’s found not to comply.
In this image it shows that when measured with a radius gauge of 2.5 mm it’s found not to comply.
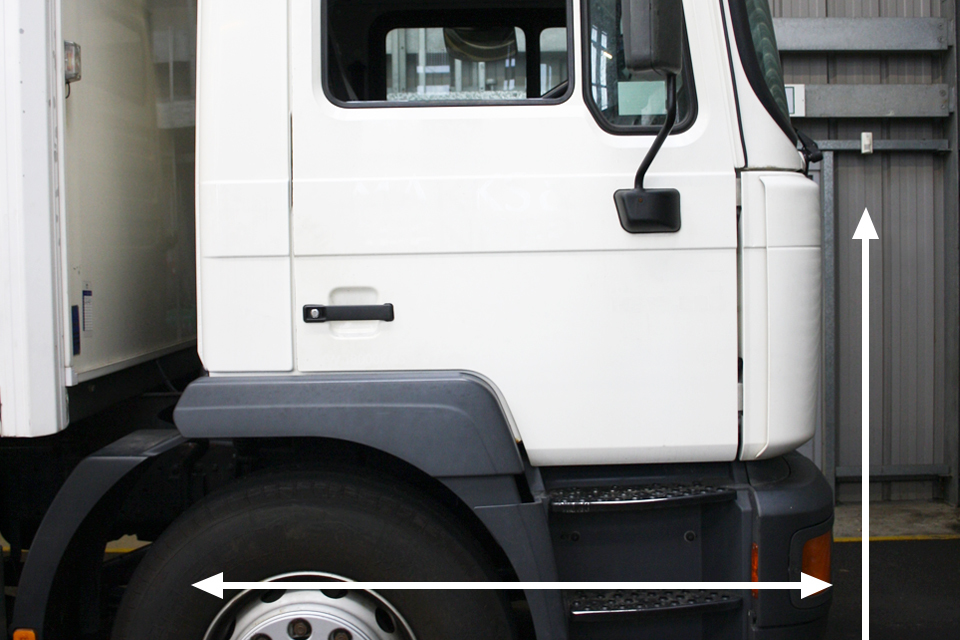
Front and side of the cab are inspected.

Front and side of the cab are inspected.
DVSA will inspect only the front and side of the cab area. DVSA won’t inspect:
- anything to the rear of the cab
- anything above two meters from the ground
10.2 What to check before exterior projections are inspected
DVSA uses a 100 mm sphere to assess the exterior. Anything that is contactable is checked with a radius gauge.
Any hard part that the sphere touches must be ‘radiused’ to at least 2.5 mm or any items that project:
- more than 5mm needs to ‘radiused’ to 2.5mm
- less than 5mm needs to be blunted
A sharp edge may cause a pedestrian an injury, whereas a ‘radiused’ or a blunt edge/corner may cause less of an injury.
Check the exterior of the vehicle by look and touch to see what you think may cause injury. This is what DVSA will look for.
Second stage builders building on a chassis cab with a Statement of Compliance that don’t add or alter the cab will retain stage 1 vehicle approval. Items that are added to the exterior of the cab must comply with the Required Standards.
10.3 The standard exterior projections must meet
See section 49 - exterior projections of the IVA inspection manual for the full inspection standard.