Commercial vehicles: maintain brake automatic slack adjusters
Updated 19 November 2021

© Crown copyright 2021
This publication is licensed under the terms of the Open Government Licence v3.0 except where otherwise stated. To view this licence, visit nationalarchives.gov.uk/doc/open-government-licence/version/3 or write to the Information Policy Team, The National Archives, Kew, London TW9 4DU, or email: psi@nationalarchives.gov.uk.
Where we have identified any third party copyright information you will need to obtain permission from the copyright holders concerned.
This publication is available at https://www.gov.uk/government/publications/automatic-slack-adjusters-maintenance-guide/how-to-maintain-automatic-slack-adjusters
1. Overview
Brake slack adjusters compensate for wear in both the brake lining and the brake drum. An automatic slack adjuster eliminates the need for in-service manual adjustment.
Any fitting, maintenance, or assessment should be carried out only by suitably trained and competent technicians. If in any doubt you should refer to the component manufacturer for more information. It’s particularly important to follow manufacturer’s instructions during the installation process.
2. Vehicles that require automatic slack adjusters
Automatic slack adjusters must be fitted to:
- motor vehicles first used from 1 April 1995
- trailers manufactured from 1 April 1995
Automatic slack adjusters do not need to be fitted to trailers licenced in Ireland before 1 June 2011.
Automatic adjustment to compensate for wear is required on all axles of the following vehicles:
- buses and coaches with more than 8 passenger seats
- heavy goods vehicles
- trailers over 3.5 tonnes
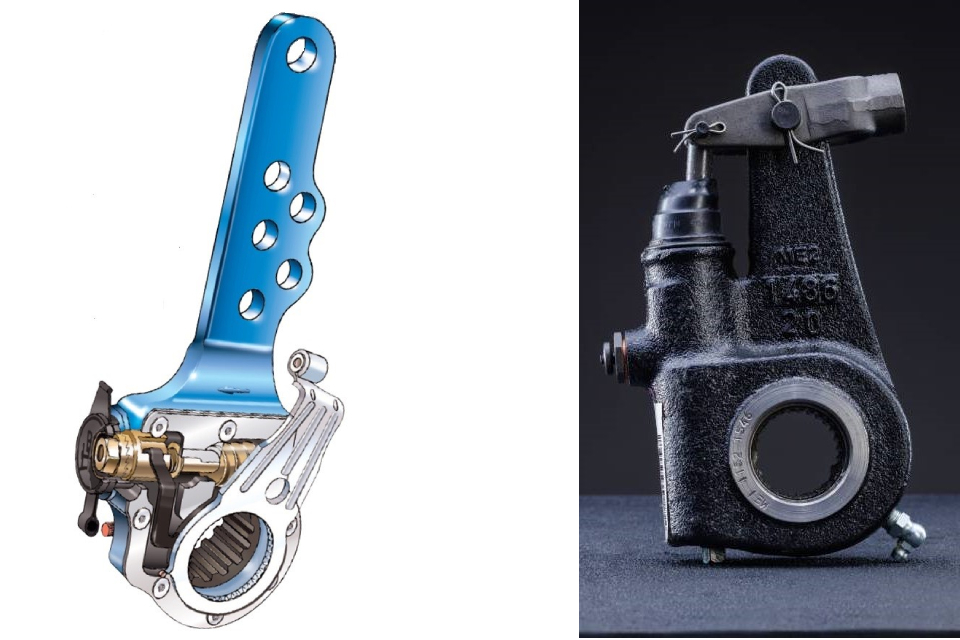
3. Types of automatic slack adjuster
There are 2 types of automatic slack adjuster:
- clearance sensing
- stroke sensing
It’s important to recognise the type of automatic slack adjuster that you are dealing with, as they are installed and maintained differently. As shown in the pictures below, it may not be immediately obvious which type of adjuster you are dealing with.
3.1 Clearance sensing adjusters
Clearance sensing adjusters work by maintaining a nominal distance or clearance between the brake lining and the drum.

Clearance sensing adjusters manufactured by Haldex and Bendix.
3.2 Stroke sensing adjusters
Stroke sensing adjusters work by maintaining a constant optimum stroke of the brake actuator or cylinder pushrod.
Stroke sensing adjusters manufactured by BPW and Meritor.
If your automatic slack adjuster only works by manual adjustment, it is not functioning as an automatic slack adjuster and will not comply with the requirements.
4. Maintaining your automatic slack adjusters
Automatic slack adjusters are subject to wear, so you should check them regularly and replace them when necessary.
4.1 Regular checks
During every maintenance inspection, you should check:
- brake actuator travel
- control arm and bracket condition
- free movement and return
- wear and end float
- lubrication
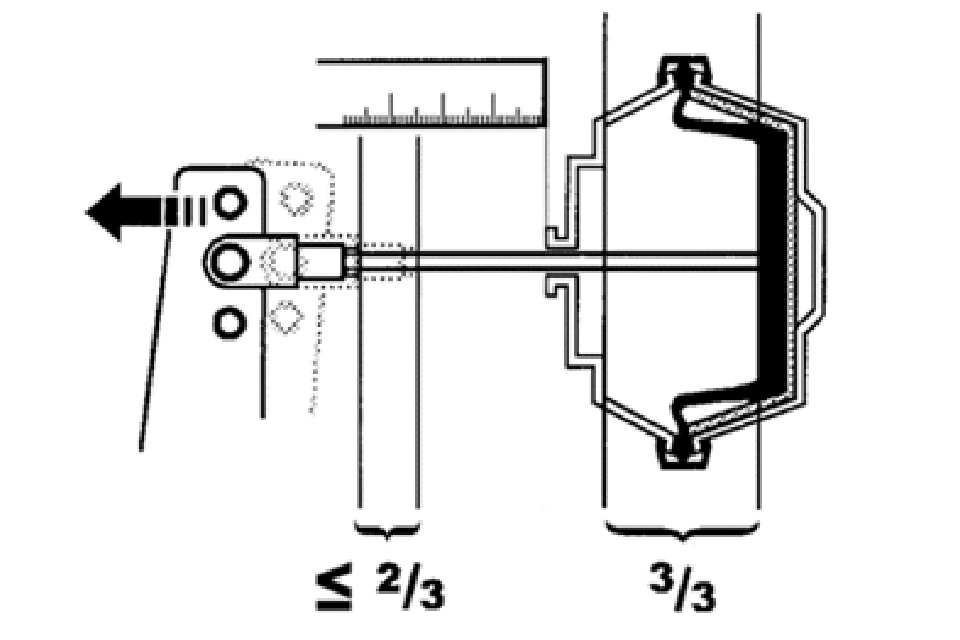
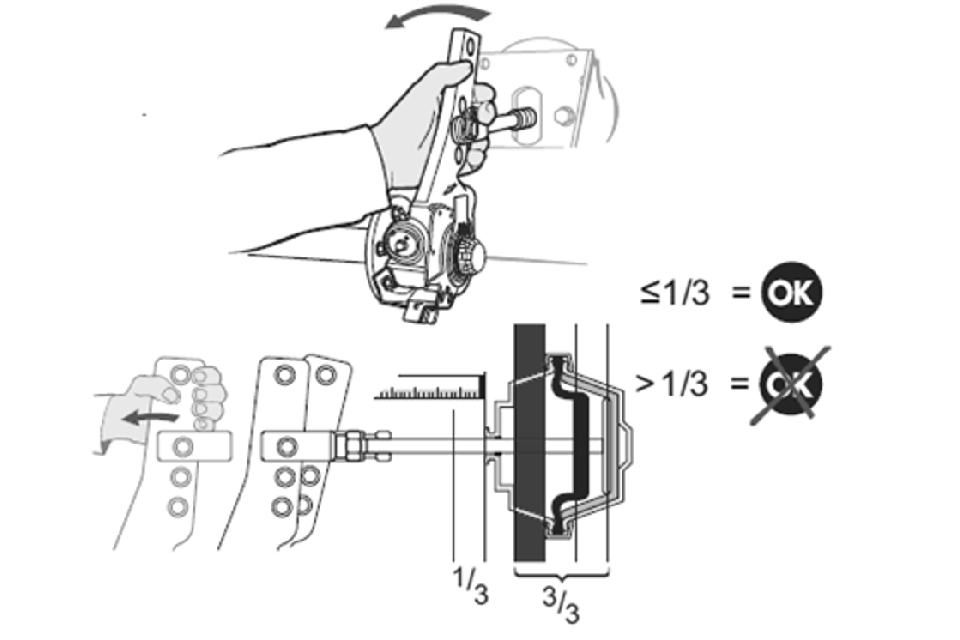
4.2 Checking brake actuator travel
Check the brake actuator push rod stroke to see if it’s within the manufacturer’s recommended tolerance. Use a ruler or tape measure to measure the distance from the front of the actuator to a point on the slack adjuster push rod.
As a rough guide, the stroke should not exceed 2 thirds of the maximum stroke of the actuator when the service brake is fully applied.
Maximum stroke length is determined by the size of the brake chamber. A typical Type 30 brake actuator will have a maximum working stroke of approximately 50mm, whereas a typical Type 24 brake actuator will have a maximum working stroke of approximately 45mm. Check the manufacturer’s information to confirm.
If it’s not within tolerance, the automatic slack adjuster may be incorrectly set up, malfunctioning, or there may be an issue with other related brake components.
If the actuator push rod travel is within tolerance, you should not manually adjust the brake.
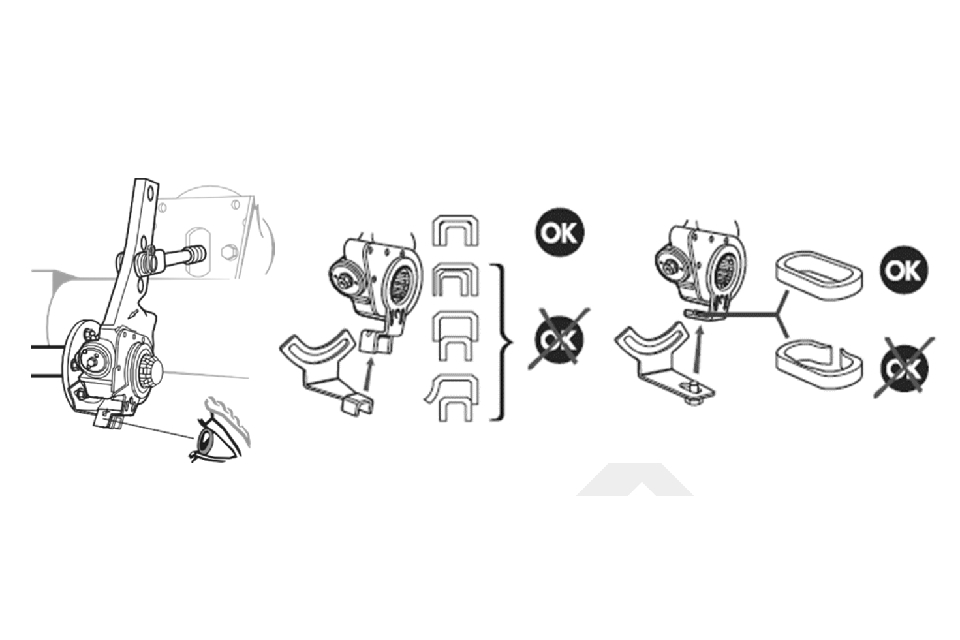
4.3 Checking the condition of the control arm and bracket
Check the control arm bracket and yokes (if fitted) for:
- cracks
- bending
- broken bolts
These may indicate that the adjuster has either been incorrectly fitted or the camshaft bearing is worn.
4.4 Checking for free movement and return
Check that the adjuster has free movement and returns fully without any fouling. If the adjuster does not return fully, automatic adjustment will not take place.
4.5 Checking for end float and wear
Check if the camshaft is moving lengthwise, (this is called ‘end float’), and for any wear - both should be minimal.
You should do a visual check to check if float or wear is excessive. If you do need to measure, use a dial test indicator gauge or feeler blades. End float should not be more than 0.5mm.

4.6 Lubricating the slack adjuster
Grease the slack adjuster until clean grease is emitted (unless it is of the sealed type) and lubricate the clevis pin whilst ensuring that it moves freely within the yoke.
4.7 Annual checks
Each year, you should check:
- the condition of the mechanism
- the operation of the mechanism
- final reset
4.8 Checking the condition of the mechanism
Slacken off the adjustment screw with a torque wrench.
The unit should be replaced if:
- the torque required to do this is below 18 Nm (this setting may vary depending on the manufacturer)
- you do not hear any clicking
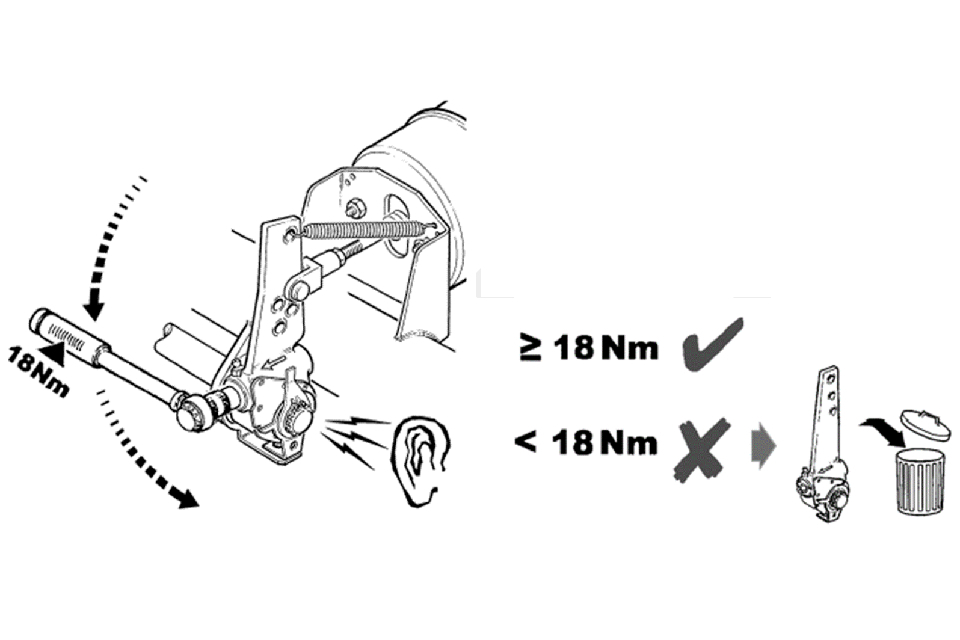
Some adjusting screws include a coupling sleeve, which you must keep depressed by using the spanner or socket during rotation. You can damage internal components if you don’t do this. There’s no torque setting for this type of adjusting screw, and you won’t hear any clicking.
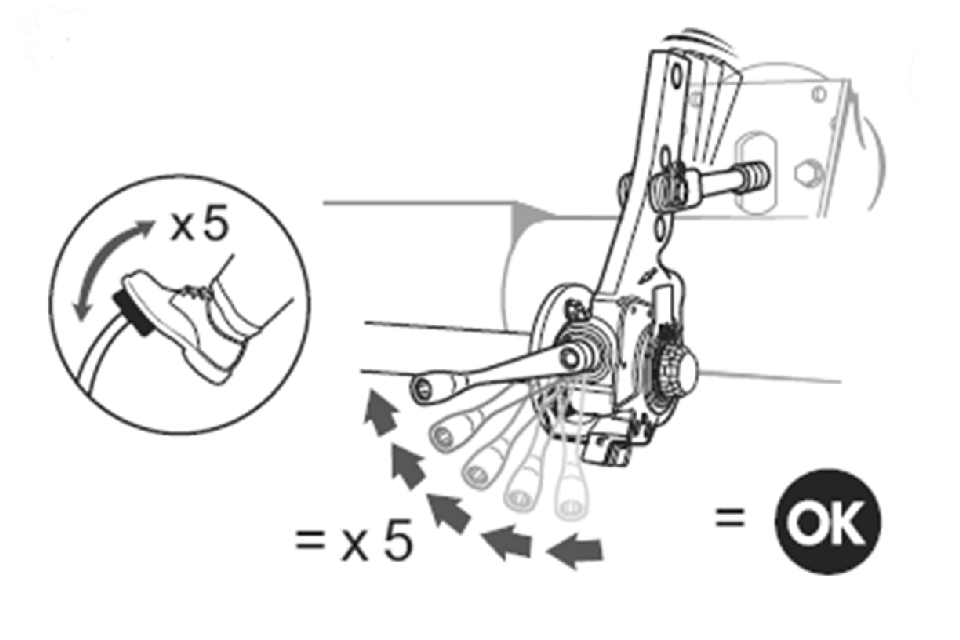
4.9 Checking the operation of the mechanism
Use a spanner to slacken off the adjustment screw 3 quarters of a turn.

Leave a spanner on the unit and either:
- apply the brakes 5 times
- move the adjuster manually 5 times
Observe the clockwise movement of the spanner with each stroke until no further adjustment takes place.
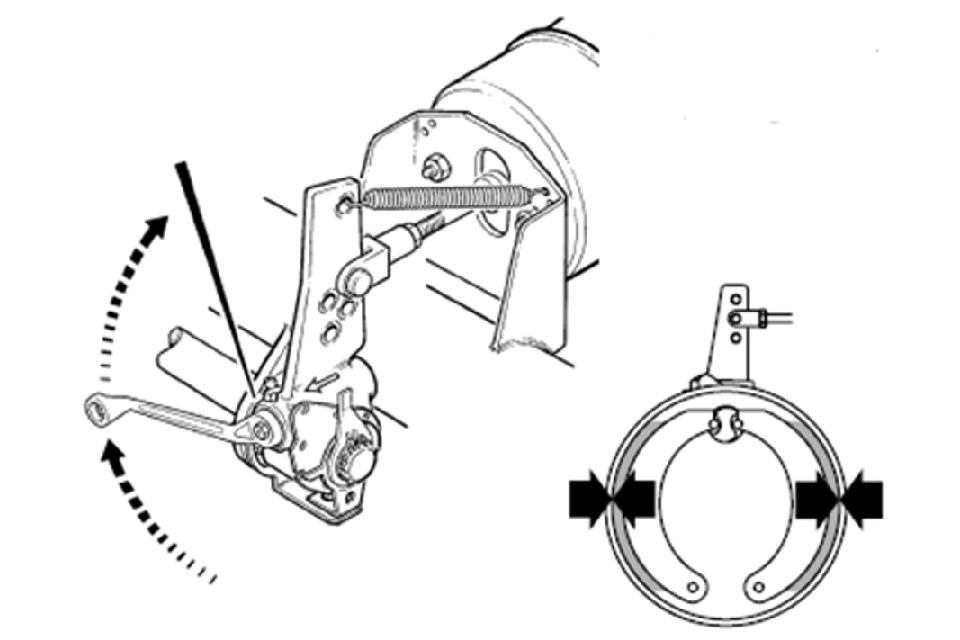
4.10 Doing a final reset
Do a final reset of the brake by tightening the adjustment screw until the brake shoes contact the drum and then slacken off by a half to 3 quarters of a turn - check with the manufacturer for the exact amount.
How to do a final reset.
There must be some ‘free travel’ of the stroke when the brake is manually applied to permit automatic adjustment. This should not be more than a third of the maximum stroke of the actuator.
Some manufacturers do not recommend the final reset of the brake by this method but instead recommend repeated application of the brake until no further automatic adjustment takes place and then checking the free travel or the working stroke as appropriate.
The stroke should be equal on both sides of any axle. If they require manual adjustment, you should replace them. Adjusters that ‘over-stroke’ should also be replaced.
Protective cap
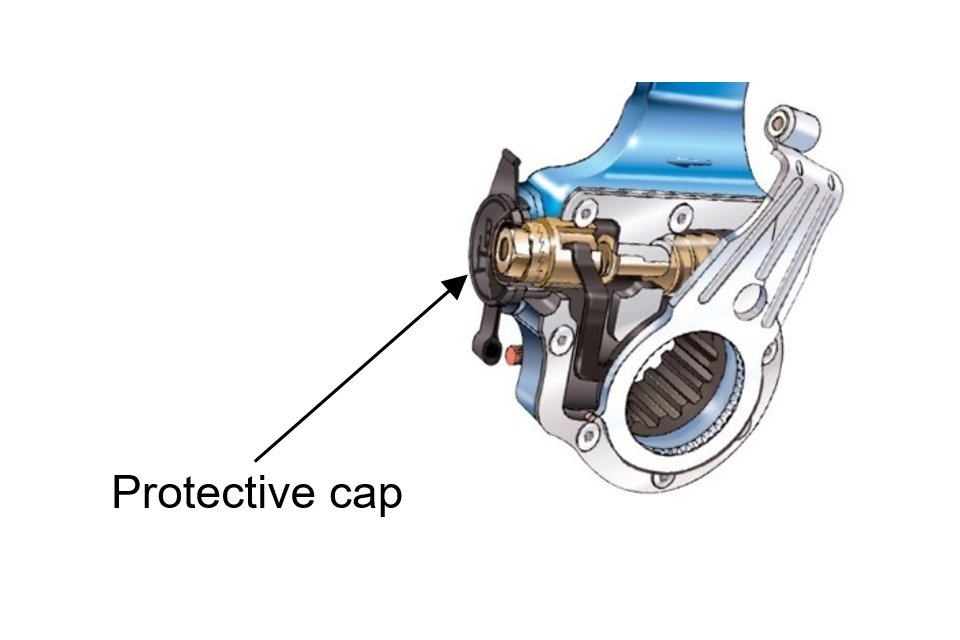
Some manufacturers incorporate a protective cap over the adjuster which has to be removed before adjustment. This must be re-fitted after adjustment, or contaminants may enter the adjuster mechanism.
5. Common mistakes
There are 2 common mistakes when it comes to automatic slack adjuster maintenance:
- a lack of general lubrication
- unnecessary manual adjustment
5.1 Unnecessary manual adjustment
Automatic slack adjusters should never need to be manually adjusted in service.
Repeated manual adjustment can cause premature wear of the internal components and lead to early failure. However, you might need to manually adjust your slack adjuster when you:
- install it
- repair your brakes
- perform overhaul procedures, such as relines
Automatic slack adjusters should not be manually adjusted to correct excessive pushrod stroke.
Excessive pushrod stroke indicates that there is a problem with either the automatic adjuster, with the installation of the adjuster, or with other related brake components, which manual adjustment will not fix.
6. Specific manufacturers information
There may be other checks that are relevant for your specific model of automatic slack adjuster. You can get more information about installing and maintaining it from the manufacturer: