
Finding fingermarks with shortwave ultraviolet radiation
Published 31 January 2024

© Crown copyright 2024
This publication is licensed under the terms of the Open Government Licence v3.0 except where otherwise stated. To view this licence, visit nationalarchives.gov.uk/doc/open-government-licence/version/3 or write to the Information Policy Team, The National Archives, Kew, London TW9 4DU, or email: psi@nationalarchives.gov.uk.
Where we have identified any third party copyright information you will need to obtain permission from the copyright holders concerned.
This publication is available at https://www.gov.uk/government/publications/finding-fingermarks-with-shortwave-ultraviolet-radiation/finding-fingermarks-with-shortwave-ultraviolet-radiation
Forensic units commonly utilise radiation from longwave ultraviolet (UVA) to infrared (320-1000 nm). UVC radiation (100-280 nm) is less frequently utilised, mainly due to health and safety concerns, but appropriate control measures within the laboratory environment can address these concerns.
UVC radiation is different to longer wavelengths. It is more strongly scattered by surface features (including some fingermarks) and does not penetrate into the material - and so surface patterns can disappear and transparent material can appear opaque.
As well as differing absorption properties between some organic and inorganic materials, you can exploit these unique interactions between UVC radiation and an item or surface to provide an effective method for visualising marks (Forensic Photography: A Practitioner’s Guide) [1].
UVC imaging techniques have been applied in forensics since the 1990s and scene portable Reflected Ultraviolet Imaging Systems (RUVIS) are commercially available (but not widely used in the UK). The Defence Science and Technology Laboratory (Dstl) are exploring and monitoring imaging technologies, which include handheld and portable devices.
The Arrowhead Forensics Full Spectrum Imaging System (FSIS) II (figure 1), is an example of a UVC imaging capability. It can capture high quality images from UV to infrared (IR) in reflection or fluorescence modes.
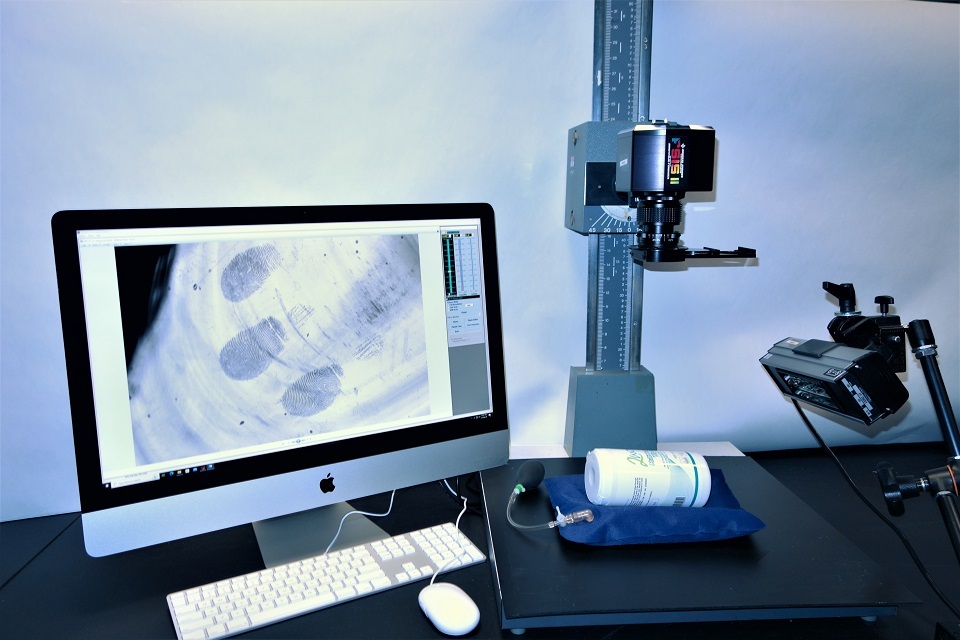
Figure 1: FSIS II equipment within the Dstl fingerprint research laboratories
To improve visualisation the FSIS II system provides an ‘integration’ function within the image capture software. This tool helps the user to build an evenly illuminated image, regardless of whether the surface is flat, curved (for example, a drinks can) or crinkled (for example, a plastic bag). It reduces the issues around radiation angular dependence, which is even harder to get right for non-visible wavelengths compared to visible ones.
The FSIS II system transforms the ability to quickly search items and then capture an evenly illuminated image of the area. Figure 2 (latent marks) and figure 3 (Superglue-enhanced marks) show images captured using the integration function. In both cases, interference from printing has been significantly reduced. Contact areas, which contain good quality marks, have also been captured. The images took just a few minutes to set up, illuminate and capture.
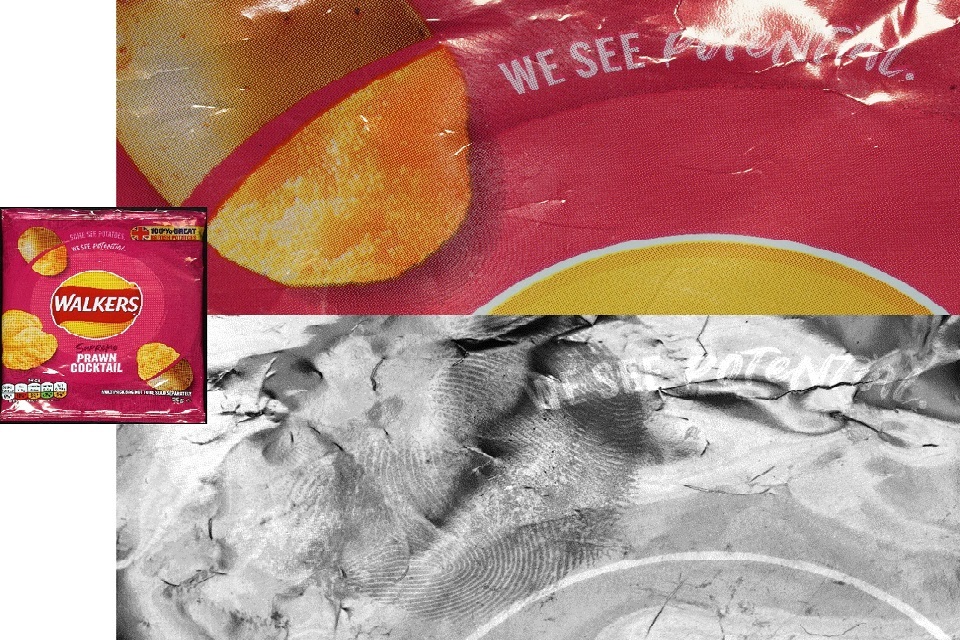
Figure 2: Reflected UVC image of latent marks on a crisp packet captured with FSIS II (bottom). For comparison, an image captured with white light is also shown (top)
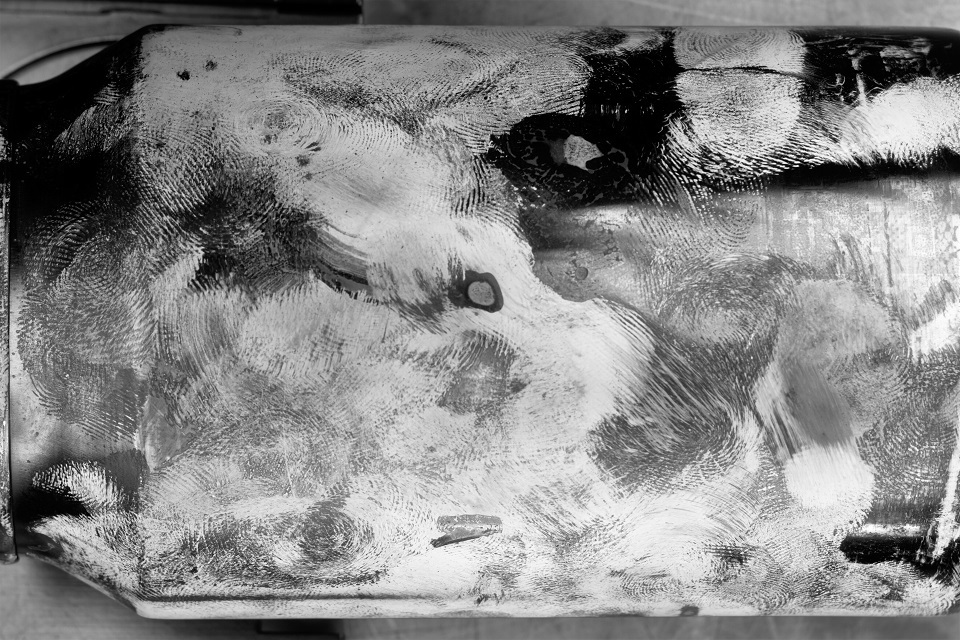
Figure 3: Reflected UVC Image of superglue-enhanced marks on a coke can captured with FSIS II. The UVC radiation is scattered extremely well by the 3D nature of the polymer deposit and the ridge detail is not obscured by background patterns.
Next steps for exploring UVC
Evaluating UVC imaging devices for fingermark visualisation requires assessing their effectiveness to find marks across a range of scenarios and determining usability, which includes any health and safety concerns. Avoiding exposure to eyes and skin is essential because UVC radiation is extremely hazardous. The initial focus of our work has been establishing safe working procedures that allow for an effective process.
The next steps are to determine where the process offers the most benefit. From a substrate perspective, we already know that UVC imaging (in reflection mode), as well as UVA and visible examinations, generally yield best results on smooth, non-porous surfaces. This is due to their reflective properties. Early studies also demonstrate the benefit in looking more broadly at other substrates.
References
[1] Marsh, Nick, 2014, Forensic Photography: A Practitioner’s Guide, Wiley Blackwell, ISBN 978-1-1199-7582-3