Submit and manage your filings
Updated 22 November 2021

© Crown copyright 2021
This publication is licensed under the terms of the Open Government Licence v3.0 except where otherwise stated. To view this licence, visit nationalarchives.gov.uk/doc/open-government-licence/version/3 or write to the Information Policy Team, The National Archives, Kew, London TW9 4DU, or email: psi@nationalarchives.gov.uk.
Where we have identified any third party copyright information you will need to obtain permission from the copyright holders concerned.
This publication is available at https://www.gov.uk/government/publications/how-to-use-the-hmcts-e-filing-service/submit-and-manage-your-filings
1. Before you start
Before using this guide, please visit our main guidance page on the HMCTS E-Filing service for citizens and professionals. This explains:
- what the E-Filing service is
- what you need to know before you start
- what happens after you have submitted a filing
- other ways to submit filings (if you cannot use the E-Filing service)
- how to get further advice and support
To use the E-Filing service, you’ll need to make sure that you have all your documents and information to hand. This includes:
1. digital versions of anything you wish to send to HMCTS:
- court or tribunal forms
- evidence in support of a claim
2. your payment details
- credit or debit card
- help with fees reference number
- Payment by Account (PBA) number (for legal professionals)
If you experience any technical issues, please email efilesupport@justice.gov.uk.
2. Create a filing
If you are applying for help with fees, please contact the court before you create a filing.
Select a court and case type
1. Select ‘Create Filing’ and choose from the dropdown lists on each field. You must complete all fields. Each field is only selectable when the fields above it are complete.
- Court – the court where your case or claim is being heard
- Filing category – either a new case or an existing case
- Matter number – this is only for legal professionals and is the firm’s internal reference number (you will not see this option if you are not represented)
- Case category – the categories of case dealt with by the court you have selected
- Case type – the groups of similar cases, such as appeals or applications
- Case subtype – the specific type of case, for example the exact appeal, application or claim
- Filing type – the groups of similar filings, such as an application form
- Filing subtype – the specific type of filing, for example the named form
2. If you are creating a filing for an existing case, you will need the case number. There is information on the screen about the case number format. You must make sure you have selected the correct court for the case number to be recognised.
3. Once all fields are complete, select ‘Save & Next’.
Image – create a filing for a new case:
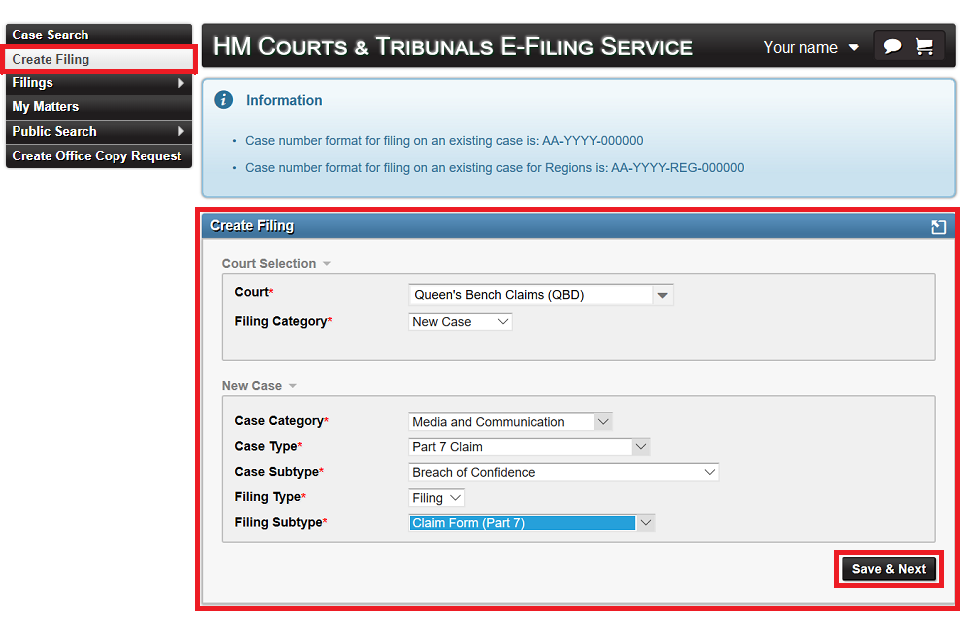
Image – create a filing for an existing case:
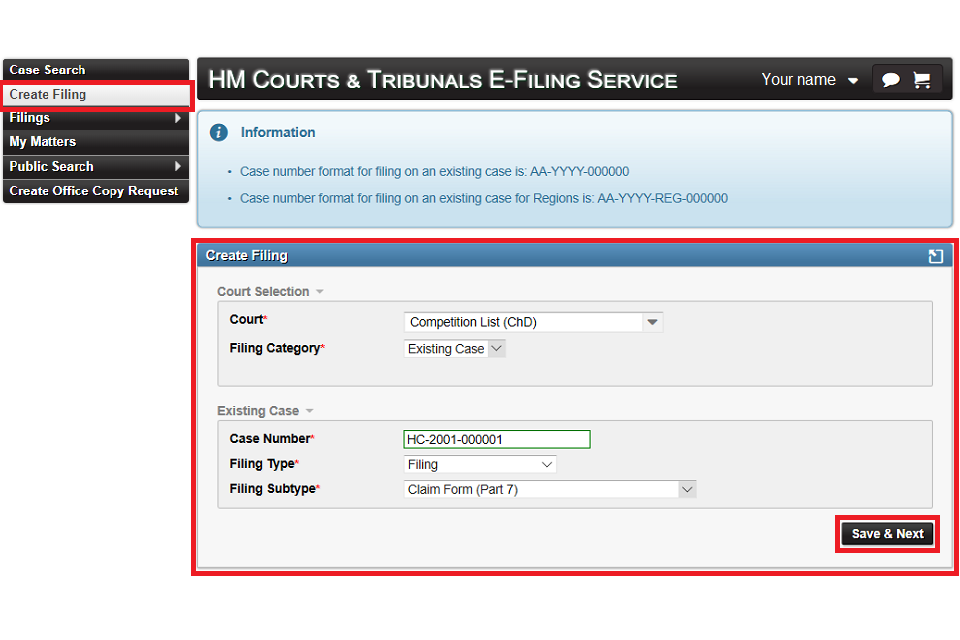
If your account is linked to a legal organisation you will see an additional ’Matter Number’ box appear. This will show your reference number if someone in your organisation has filed on this case. If that the field is blank, you must enter your reference number so that it appears on any invoices.
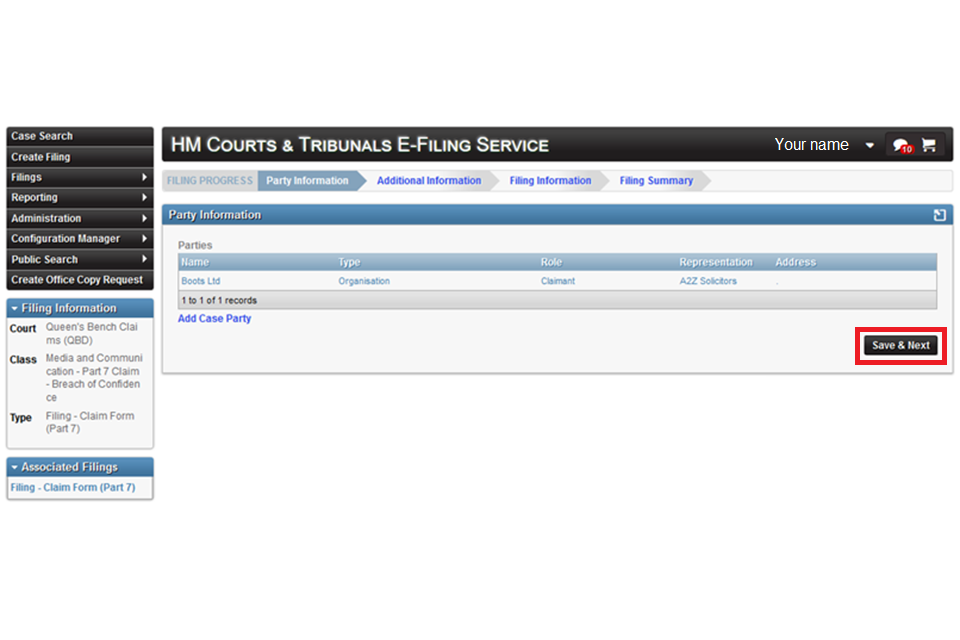
Party information
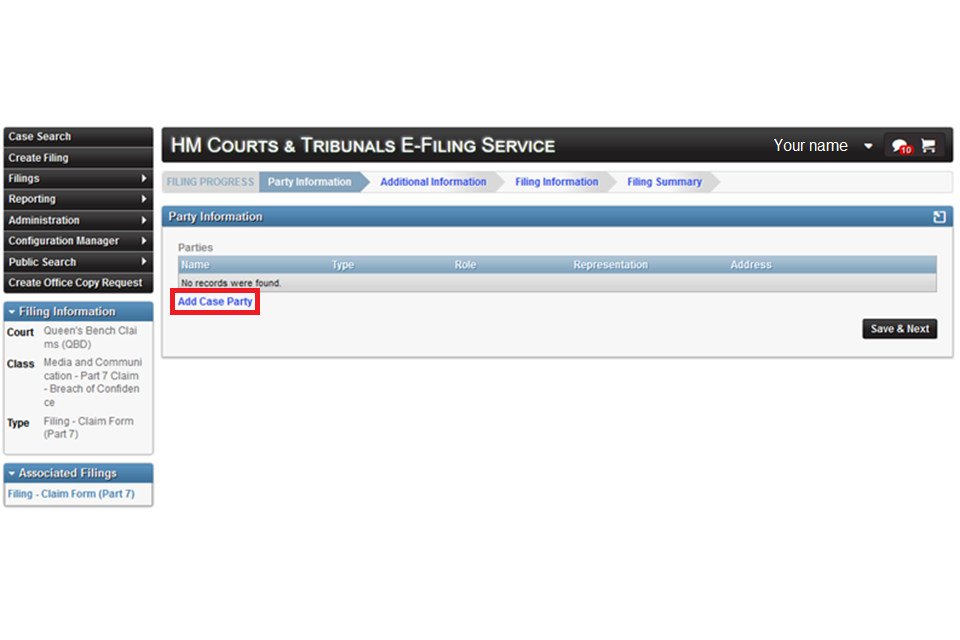
It is mandatory for at least one party to be added to a filing.
You will only need to complete this section for new cases. If you are filing for an existing case, you can skip to Filing information.
1. Select ‘Add Case Party’. A ‘party’ is any one of the participants in the case who has a personal interest in the outcome – such as the person making a claim (claimant) or the defendant of a claim.
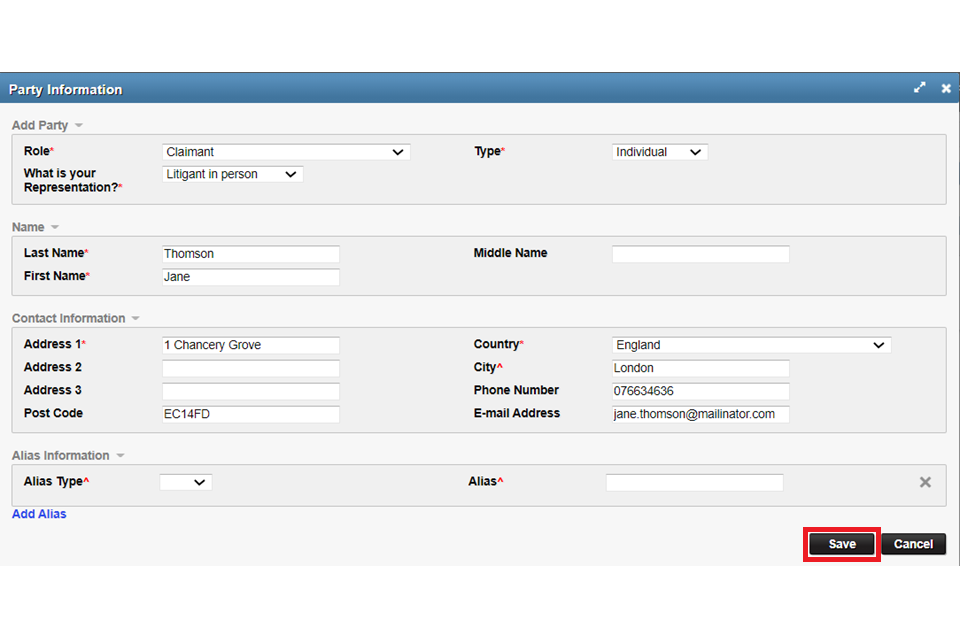
2. Complete the fields using the dropdown options. For example, choose ‘Claimant’ in the ‘Role’ dropdown.
3. If you are not represented, select ‘Litigant in person’ from the ‘What is your Representation?’ dropdown and ‘Individual’ from the ‘Type’ drop down. Complete the name, address, phone and email fields.
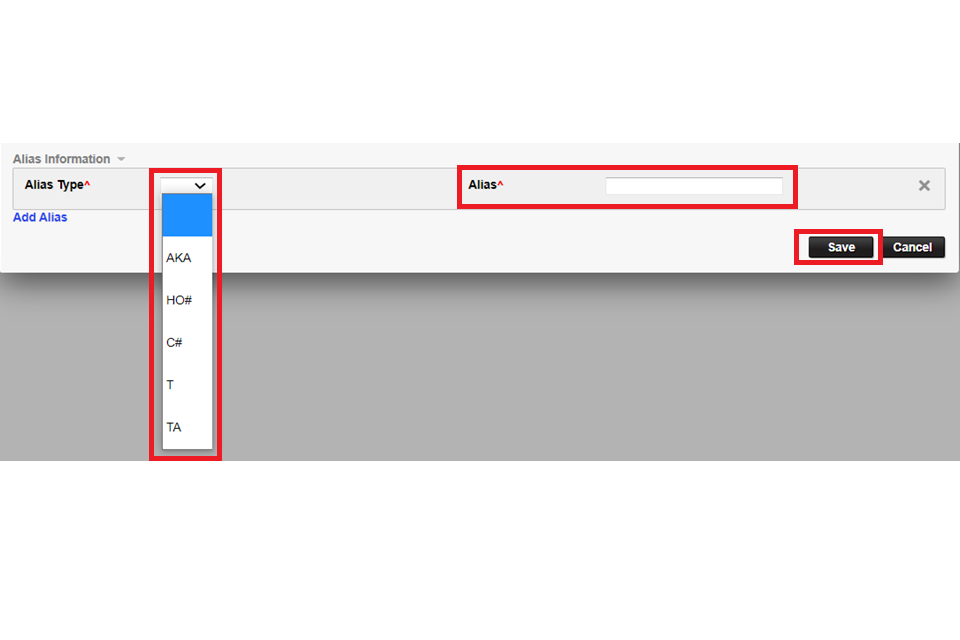
4. You can also add an ‘alias’. You may wish to do this if you are known by another personal name, have a Home Office number (if relevant) or are acting on behalf of a company:
- AKA – also known as
- C# – company number
- HO# – Home Office reference number
- T – trading at
- TA – trading as
For example, if you have another personal name, select ‘Alias type’ and choose ‘AKA’ (also known as) from the dropdown list. Write your other name in the ‘Alias’ box.
When you have finished, select ‘Save’. Go to point 9.
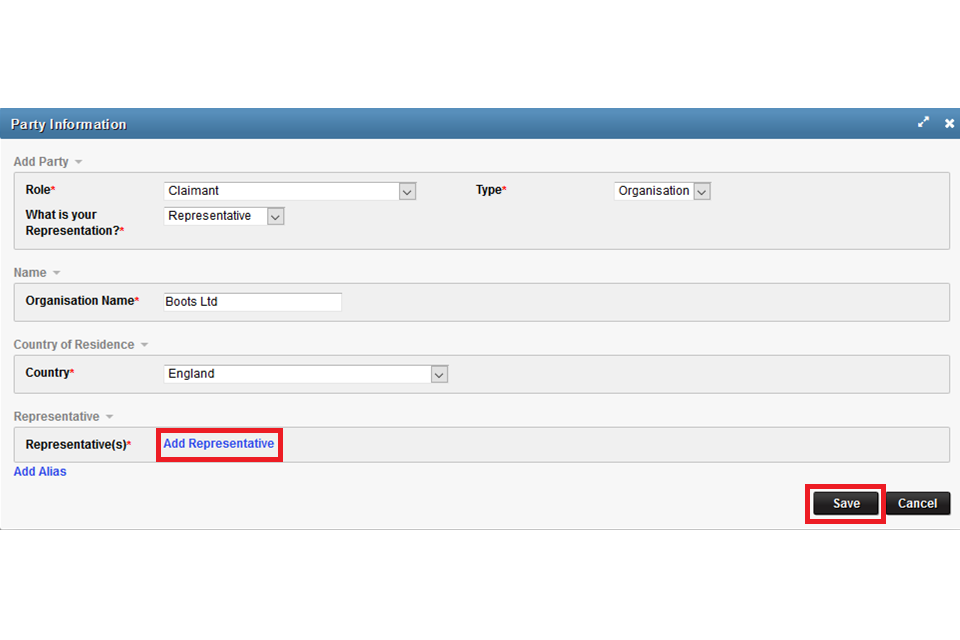
5. If you are a representative, select ‘Representative’ and choose ’Organisation’ in the ‘Type dropdown’. Enter the organisation’s name and choose a country.
6. You should then select ‘Add Representative’ and enter the representative type – individual representative, representative organisation of solicitor’s firm. Enter the name of the representative, organisation or firm. Search and then select the appropriate result. Review your details and select ‘Save’.
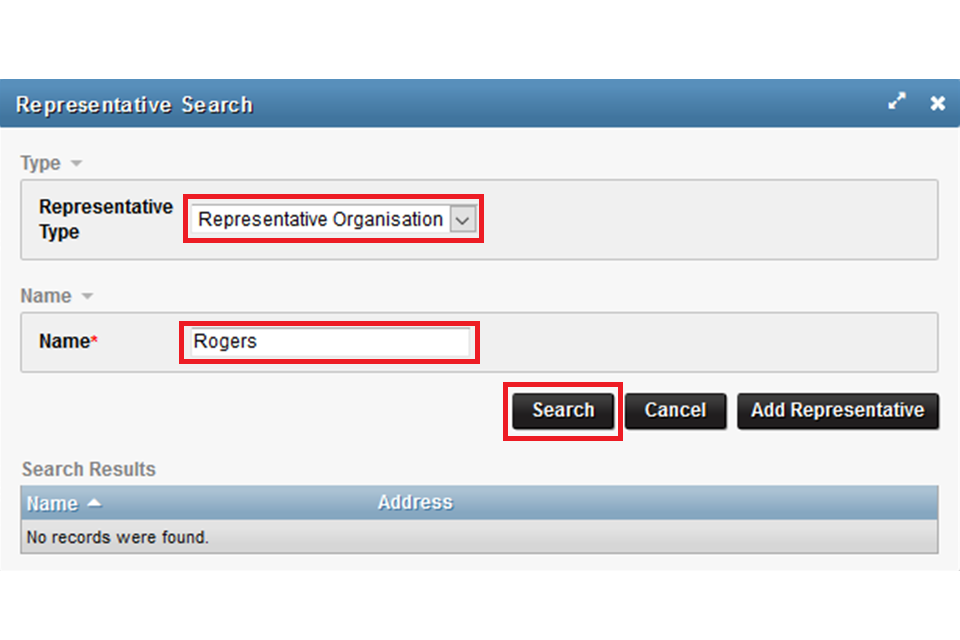
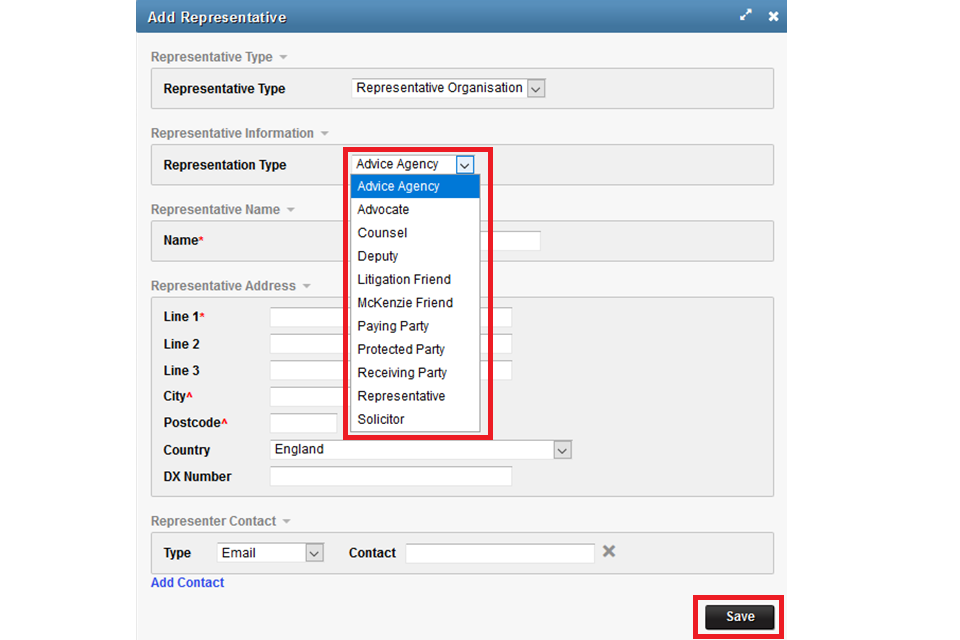
7. If they are not in the search results, select ‘Add Representative’ and complete the information in the new screen that opens. Then select ‘Save’. If you are adding a representative organisation you will also need to choose a secondary representation type from the drop down list. You will not see this list if you are adding a individual representative or a solicitor’s firm.
8. If you are a legal representative, you can add an alias for your client or other parties – see point 4 above.
9. Repeat the relevant steps above for other parties to your action. You will need to select the appropriate representation type for each party.
10. You can check the details, go back and amend or select ‘Save & Next’.
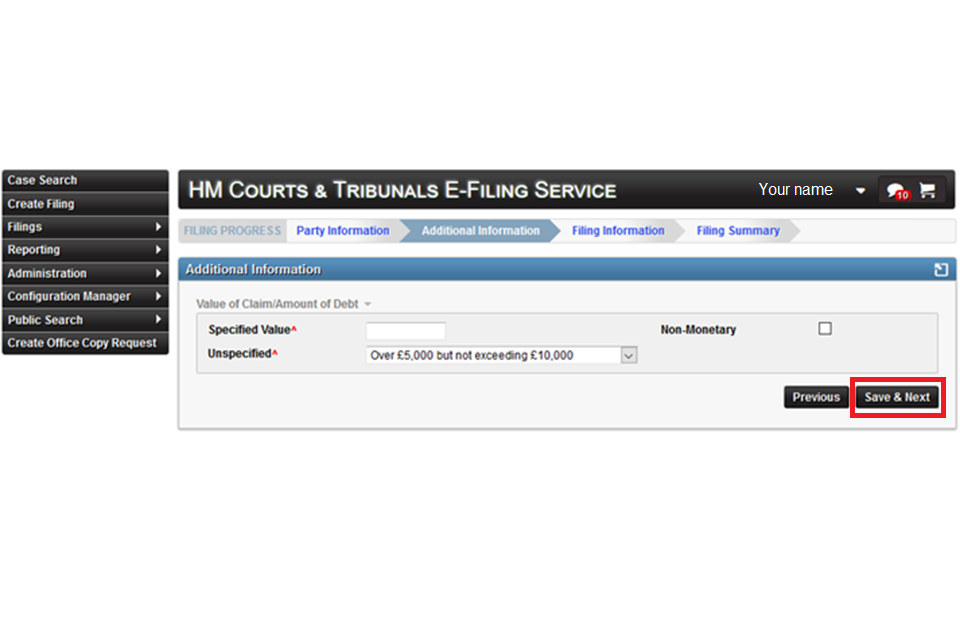
Additional information
You may need to complete this step if the type of filing you are making requires this information.
If your filing type does not require this information, you will not see the ‘Additional information’ screen and you can skip to Filing information.
1. Fill in the ‘Specified Value’ box if your case involves money and you know the amount.
2. If you do not know the amount, please select the appropriate option from the ‘Unspecified’ dropdown box.
3. If your case does not involve money you should select the ‘Non-Monetary’ tick box.
4. When complete, select ‘Save & Next’.
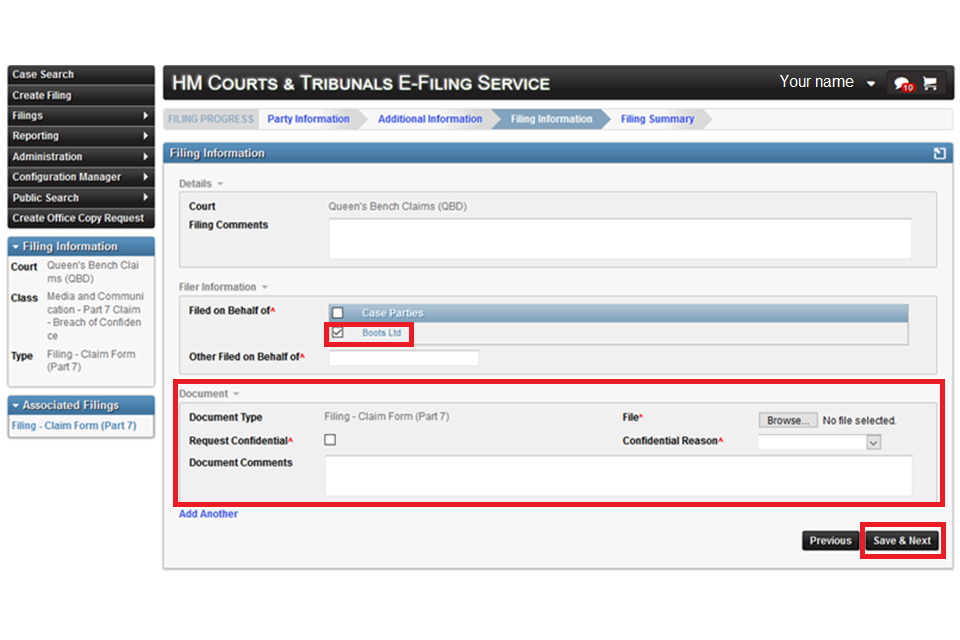
Filing information
1. For new cases, in the ‘Filer Information’ section, confirm that you have completed this filing by selecting the tick box next to your name, or the name of the person you are making the filing on behalf of. If you are filing for an existing case, you will not see the ‘Filer Information’ section.
If your filing is urgent it is your responsibility to inform the court. You will need to upload a letter with the document outlining the reason(s) why the case must be dealt with urgently. You must also place a comment in the ‘Comments’ field stating that the filing is urgent and, once submitted, contact the court to ask them to review your fling urgently.
2. Select ‘Browse’ to find and upload the relevant documents from your device. Select one document at a time. The maximum file size for each document is 50MB.
3. If you wish your document(s) to be marked as confidential, select ‘Request Confidential’. If your reason for requesting confidentiality is not within the dropdown list, please explain these in the comments box. Contact the court to ask if you need to make a formal application to make the document confidential. If the court approves your request, your document won’t be available to the public.
4. Add comments you have in the ‘Document Comments’ box.
5. If you have more documents to upload, select ‘Add Another’ and repeat steps 2, 3 and 4. You can add up to 10 documents to each filing. If the document you wish to upload is not included in the dropdown options, you will have an opportunity to add these later using ‘associated filings’.
6. Check all the relevant jurisdiction’s rules and practice directions to make sure you submit all the required information and documents. If your filing is rejected and you want to re-file before your fee is refunded, you will need to pay the fee again.
7. Once sure you have included all the information, select ‘Save & Next’.
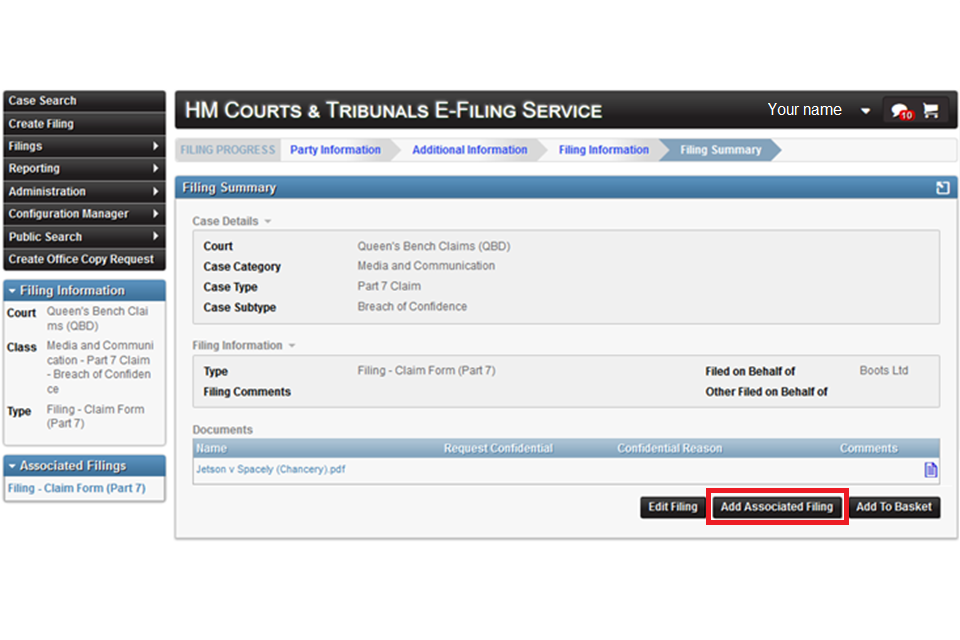
Filing summary
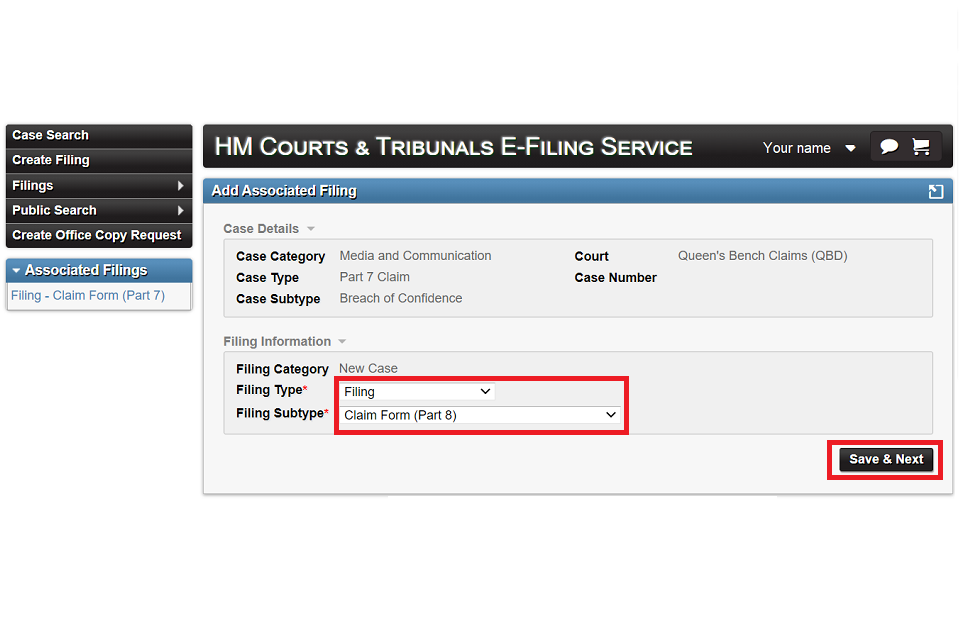
1. If you want to add any further documents, you can do so now by selecting ‘Add associated filing’. If you have finished adding documents, go to step 9.
2. Select the relevant filing type and filing subtype. Then select ‘Save & Next’.
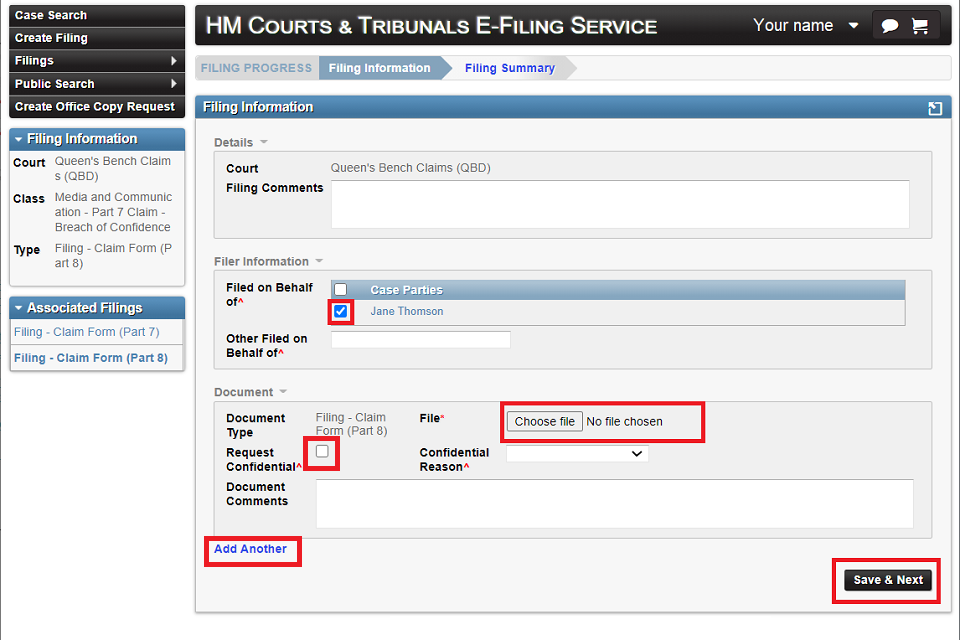
3. You will then see the filing information screen. For new cases, in the ‘Filer Information’ section, confirm that you have completed this filing by selecting the tick box next to your name. If you are filing for an existing case, you will not see the ‘Filer Information’ section.
4. Select ‘Browse’ to find and upload the relevant documents from your device. Select one document at a time. The maximum file size for each document is 50mb.
5. Select ‘Request Confidential’ if you want your document to be confidential.
6. Add comments you have in the ‘Document Comments’ box.
7. If you have more documents to upload select ‘Add Another’ and repeat steps 4, 5 and 6. You can add up to 10 documents to each filing.
8. Once you have added all your documents, select ‘Save and Next’.
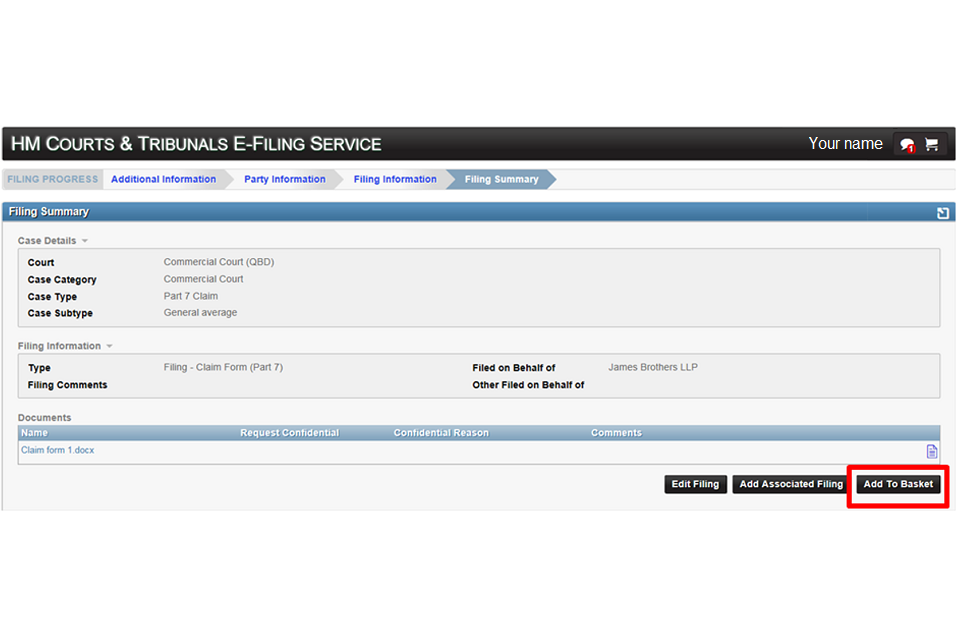
9. You can now edit, add any further associated filings or submit your filing. If you wish to submit the filing, select ‘Add to Basket’.
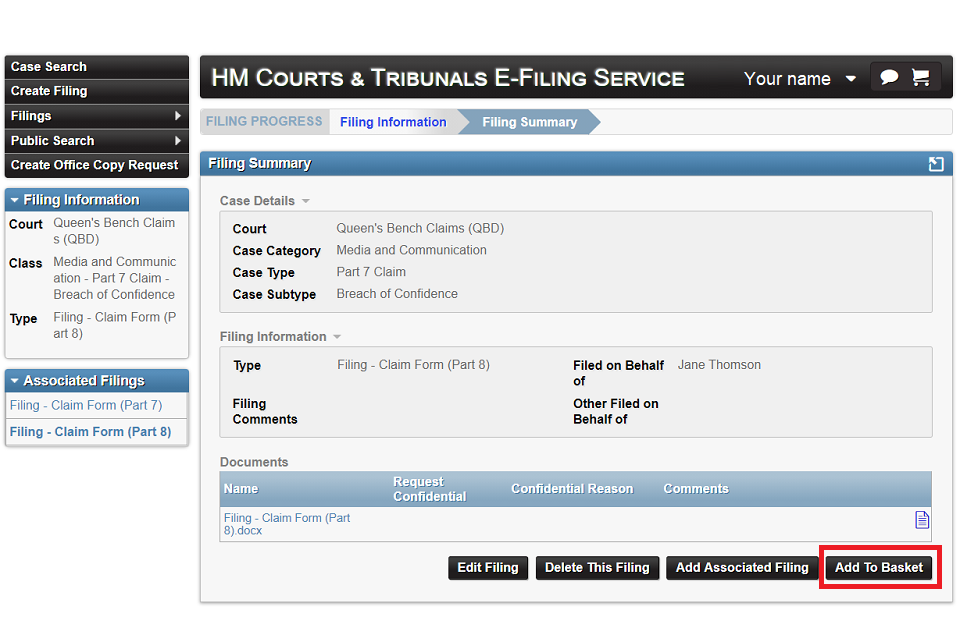
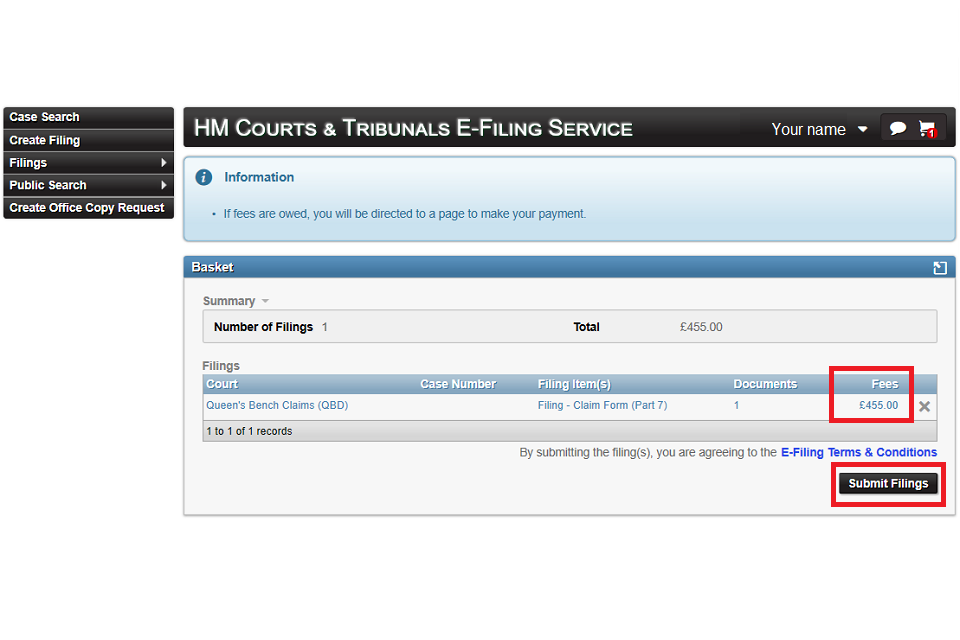
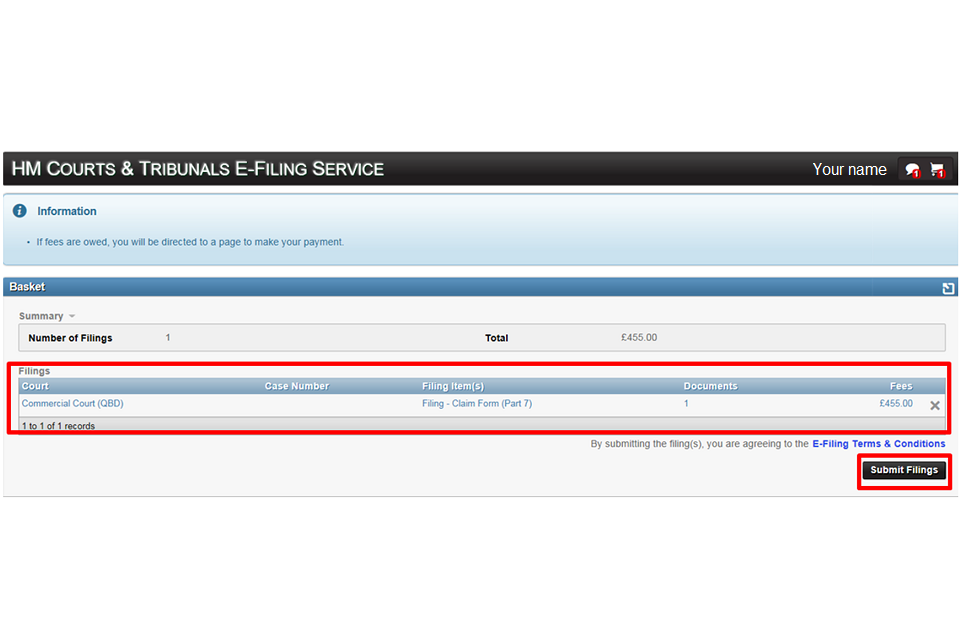
10. The next screen will show you the fee to file your case. If you are filing for an existing case, there may not be a fee, depending on the type of filing.
11. Select ‘Submit Filings’.
Pay the fee
Once you have submitted your filing you will need to pay the fee, if appropriate.
- You can pay by credit or debit card – go to point 1
- If you have applied for help with fees you should input the reference number here – alternatively, you can follow the help with fees link to apply online or for more information
- If you are a solicitor acting on behalf of a client, you can select ‘Fee Account’ to pay using an HMCTS Payment by Account (PBA) number
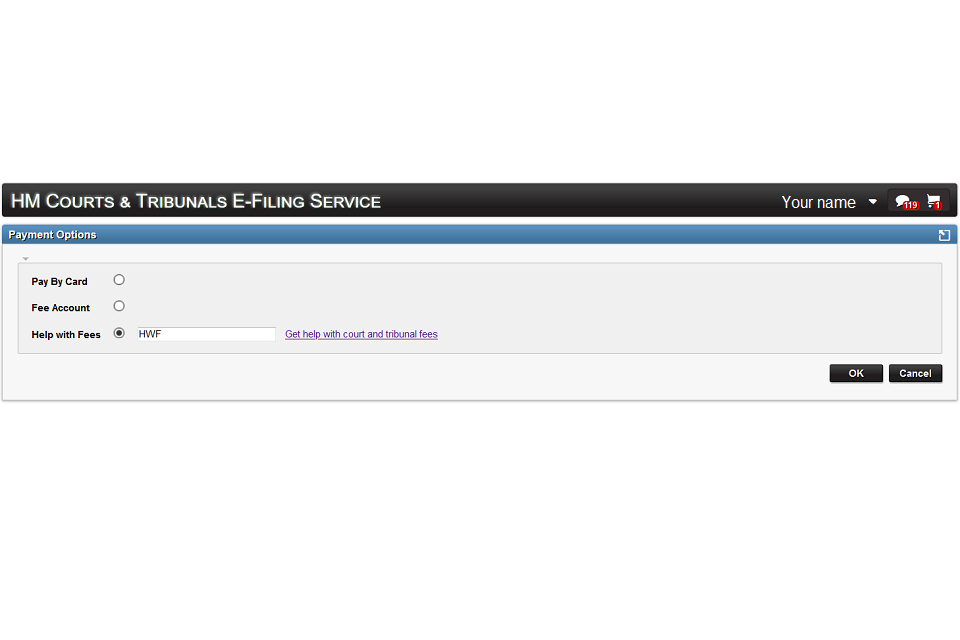
To pay by card:
1. Select ‘Pay by Card’ and ‘OK’.
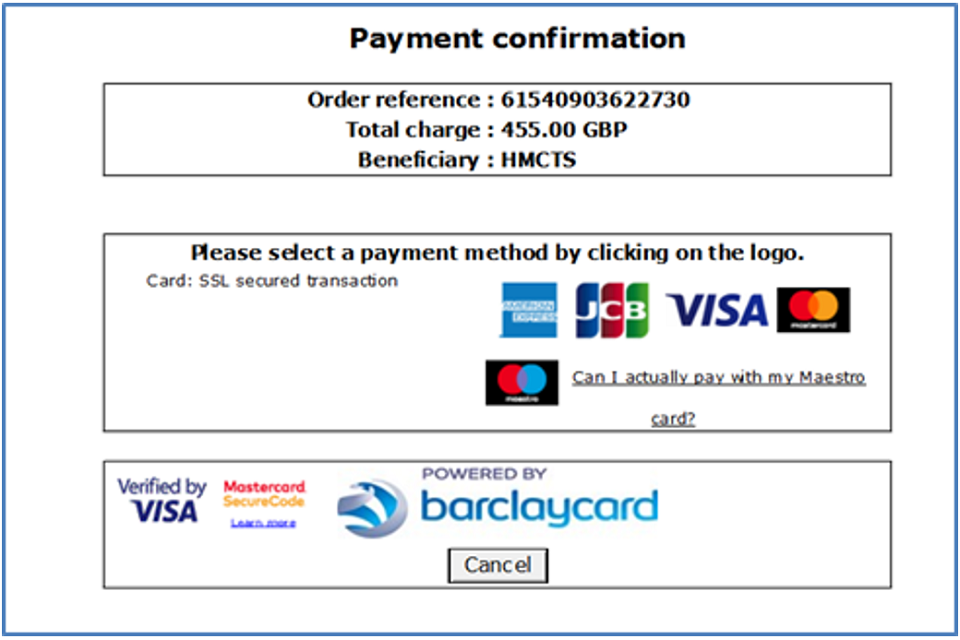
2. Select your card type (for example, Visa). Amex is not accepted.
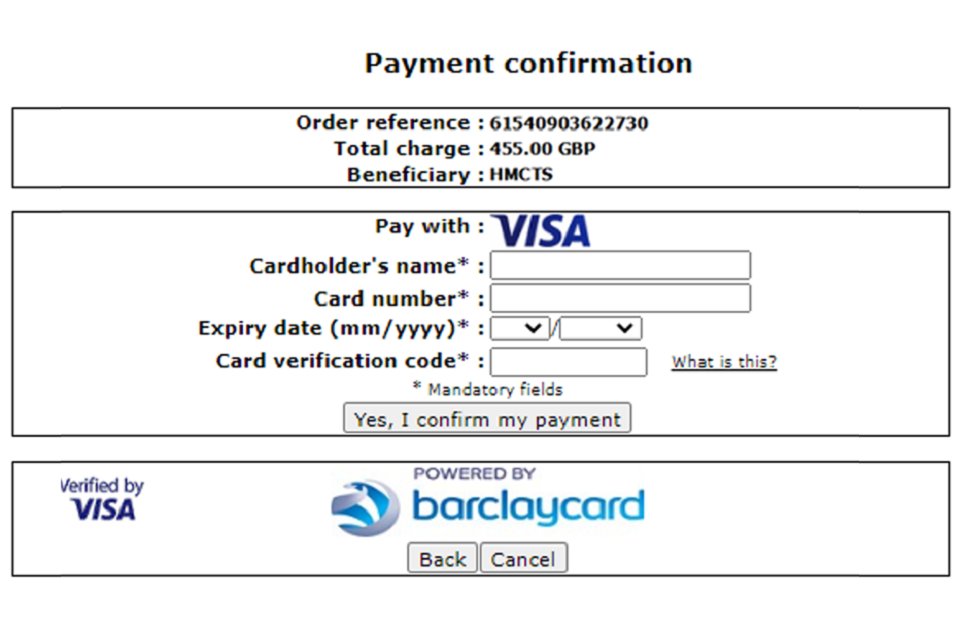
3. Add the name on the card, your card number, sort code and card verification code (this is the 3-digit number on the back of your card).
4. You will see a payment confirmation message on E-Filing and will receive an email. Do not select any of the buttons on the payment confirmation page, including ‘OK’ – you will be redirected automatically.
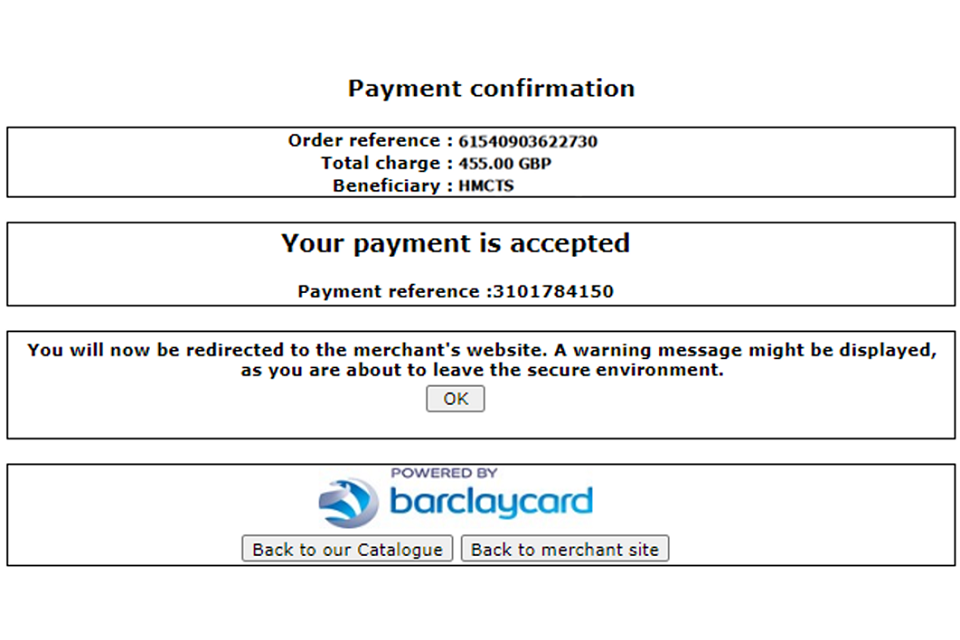
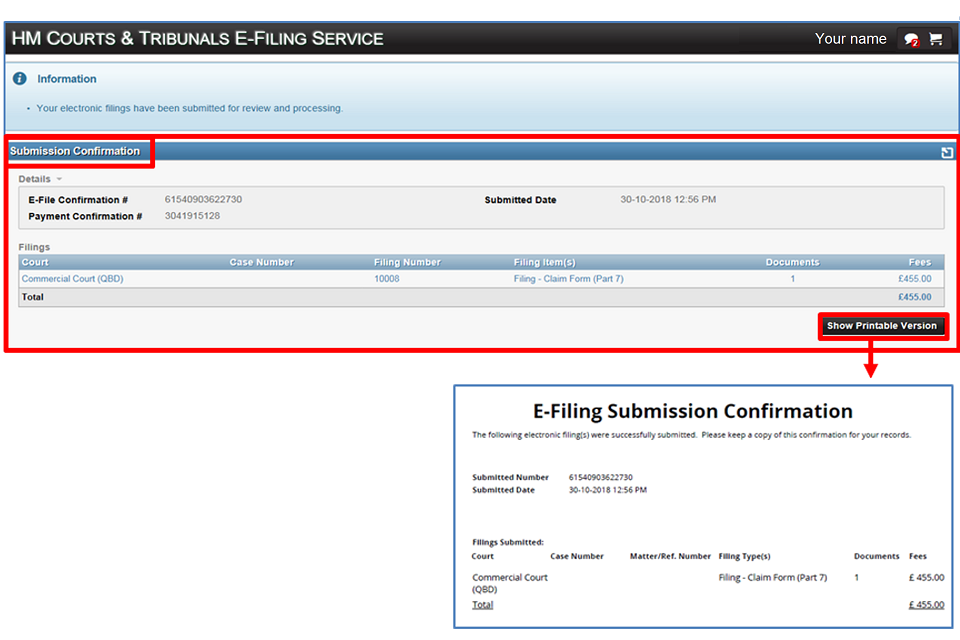
5. You will be redirected to the ‘Submission Confirmation’ screen. If you want to print your submission confirmation, select ‘Show Printable Version’. You will not be able to get a printable version of the receipt after this point. If you need it later, download and save it at this point.
6. Your filing will now be in the system waiting for review and action by HMCTS staff. Regardless of whether your filing is accepted or rejected you will be notified in E-Filing and by email, along with a new case number. In E-Filing this will appear in the top right corner of the screen.
3. Manage your filings
Once you have filings submitted, you can manage them in E-Filing. This includes checking on their status, resubmitting filings if they are rejected and printing.
Check case status and alerts
1. You can check the status of your filing from the boxed (‘widgets’) on your dashboard.
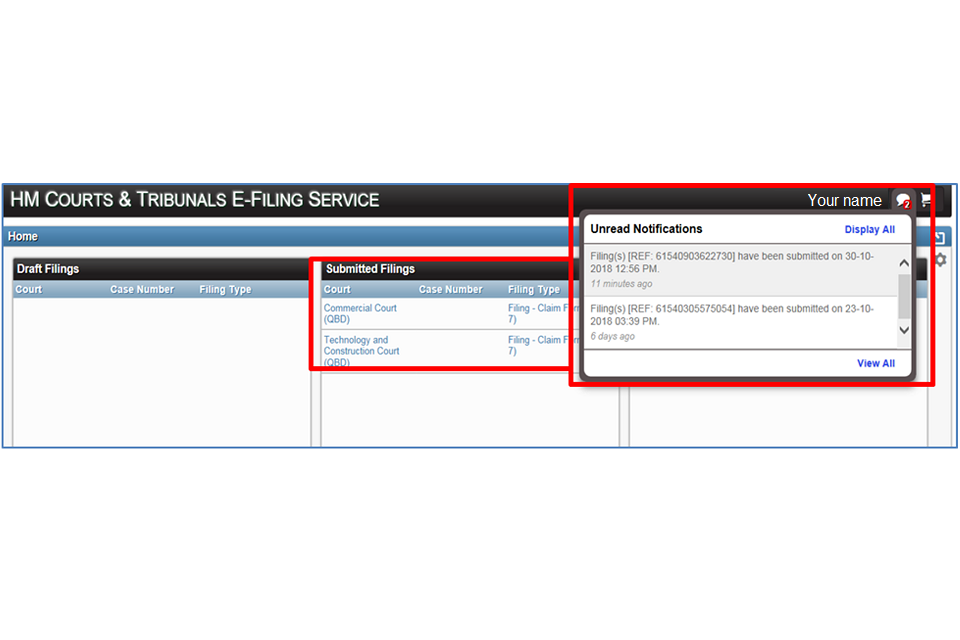
2. Depending on the contact preferences you have selected, E-Filing will send you an alert when there is an update on your filing or when your filing status changes. You will also receive an email when there is a new alert and to tell you if the court accept or reject your filing.
My Matters – Sharing with colleagues (legal representatives only)
You can share filings with colleagues if they are already registered with E-Filing, so that they can view submissions and documents.
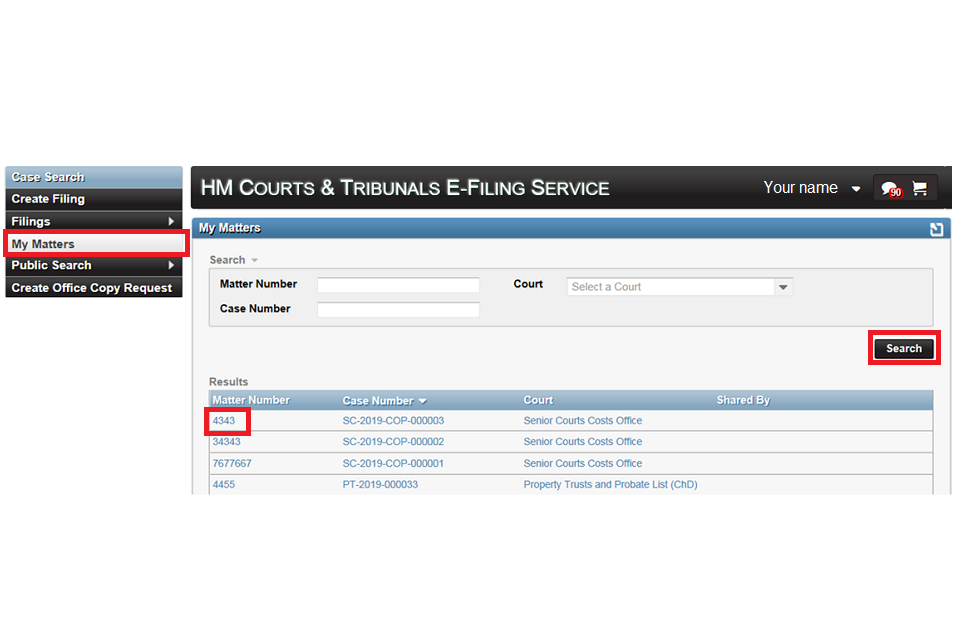
1. Select ‘My Matters’ then ‘Search’ to show all filings shown in the results. You can also search for a specific matter number by entering the number in the field before selecting ‘Search’.
2. In the search results, select the ‘Matter Number’ of the filing you want to share.
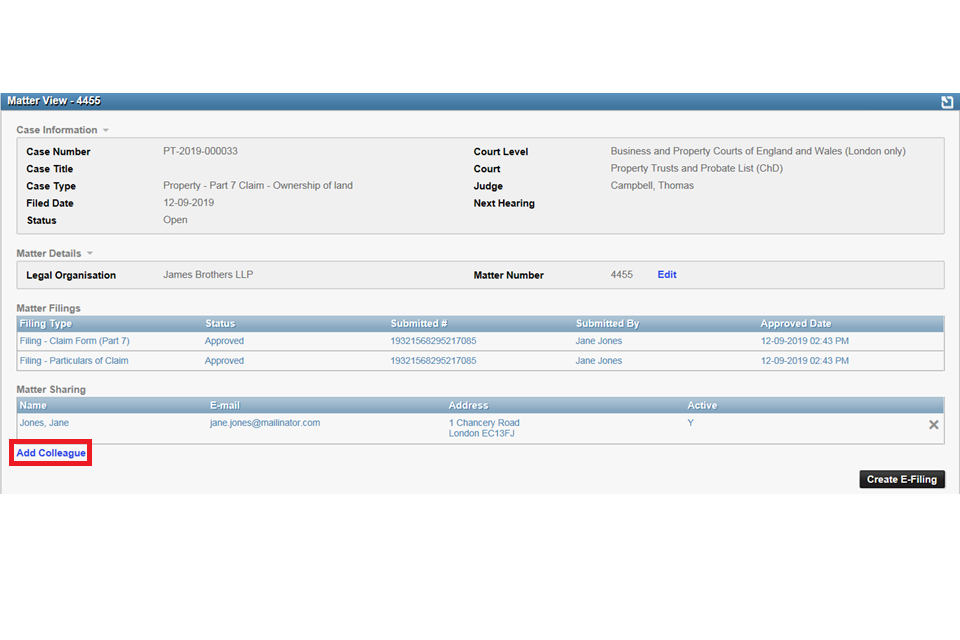
3. In the ‘Matter View’ screen, select ‘Add Colleague’.
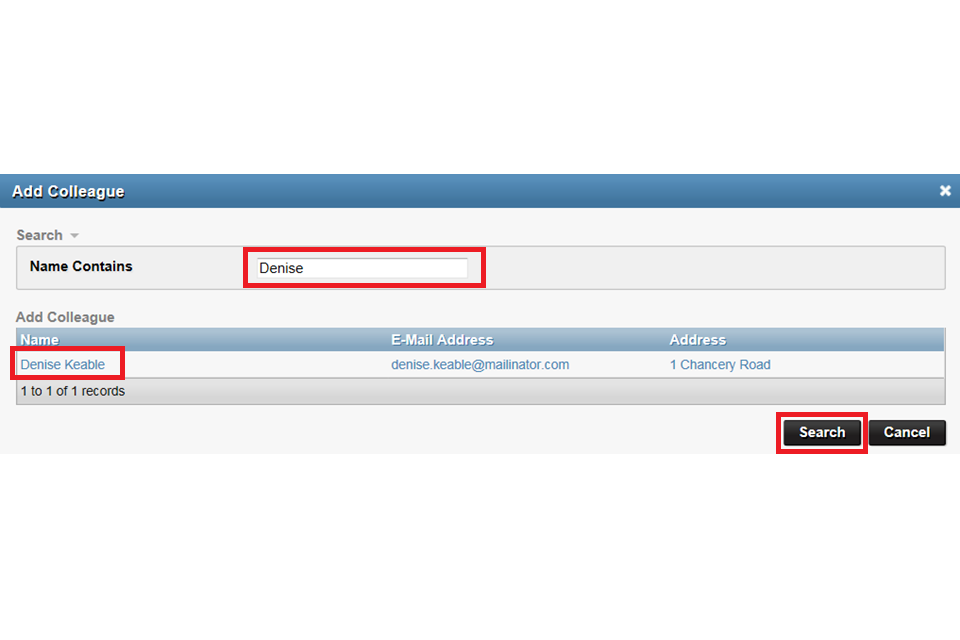
4. In the ‘Add Colleague’ screen, type in the name of your colleague and select ‘Search’. If they are registered, they will show in the results. You can type in %%% to search for all colleagues associated with your law firm.
5. Select your colleague’s name from the results.
6. You can continue adding colleagues to create a ‘Matter team’.
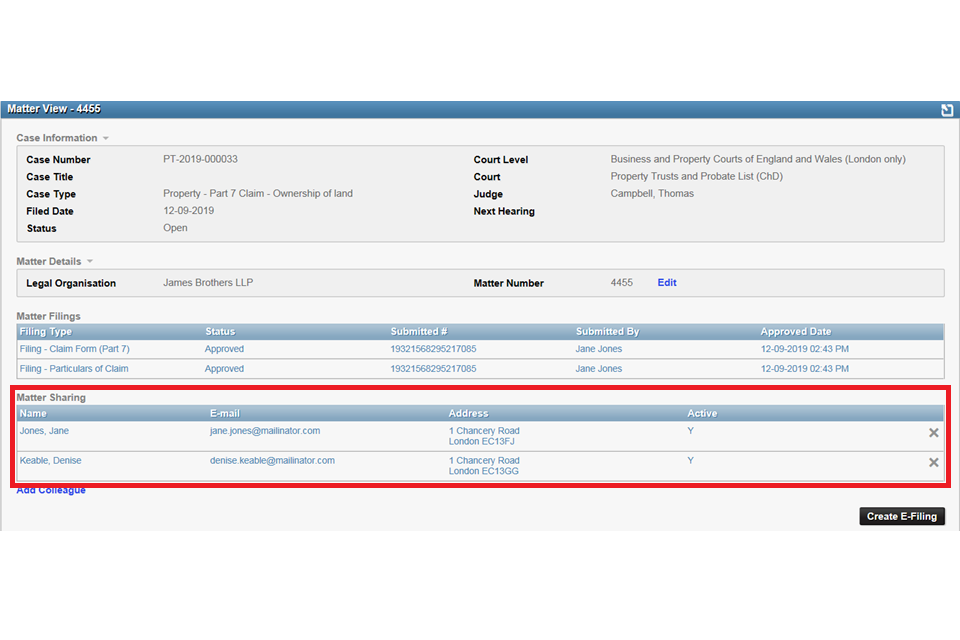
7. The colleagues you have added will now see this filing in their dashboard.
Edit an existing filing
If you need to remove or replace a document from a filing, contact the court or tribunal.
You can add filings to an existing case if you have filed on it previously.
Alternatively, you can create a filing on an existing case by selecting ‘existing case’ on the Create Filing screen – see Create a filing.
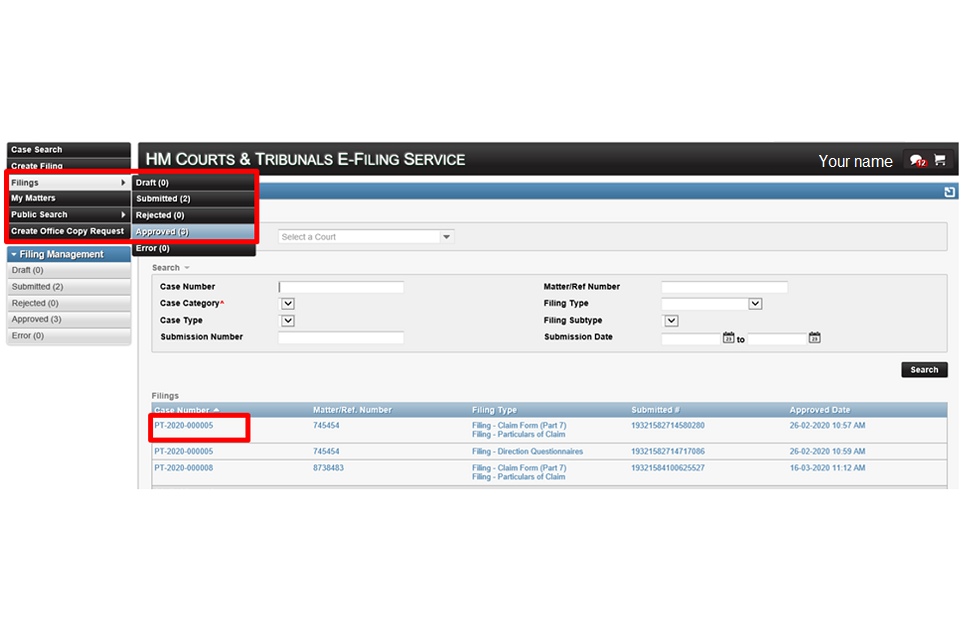
1. Select ‘Filings’ then ‘Approved’. Search for your filing in the results area or do a specific search, for example on a case number. Select the filing in the results to open it.

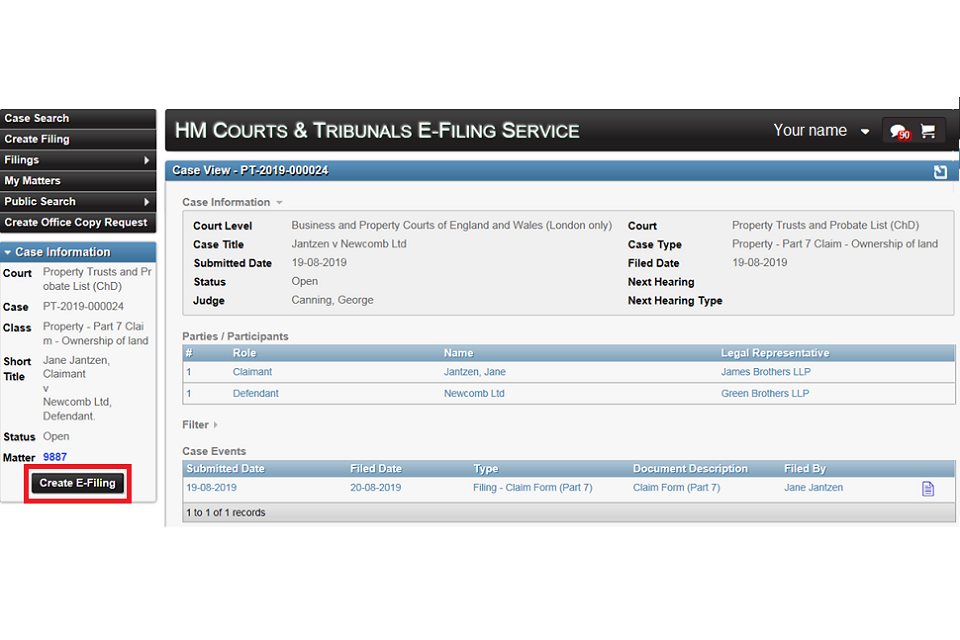
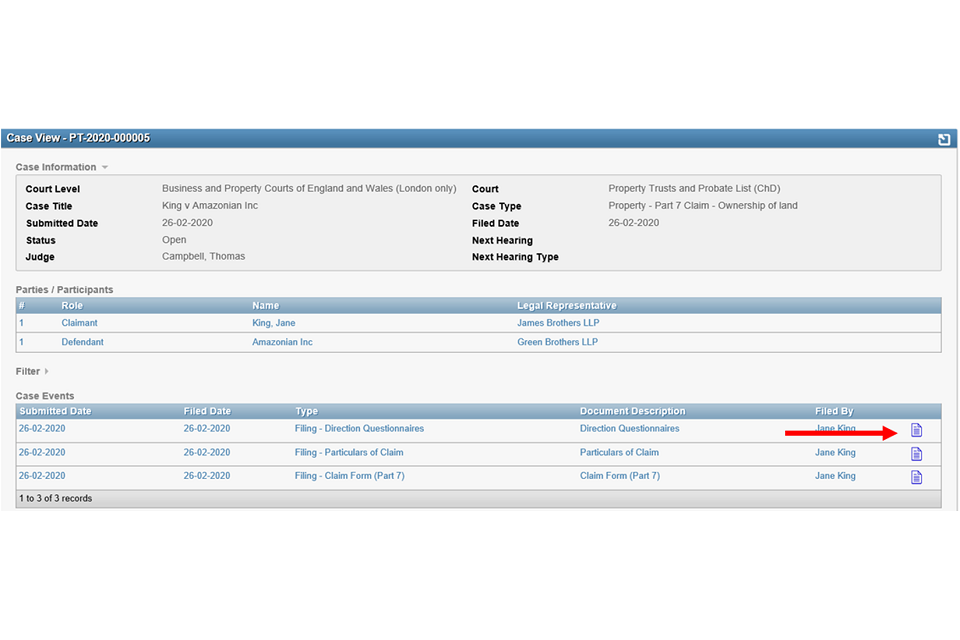
2. On the case view screen, select ‘Create Filing’.
3. Carry out the necessary steps from the Filing information section.
Resubmit a rejected filing
If the court rejects your filing, you will be emailed or notified through the portal explaining the reasons why and asking you to resubmit. You can contact the court to ask them to amend the date of submission if required.
You will need to pay the fee again. You will get your original fee refunded in approximately 10 working days.
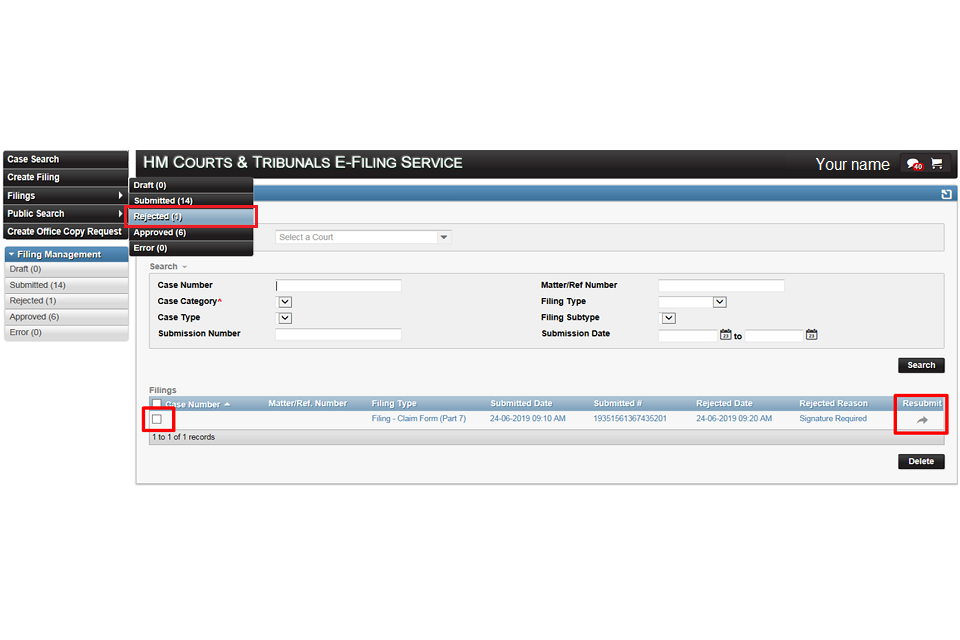
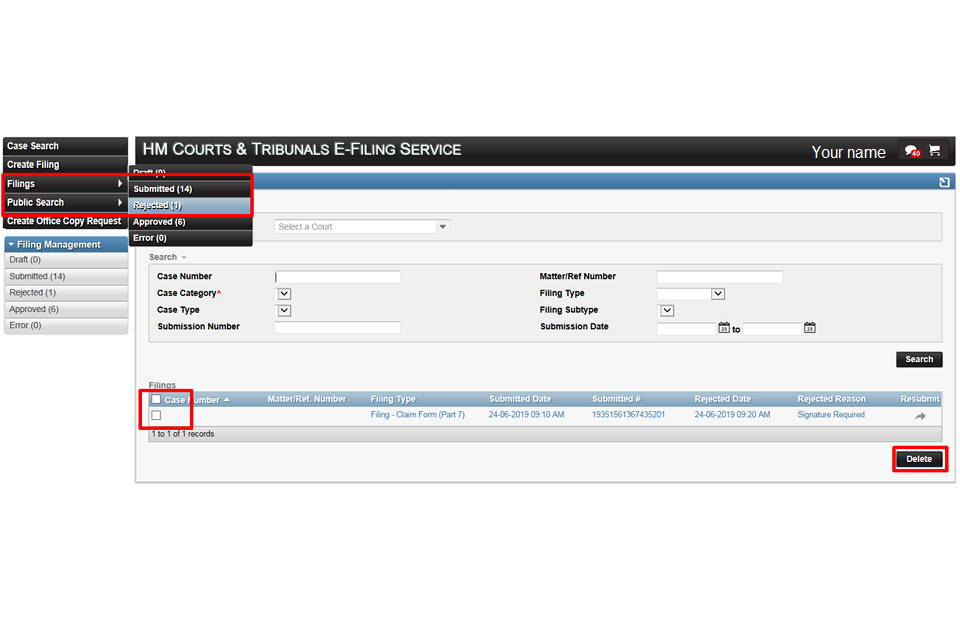
1. Login to your E-Filing account and select ‘Filings’ then ‘Rejected’. You will again see why your file was rejected. For example, it might say ‘Signature Required’. To fix this, amend your document and save it ready to submit again.
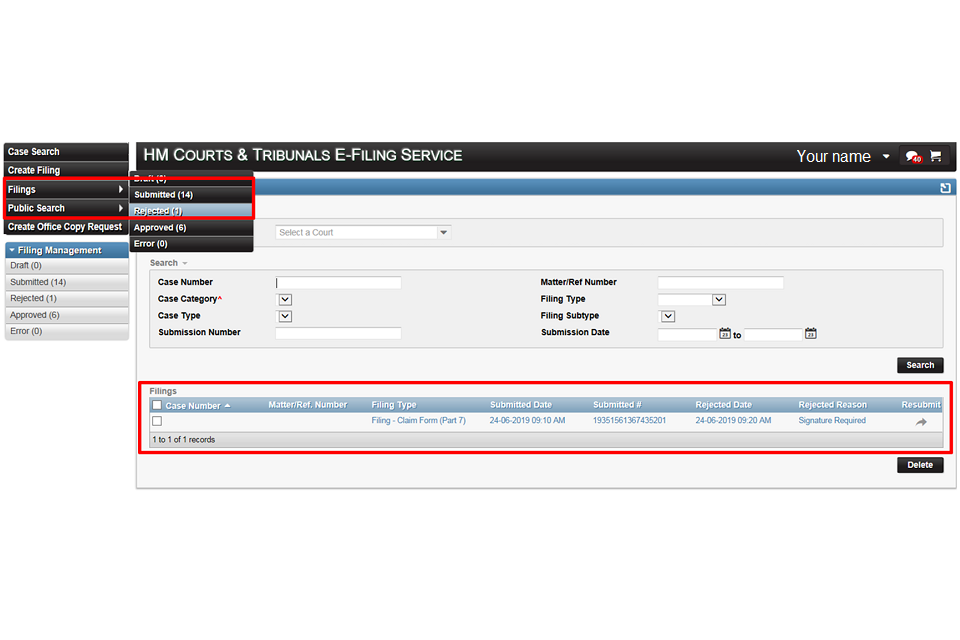
2. When you are ready to resubmit your filing, check the tick box for the filing in the ‘Filings’ list and select ‘Resubmit’.
3. A box will appear asking you to confirm that you are sure you want to resubmit the filing. Select ‘OK’.
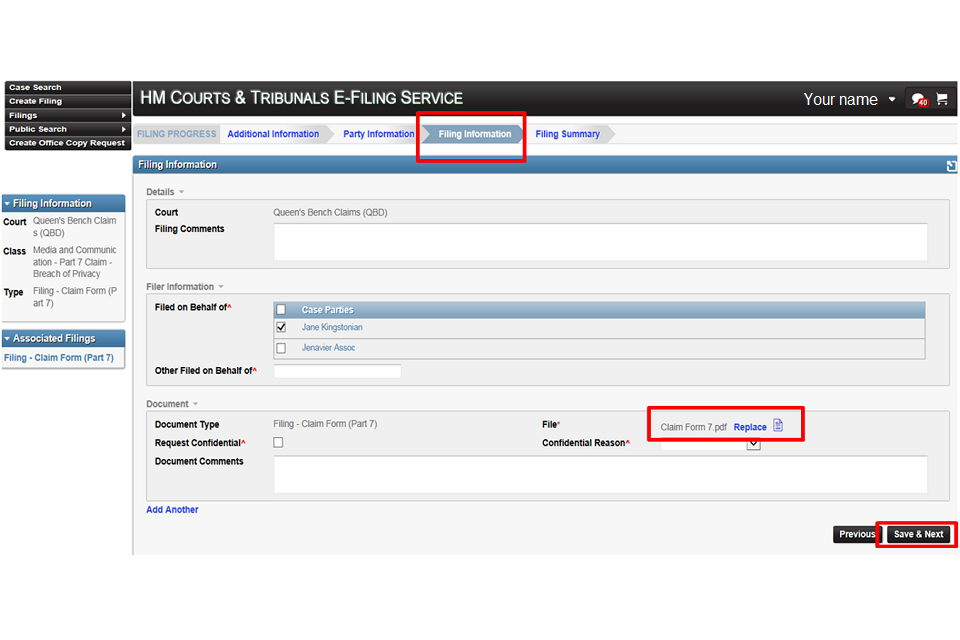
4. The ‘Filing Summary’ tab will appear. Select the ‘Filing Information’ tab to upload an amended document.
5. Select ‘Replace’ in the ‘Document’ section and browse for the document you want to upload.
6. Select ‘Save & Next’.
7. You are now ready to resubmit your filing. Select ‘Add to basket’.
8. The next screen will show you how much you need to pay. Select ‘Submit Filings’.
9. You should pay the fee as you did before – see Pay the fee. You will get your original fee refunded in approximately 10 working days.
Remove a rejected filing
1. Once you have resubmitted your filing, you can remove the rejected filing if you want to. Select ‘Filings’ then ‘Rejected’.
2. Check the tick box next to the rejected filing and select ‘Delete’.
Print a filing
You can print your filing as a PDF.
1. Select ‘Filings’ then ‘Approved’.
2. Find the filing you want to print and select it.
3. Find the document you want to print and select the preview document icon.
4. Sometimes the PDF is larger than a standard A4 sheet, even though it fits on the preview. Select ‘Fit’ on the print options screen to make sure you print all the information.
