Hedge height and light loss
Published 8 April 2004

© Crown copyright 2004
This publication is licensed under the terms of the Open Government Licence v3.0 except where otherwise stated. To view this licence, visit nationalarchives.gov.uk/doc/open-government-licence/version/3 or write to the Information Policy Team, The National Archives, Kew, London TW9 4DU, or email: psi@nationalarchives.gov.uk.
Where we have identified any third party copyright information you will need to obtain permission from the copyright holders concerned.
This publication is available at https://www.gov.uk/government/publications/hedge-height-and-light-loss/hedge-height-and-light-loss
Summary
This guidance note has been produced by BRE as part of a contract ‘Review of hedge height and light loss’. It supersedes an earlier guidance note produced in October 2001 for the then Department for Transport, Local Government and the Regions.
The aim of this document is to provide an objective method for assessing whether high hedges block too much daylight and sunlight to adjoining properties, and to provide guidance on hedge heights to alleviate these problems.
The document introduces the concept of ‘action hedge height’ above which a hedge is likely to block too much light. It then gives a procedure to calculate this height both for a garden, and for windows to main rooms in a dwelling. The minimum action hedge height is 2 metres.
The procedure is intended to be simple enough for householders to use. It involves multiplying the distance from a window to the hedge, or the depth of the garden, by a factor; for gardens this factor depends on hedge orientation. Corrections can be made for site slope or where the hedge is set back from a garden boundary.
A simple technique cannot cover every situation, and a section discusses other relevant factors which might need to be considered. Of course the hedge owner is free to trim the hedge below the height proposed in these guidelines, or remove it altogether, if it is easier or safer to do so.
1. Introduction
Hedges have many benefits; they can provide privacy and wind shelter and encourage wildlife. A hedge can also be an attractive feature in its own right.
However, very high hedges can cause problems. Often the worst of these is the loss of sunlight and daylight to neighbouring gardens and houses.
This Guidance Note provides a way of calculating the height of a hedge that is likely to cause significant loss of light to a garden or house nearby. This method could be used by a hedge owner, or by an affected neighbour, to find out if a hedge is likely to block too much light to the neighbour’s house or garden.
The Note may be used to help resolve cases arising under the Anti-Social Behaviour Act 2003.
However the advice given here is not mandatory, and is only one of the factors a local authority will need to take into account. A discussion of the other factors which may be addressed is given in a guidance document High hedges complaints: prevention and cure.
In the Anti-Social Behaviour Act, “high hedge” means ‘so much of a barrier to light or access as:
(a) is formed wholly or predominantly by a line of two or more evergreens; and
(b) rises to a height of more than two metres above ground level.’
Consequently, these guidelines apply to evergreen hedges. They have not been designed to be applied to individual trees, groups of trees or woodlands.
2. Hedge heights
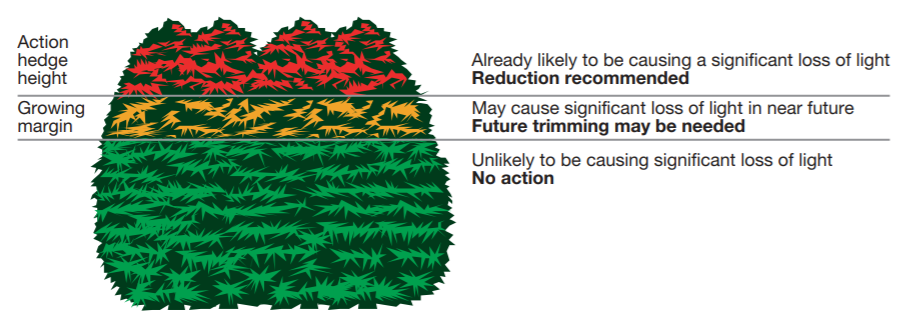
This Note gives a method to calculate the ‘action hedge height’ H. A hedge higher than this is likely to be already causing a significant loss of light. Reduction of the height of the hedge is then recommended.
Where reduction in height is deemed necessary, it is advisable for the hedge to be cut below the action hedge height. This will allow the hedge to grow in between annual (or more frequent) trimmings, and still remain below the action hedge height. For most hedge types, between 600mm and 1 metre below the action hedge height would give a suitable margin for growth.
However there may be other reasons why a local authority may require a hedge to be cut lower, in some case substantially lower, than this height. This could happen if the hedge is causing adverse effects other than loss of light.
If the hedge is somewhere within the buffer zone or growing margin, it may cause significant loss of light as it grows. In this case future trimming will be needed.
If the hedge is already below the buffer zone or growing margin, it could cause a noticeable loss of light. However it is unlikely to cause significant over shading and no action need be taken. Of course this situation may change in the future as the hedge grows.
Figure 1 summarises this. Advice on measuring heights of hedges can be found in Annex 1.
Figure 1. The action hedge height
3. Procedure for calculating action hedge height
To calculate the action hedge height, follow this procedure.
(a) Calculate the hedge height for loss of light to the nearby garden (Section 4).
(b) Calculate the hedge height for loss of daylight to main house windows (Section 5).
(c) Take the lower of these two heights.
(d) If this height is less than 2 metres, round it up to 2 metres.
(e) The resulting number is the action hedge height.
4. Loss of light to gardens
4.1 Introduction
A hedge will create an area of shade next to it. The extent of this area of shade will depend on the height and orientation of the hedge (whether it is north or south of the obstructed garden). The impact on the amenity value of the garden will depend on its size, relative to the size of the shaded patch.
These guidelines apply to any type of garden, even small back yards with no lawn. They are intended to protect light to the garden as a whole rather than particular features within it.
The procedure for calculating action hedge height is as follows:
i. find the effective depth of the garden (for a rectangular garden the effective depth is the distance between the hedge and the opposite end of the garden)
ii. multiply the effective depth by a factor (which will vary with the orientation of the hedge) to get the basic action hedge height
iii. make a further correction if the hedge is set back from the boundary
iv. correct for site slope if any.
4.2 Hedge height and garden size
The basic action hedge height is calculated from the effective depth of the garden.
The equation for non-rectangular gardens is:
Effective depth = Area of garden
divided by
Effective length of hedge
For a rectangular garden, where the hedge grows along the whole length of a boundary, the effective depth is the distance between the boundary by the hedge and the opposite end of the garden. Where the length of the hedge is less than the length of the boundary it grows on, then the formula for nonrectangular gardens (see above) should be used.
In all cases, the area of the garden includes outhouses, greenhouses, sheds, patio and yard areas, and paths within the garden itself. However it does not include garages, or narrow access ways (less than 3m wide) for example pathways and driveways to the side of a house. For gardens which go round the side of a house, the area of garden should be that which has a direct view of most of the hedge (see figure 2). The impact of trees and screens within the obstructed garden is not taken into account here. Areas behind such a screen still count in the garden area.
Figure 2. Only the hatched area is included in the calculation of effective garden depth
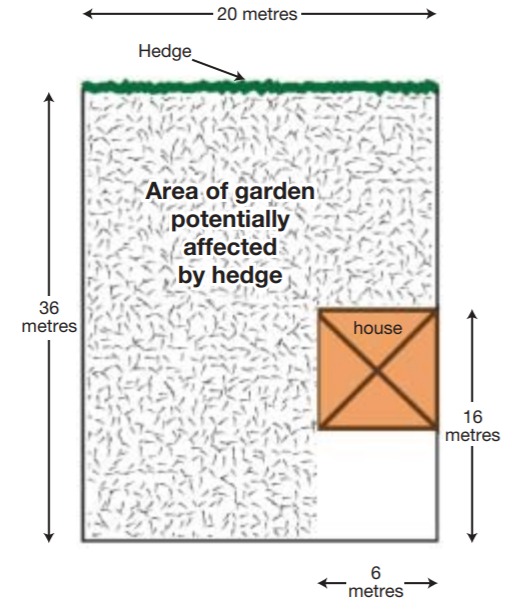
In the example shown in figure 2, the area of the garden (the hatched area) is (20 x 36) – (6 x 16) = 720 – 96 = 624 m2. The effective depth of the garden is this area divided by the effective length of the hedge, in this case 20 metres. So the effective depth of the garden is 31.2 metres.
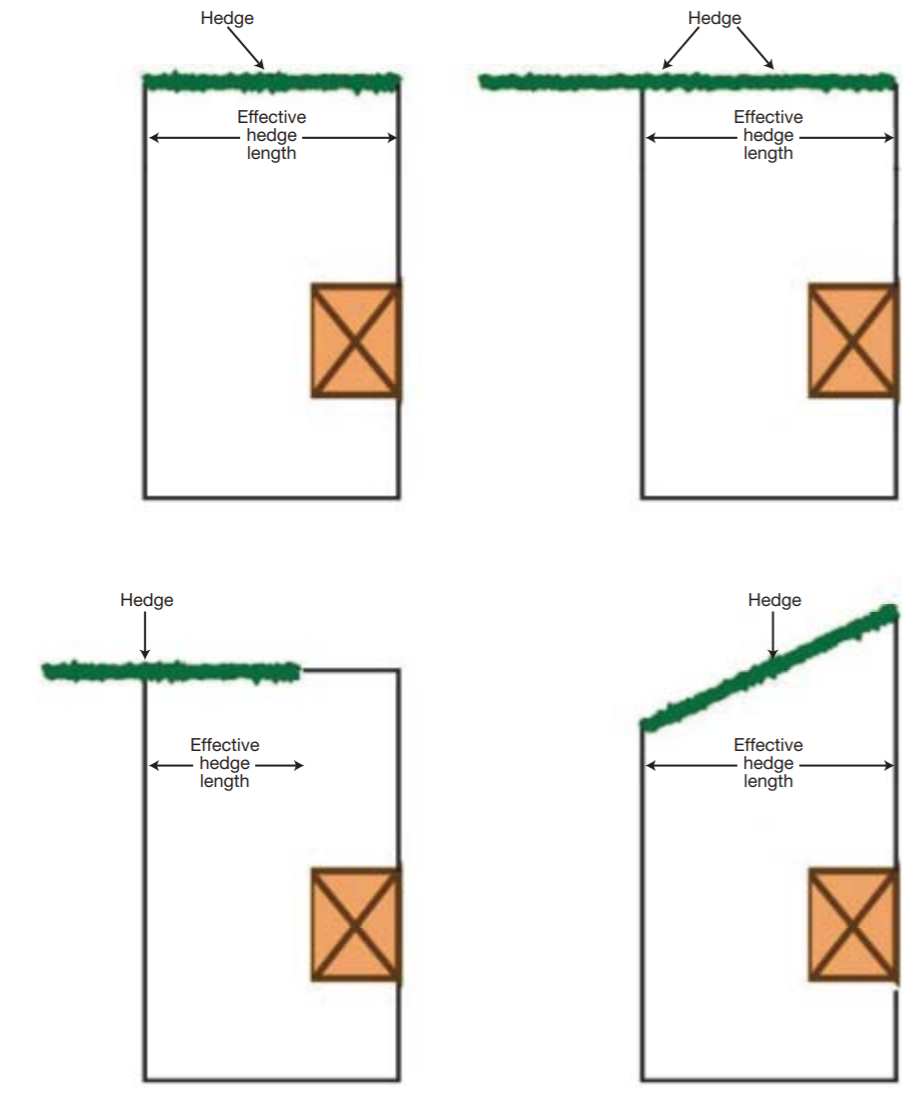
The effective length of the hedge is the length of the hedge that runs parallel to the garden boundary (see figure 3). The effective length of the hedge cannot be more than the width of the garden boundary.
Figure 3. Examples of the measurement of effective hedge length
Once the effective depth of the garden is obtained, multiply it by the relevant factor in Table 1 to get the basic action hedge height.
Table 1
| Orientation | Factor |
|---|---|
| North | 0.65 |
| North East | 0.55 |
| East | 0.4 |
| South East | 0.3 |
| South | 0.25 |
| South West | 0.25 |
| West | 0.35 |
| North West | 0.5 |
Factors for other orientations may be obtained by interpolation. The orientation in Table 1 is the direction faced when looking from the obstructed garden to the hedge. So if the hedge is by the western boundary of the obstructed garden, multiply the effective garden depth by 0.35. If the hedge is to the south east of the garden, multiply the effective garden depth by 0.3.
4.3 Special cases for gardens
4.3.1 Hedge set back from boundary
Sometimes the hedge may not be immediately adjacent to the boundary of the affected garden, but some distance away from it. For example, there may be a driveway between the hedge and the boundary. Or the hedge might be at the far side of the hedge owner’s garden.
Where the hedge is more than 1 metre from the boundary, the shortest distance between the boundary and the nearest part of the hedge should be added to the action hedge height.
Figure 4 shows an example. The effective depth of the garden is 15 metres, and the hedge is to the south of the garden. This gives a basic action hedge height of 15 x 0.25 = 3.75 metres.
The hedge is set back 2.5 metres from the boundary. So the corrected action hedge height is 3.75 + 2.5 = 6.25 metres.
Figure 4. Hedge set back from boundary

4.3.2 Garden sloping or stepped
Where the base of the hedge is above or below the level of the obstructed garden, or the obstructed garden is sloping or terraced, the action hedge height needs to be corrected.
This applies only if the level of the obstructed garden changes as you walk away from the hedge, at right angles to it (see for example figure 5). Where the slope is along the line of the hedge, so that the hedge runs up or down the slope, no correction need be made.
The procedure is as follows:
a. Measure the effective depth of the garden in metres (see (i) above).
b. Divide by 3.
c. Take a point this distance away from the boundary nearest the hedge.
d. Estimate the vertical height difference between this point and the base of the hedge opposite it.
e. If the base of the hedge is higher, subtract this height difference from the action hedge height. If the base of the hedge is lower than the point in the garden, add this height difference to the action hedge height.
Figure 5 shows an example. The effective garden depth is 9 metres, and the hedge is west of the garden. So the action hedge height is 9 x 0.35 = 3.15 metres.
Now we correct for site slope. The garden depth divided by 3 is 3 metres, so we choose a point P 3 metres from the boundary next to the hedge. P is 2 metres below the base of the hedge, so the action hedge height is 3.15 – 2 = 1.15 metres. This is less than 2 metres, the minimum action hedge height, so it would be rounded up to 2 metres (see section 3).
Figure 5. A hedge and a sloping garden

5. Loss of light to windows
5.1 Introduction
High hedges can obstruct daylight to windows. Even if a window faces north, significant loss of diffuse sky light can occur. The extent of the loss of light will depend on the distance from the hedge to the window as well as the height of the hedge.
The guidelines given here are intended for use for the main rooms of a house. These include living rooms, dining rooms, kitchens and bedrooms. Glazed doors can be counted as windows if they form a major source of light to the room.
Loss of light to toilets, bathrooms, storerooms and circulation areas (hall, stairs and landing) is deemed less important and such windows need not be analysed. These guidelines apply to dwellings, and not to outbuildings such as sheds, greenhouses, summer houses, garages or workshops. Windows to these structures need not be taken into account.
Where a dwelling has a conservatory, the opening between it and the house, not the front or side faces of the conservatory, is taken as the window position.
5.2 Hedge is directly opposite window
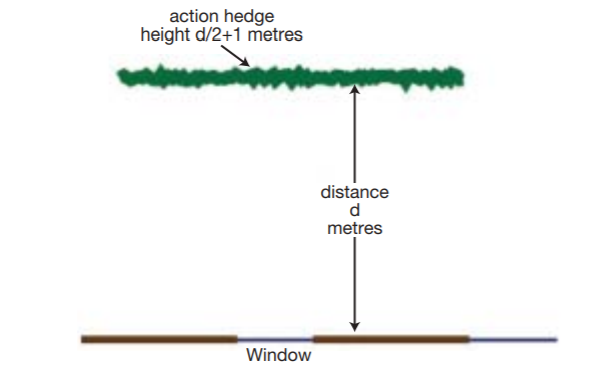
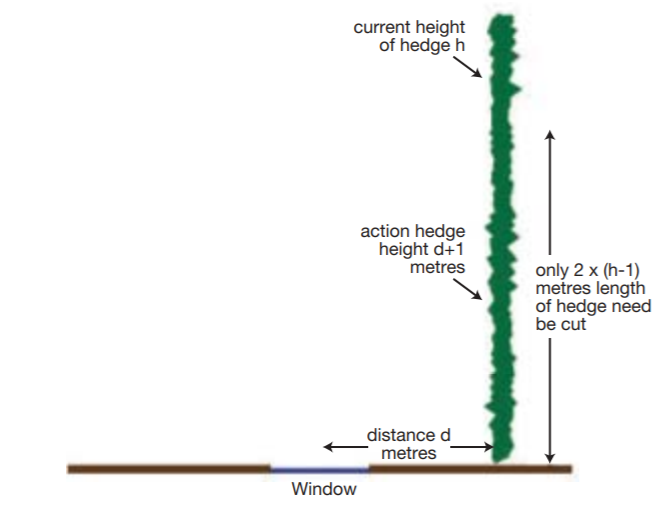
Where the line of the hedge is parallel to the window wall (figure 6), measure the horizontal distance between the outside window wall and the boundary on which the hedge stands. (If the hedge is set back from the boundary, follow the guidance in ‘Special cases’ at the end of this section). Halve it and add 1 metre. This gives the action hedge height.
Example: the hedge is 8 metres away. The action hedge height is (8 ÷ 2 = 4) + 1 = 5 metres.
Figure 6. Hedge opposite a window
5.3 Hedge is to one side of window and at right angles to window wall
This is normally the case if the hedge separates the gardens of two adjoining houses. Measure the horizontal distance between the centre of the window and the boundary on which the hedge stands. Add 1 metre to get the action hedge height.
Example: the hedge is 2 metres to the right of the centre of the window (figure 7). The action hedge height is 2 + 1 = 3 metres.
Most of the light loss to the window will be caused by the portion of the hedge nearest to it. Only this part need be reduced in height. To find the length of hedge that needs trimming, take the current height of the hedge, subtract 1 metre and then double this number. So in figure 7, if the hedge is currently 7 metres high, the length that needs cutting is (7 – 1 = 6) x 2 = 12 metres.
Figure 7. Hedge to one side of window
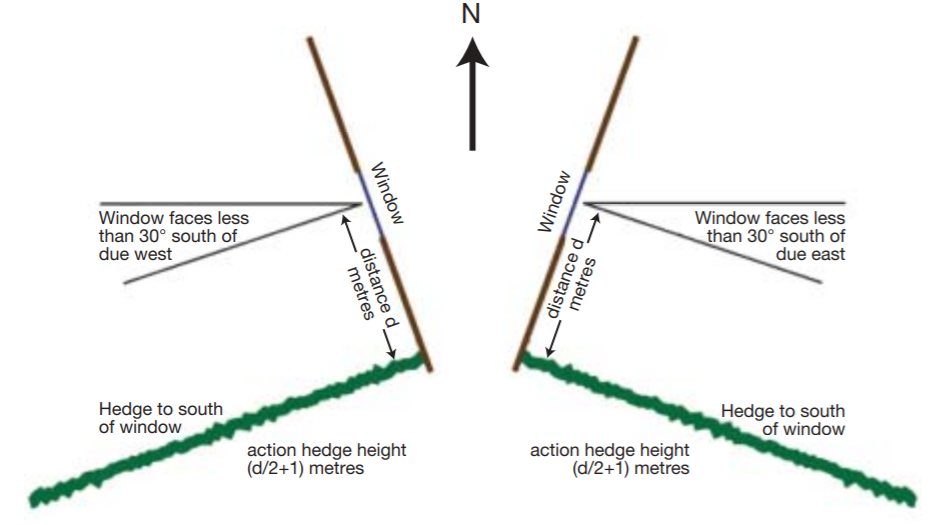
In certain cases the hedge can block significant amounts of sunlight as well as daylight, particularly in the winter. Particular problems can occur if the window faces less than 30° south of due east or west, for example between east and east south east, or between west south west and west (figure 8), and the hedge is to the south of the window.
In these cases the action hedge height is found by taking the horizontal distance between the centre of the window and the boundary on which the hedge stands, dividing this by 2 and then adding 1 metre to get the action hedge height.
Example: the hedge is 6 metres south of the centre of the window (figure 8). The action hedge height is (6 ÷ 2 = 3) + 1 = 4 metres.
The length of hedge that needs trimming is found as described above (take the current height of the hedge, subtract 1 metre and then double this number).
Figure 8. Examples of hedges that could block substantial amounts of winter sunlight
The window faces within 30° south of due east or west and the hedge is to the south of the window.
5.4 Hedge is at 45° to window
This can sometimes happen if the hedge is on a corner plot (figure 9). Take the closest distance d from the boundary on which the hedge stands to the centre of the window (this will be measured along a line at right angles to the hedge and 45° to the window). Multiply this distance by 2, divide it by 3 and add 1 metre. So if the distance d were 6 metres, the action hedge height would be (6 x 2 ÷ 3 = 4) + 1 = 5 metres.
Figure 9. Hedge at 45° to window
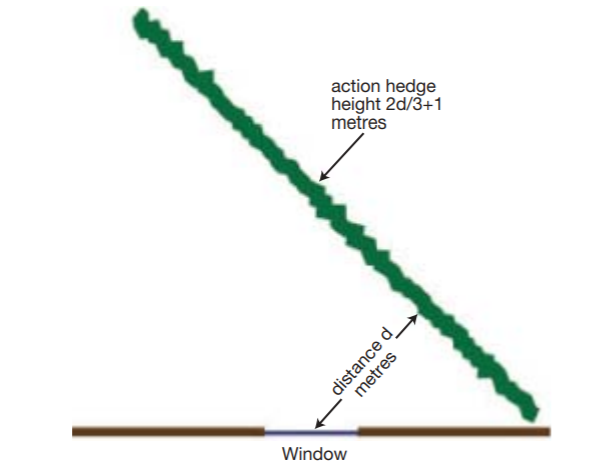
Where the window faces less than 30° south of due east or west, eg between east and east south east, or between west south west and west, extra sunlight may be blocked in winter if the hedge begins to the south of the window (compare figure 8).
In these cases the action hedge height is found by taking distance d in figure 9, dividing this by 2 and then adding 1 metre to get the action hedge height.
Example: the distance d (figure 9) is 10 metres. The action hedge height is (10 ÷ 2 = 5) + 1 = 6 metres.
5.5 Special cases for windows
If the lowest affected window is at first floor height or above, add the height above ground of the floor level of the affected room to the action hedge height. For example, a flat above a shop might have a floor level 3 metres above ground. The action hedge height, as calculated above, should be increased by 3 metres.
Sometimes the same hedge may obstruct main windows in more than one wall. This can happen if there is a rear extension to a house, for example. In this case the action hedge height is calculated separately for each window wall, and the lowest value taken.
If the land slopes or is stepped from window wall to hedge, the action hedge height needs to be modified to take account of this. If the base of the hedge (where the trunks meet the ground) is higher than the base of the window wall, subtract this height difference from the calculated action hedge height. If the base of the hedge is lower, add the height difference to the calculated action hedge height.
Where the hedge is set back from the boundary by at least 1 metre, the distance from the window should be measured to the hedge itself, not the boundary. From the affected window, look towards the hedge and estimate which part of it appears highest. For a hedge that has not been trimmed in the past, this may be the centre of the hedge above the trunks. Where a hedge has previously been trimmed and grown thick and bushy, the part that appears highest from the window may be closer than the centre of the hedge. In each case, measure the distance from the window to the part of the hedge that appears highest when viewed from it. The distance is always measured at right angles to the line of the length of the hedge (see figures 6-9).
6. Example of full calculation procedure
Figure 10 is a plan of Axel Otoff’s small garden. The garden is flat, not sloping or stepped. On the south boundary is a 6 metre high evergreen hedge owned by Laurel Riot.
Figure 10. Plan of example situation
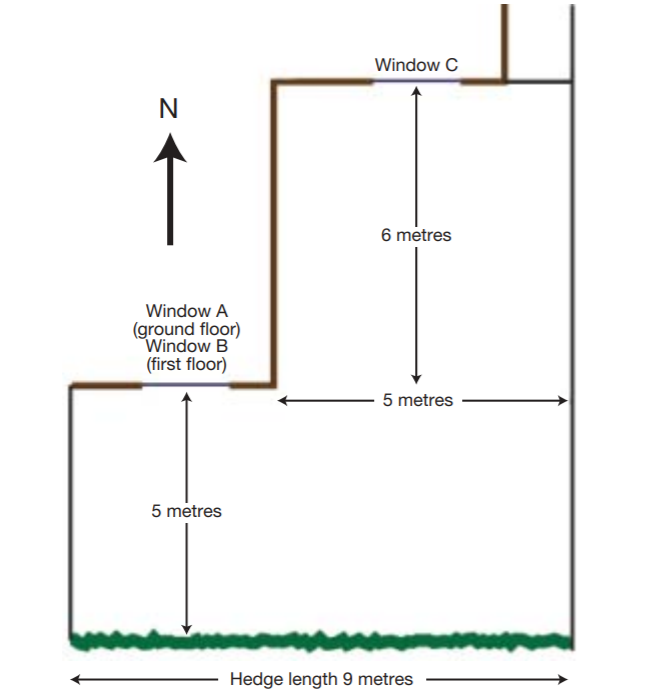
First we calculate loss of light to the garden. The area of the garden is (5 x 9) + (6 x 5) = 75 m2. We exclude the small side passage. The effective length of the hedge is 9 metres, the full width of the garden in this case. So the effective depth of the garden is 75 ÷ 9 = 8.33 metres. According to section 4.2, we then multiply by the factor in Table 1 to get the action hedge height. As the hedge is to the south, this is 0.25. So the action hedge height is 8.33 x 0.25 = 2.08 metres.
Axel’s house is a Victorian villa built with an original rear extension. He is also concerned about 3 windows that face the hedge. On the ground floor, window C lights his dining room. At ground floor level window A lights a bathroom, loss of light to which need not be taken into account (see section 5.1). However, the window directly above at first floor level (window B) lights a bedroom/study. This window, as well as the dining room window, should be analysed.
Next we calculate the action hedge height as far as the windows in the house are concerned. For window B, the distance from the centre of the hedge is 5 metres. As the hedge is opposite the window (section 5.2), we halve this distance and add 1 metre, to get an action hedge height of 3.5 metres. But because the window is at first floor level, we add on the height of the first floor above the ground. In this particular case this is 2.7 metres, giving an action hedge height for window B of 6.2 metres.
Window C is 11 metres from the centre of the hedge, and hence the action hedge height is (11 ÷ 2 = 5.5) + 1 = 6.5 metres.
We take the lower of the two action hedge heights, namely 6.2 metres for window B.
The next stage is to compare the two action hedge heights (for windows and garden) and take the lowest one. In this case the value for the garden is the lower of the two, 2.08 metres. The local authority could require Laurel to cut the hedge down to 2 metres high, and keep the hedge pruned so that it does not cause future problems related to its height.
Annex 3 of this report gives the calculation of action hedge height in spreadsheet form, and includes as an example figures from the above case.
7. Other relevant factors
As section 1 explained, this Note is intended as a guide only. A simple technique cannot cover every situation and there are circumstances which may mean a different action hedge height is chosen. These include:
i. Where hedges cover more than one side of the garden, normally different action hedge heights will be calculated for each side individually. However, to allow for the cumulative impact of the hedges a lower action hedge height could be chosen in some circumstances. One way of doing this would be to trim all the hedges to the lower of the two (or three) calculated action hedge heights.
ii. If there is a building behind, and close to, the hedge, the hedge might not be blocking any extra light. For windows, the extra light the hedge blocks could be assessed using the techniques in the BRE Report ‘Site layout planning for daylight and sunlight: a guide to good practice’.
ii.a When calculating the action hedge height for a garden where a hedge only covers part of the boundary use the calculation stated in 4.2. If a building is up against part of the boundary of the garden, and the hedge the rest of the boundary, then this may give an unfairly high action hedge height if this method is applied rigidly. It may be more appropriate to choose a lower action hedge height, although this should not be lower than the action hedge height that would have resulted if the hedge occupied the whole of the boundary.
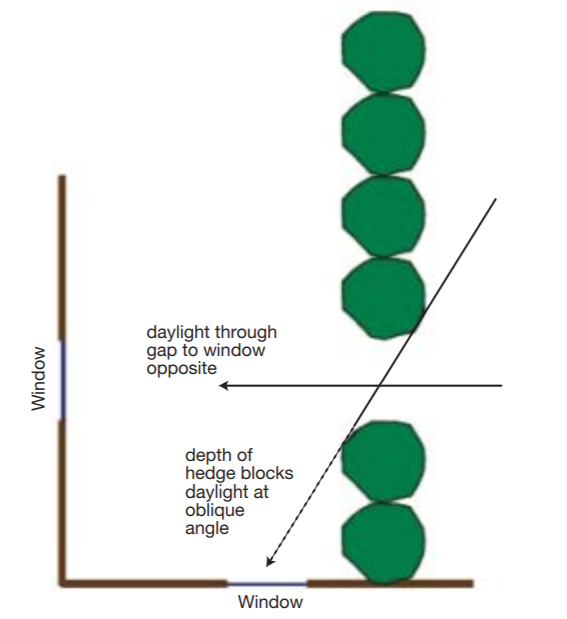
iii. If a hedge opposite a window only covers a part of the field of view (figure 11), or if there are gaps in the hedge (figure 12) the action hedge height may be raised. For a hedge opposite a window, a very rough rule of thumb is that x% gaps will lower the effective height of the hedge above the window by x%. Suppose the centre of the window is 1.5m above ground and opposite a hedge 5.5m high. The height of the hedge above the window is 4m. If the hedge had 25% gaps, it would have a similar effect to that of a hedge 4x 25% = 1m lower, in other words a 4.5m high hedge. If the hedge had 50% gaps, it would have a similar effect to a hedge 4 x 50% = 2m lower, a 3.5m high hedge. This rule of thumb only works well where the hedge is opposite the window and not too close to it. Figure 1 shows how gaps in a hedge viewed from an oblique angle tend to disappear and have little effect on light. So for a window with a hedge to one side, the effect of gaps in the hedge is much less. Where a hedge is a very irregular shape or has large gaps which may or may not be opposite the window, the light loss to the window may be calculated using the methods in the BRE Report ‘Site layout planning for daylight and sunlight: a guide to good practice’.
Figure 11
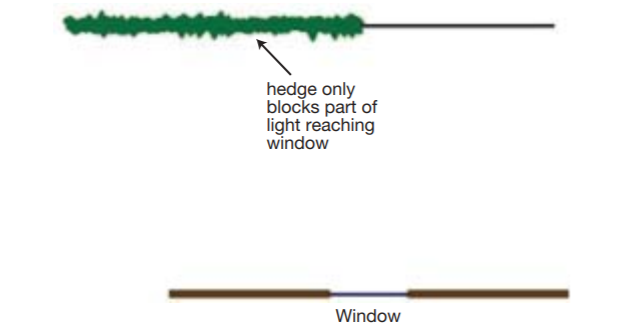
Figure 12
The effect of gaps in the hedge. Where the window is opposite the gap, it can receive daylight through it. A window at an oblique angle may receive little or no light through the gap because of the depth of the hedge.
iv. Where the hedge is deliberately being trimmed to, and managed at, a non-uniform height (for example topiary) a higher action hedge height could be set to avoid the top of the design being removed.
v. Single trees growing above a lower hedge should be considered separately. More selective and sensitive pruning should be possible.
Of course the hedge owner is free to trim the hedge below the height proposed in these guidelines, or remove the hedge altogether, if it is easier or safer to do so and the hedge is not protected by a tree preservation order or by growing in a conservation area.
High and overgrown hedges often need specialist equipment or professional help to remove them altogether, reduce their height or trim their sides. Where the work required is beyond the skills and resources available to the individual then engaging the services of a reputable tree work contractor is recommended. A hedge that has substantial value as a refuge for wildlife may receive special consideration. If birds are nesting in the hedge, trimming should be delayed until after the nesting season.
A local authority may also require a hedge to be cut lower than the height proposed in these guidelines. This could happen if the hedge is causing adverse effects other than loss of light.
8. Further reading
‘The right hedge for you’ DETR, London, 1999.
‘Hedges: suitable trees, shrubs and conifers’ Horticultural Advisory Leaflet no. 182, Royal Horticultural Society, Wisley, 2000.
‘Leyland’s cypress hedges’ Horticultural Advisory Leaflet no. 222, Royal Horticultural Society, Wisley, 1999.
‘Evergreen hedges’ Leaflet no. 5, Arboricultural Association, Romsey, 1991.
P J Littlefair ‘Site layout planning for daylight and sunlight: a guide to good practice’ BRE Report, CRC, Garston, 1991.
J F Barlow and G Harrison ‘Shaded by trees?’ Arboricultural Practice Note 5, Arboricultural Advisory and Information Service, Farnham, 1999.
The Arboricultural Advisory and Information Service runs a Tree Helpline offering advice on trees and hedges. Telephone 09065 161147. Premium rate charges apply.
9. Acknowledgments
This project was carried out for the Office of the Deputy Prime Minister. I would like to thank Julie Richardson, Peter Annett and Steve Clark of ODPM and Derek Patch of the Tree Advice Trust for their help and guidance. Emma Dewey of BRE carried out a series of site visits to test out these guidelines; I would like to thank all those people who allowed access to their gardens and co-operated with the surveys, Alan Bridgman of Hedgeline, for co-ordinating sites for visiting, and Barbara Milne of the London Borough of Bromley, for her help with the four site visits there.
I would also like to thank the following people for the time they gave in discussing the proposals and giving advice and information: Guy Barter, Colin Crosby and Paul Goacher of the Royal Horticultural Society; Richard Nicholson of East Dorset District Council; Clare Hinchliffe, Derek Glew and Alan Bridgman of Hedgeline; Alistair Redler of Delva Patman Associates and the Royal Institution of Chartered Surveyors; Becky Hesch of the London Tree Officers’ Association; Chris Colwell of the Royal Borough of Kensington and Chelsea; Barbara Milne of London Borough of Bromley; Jim Smith of Islington London Borough Council; and David Hall of Envirobods Limited. A large number of individuals and organisations also provided comments on an earlier version of this note. Their help is gratefully acknowledged, but the guidelines in this report are not necessarily in accordance with their views or those of their organisations.
The characters in the Example are entirely fictitious.
Annex 1: Measuring hedge height
It is sometimes difficult to estimate the height of an existing hedge. The following techniques can be used. The hedge height is normally taken as the height of the highest shoot.
If the hedge is less than 4-5m high, a measuring stick or tape (the stiff metal kind) can be used to find its height. From a fixed point, measure downwards towards the base and upwards to the top, and add the two heights together. It can be hard to tell if the tape or stick is at the top of the hedge; get someone else to stand back from the hedge to help judge when it is.
If the hedge is next to a house, you can assess its height by counting the bricks of the house up to the top of the hedge and multiplying by the height of a brick (with mortar bed).
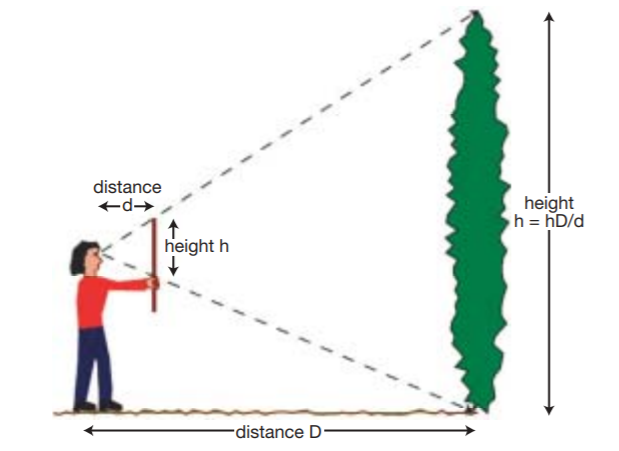
Alternatively, take a straight stick and stand some distance away from the hedge. Hold the stick vertically at arms length (get someone else to check it is vertical). Keeping the stick vertical, hold it so the top of the stick is aligned with the top of the hedge and the top of your fist is aligned with the base of the hedge (figure 13). Then the height of the hedge is given by the horizontal distance between you and the hedge trunk, multiplied by the length of the stick above your fist, divided by the horizontal distance between your eye and the stick (get your assistant to measure this).
Tree experts use an instrument called a hypsometer or clinometer to measure heights. Further details are given in ‘Measuring trees and forests’ by M S Philip (CAB International, Wallingford, 1994).
Figure 13. Estimating hedge height using a vertical rod
Annex 2: Explanatory notes
These notes are intended to provide more detail on the basis for the guidelines.
In gardens the guidelines are based on the loss of sunlight and diffuse daylight. The corrections for orientation are based on light blocked by the hedge between 0900 (clock time) and sunset, which is why the values for east and west are not the same. The factors in Table 1 form a central part of the guidelines; roughly speaking they correspond to up to a quarter of the garden losing at least half its light.
For daylight to windows of dwellings, the guidelines are based on those in the BRE Report ‘Site layout planning for daylight and sunlight: a guide to good practice’, except that the angular criteria have been replaced by spacing to height ratios for ease of application. The aim here has been to concentrate on daylight provision on cloudy days. Where the hedge is opposite a window that faces within 90° of due south, it can be shown that there is little obstruction to sunlight if the guidelines are followed.
Glossary
Action hedge height. The height above which a hedge is likely to block too much light.
Buffer zone. A distance up to 1 metre below the action hedge height (defined above). Hedges within this range of heights could cause a significant loss of light as they grow.
Centre of the hedge. This is the centre of the thickness of the hedge. For most plant types it will lie in a plane through the main trunks of the individual trees or shrubs.
Daylight. The combination of skylight and sunlight.
Diffuse daylight. Light from the sky (skylight).
Effective depth. For a rectangular garden the effective depth is the distance between the boundary by the hedge and the opposite end of the garden. For non-rectangular gardens:
Effective depth = Area of garden
divided by
Effective length of hedge
Effective length. The length of the hedge that runs parallel to the garden boundary. The effective length of the hedge cannot be more than the width of the garden.
Garden. A garden or yard which is used wholly or mainly in connection with a dwelling.
Height of a hedge. The vertical distance from the base of the trunk to the topmost shoot.
Orientation. The compass direction of a line on plan from the obstructed garden to the hedge and at right angles to the line of the hedge.
Annex 3: A spreadsheet to calculate action hedge height
See spreadsheet.
Annex 4: Solar energy
If a hedge might block sunlight to solar features in a specially designed or modified dwelling, a lower action hedge height may be necessary.
Passive solar houses can exploit the sun’s heat to give energy savings. These would normally be characterised by a main window wall facing within 30 degrees of due south, significantly larger windows on the south facing wall compared to the north facing one (or a collecting device like a Trombe wall or thermosyphon (ref 1)), provision of thermal mass to store heat, and heating controls to make sure the solar energy is utilised. To be classed as a passive solar dwelling rather than one which happens accidentally to have large windows, some evidence of design intent would be helpful (for example guidance to homeowners on the operation and maintenance of the solar features).
The BRE Reports ‘Site layout planning for daylight and sunlight: a guide to good practice’ (ref 2) and ‘Environmental site layout planning’ (ref 3) give guidance on obstruction of passive solar dwellings. This is summarised in figure 14.
Figure 14
For passive solar access, the area of sky between south east and south west is important. Obstructions in this zone should not exceed the critical angle h. For UK latitudes, h = (70° – latitude).
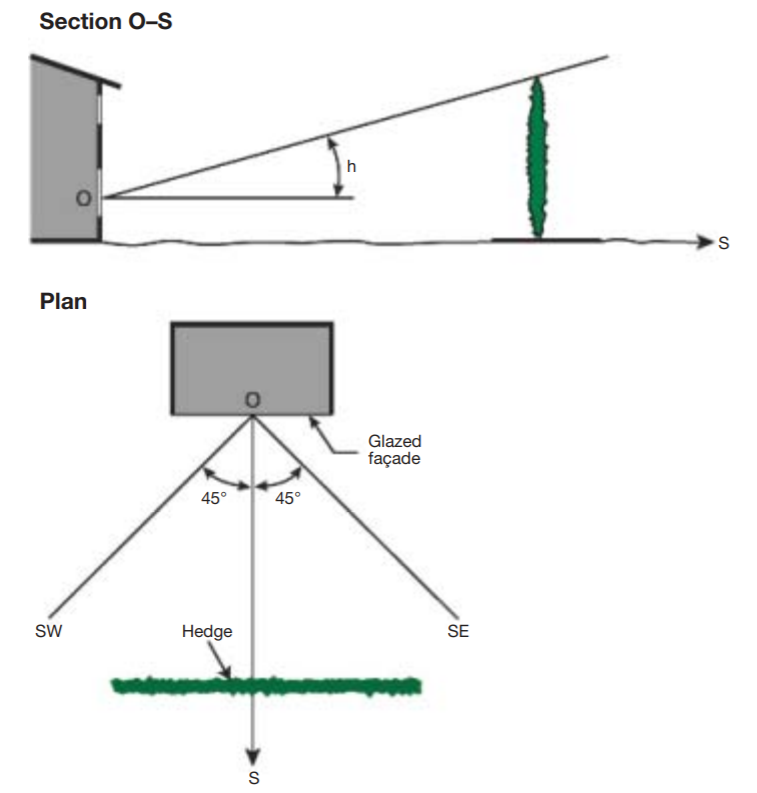
Reference 3 explains that the key area for solar access in winter lies within 45° of due south. This means that hedges to one side of the window are unlikely to have a substantial effect. Hedges opposite the window, however, will block solar access if they subtend more than the critical angle h to the horizontal measured from the centre of the window. A value of h = (70°-site latitude) (ref 3) is recommended. This would give an obstruction angle of 18.5° in the London area and 14° in Edinburgh or Glasgow.
Example. A passive solar dwelling is situated in Manchester (53.5°N). It has a ‘solar wall’ facing due south. The centre of the solar collecting glazing is 1.5 metres above the ground. The boundary on which the hedge stands is 15 metres away. The action hedge height would be 1.5 + 15 tan (75º-53.5°) = 1.5 + 15 tan (16.5º) = 5.94 metres.
If the base of the hedge (where the trunks meet the ground) is higher than the base of the window wall, subtract this height difference from the calculated action hedge height. If the base of the hedge is lower, add the height difference to the calculated action hedge height.
Where the hedge is set back from the boundary by at least one metre, the distance from the window should be measured to the hedge, not the boundary. Section 5.5 ‘Special cases’ explains how to measure this distance.
Active solar thermal installations use solar collectors with pumps or fans to provide water or space heating. A typical example is the roof mounted solar panel filled with water, usually used to provide water heating. Photovoltaic panels generate electricity directly from the sun’s radiation.
Where a roof mounted solar panel is provided, or a solar heating system serves a swimming pool and the solar collector cannot be easily relocated, the action hedge height should be set so that the hedge does not cast a shadow over the solar panel during the hours between one hour after sunrise and one hour before sunset. For an outdoor swimming pool this would apply only to the period between 21 March and 21 September. A sunpath diagram such as the BRE sunlight availability protractor (ref 4) can be used to check this.
References
-
J R Goulding, J O Lewis and T C Steemers, ‘Energy in architecture’ Batsford/CEC, London, 1992.
-
P J Littlefair ‘Site layout planning for daylight and sunlight: a guide to good practice’ BRE Report BR 209, CRC, Garston, 1991.
-
P J Littlefair et al ‘Environmental site layout planning’ BRE Report BR 380, CRC, Garston, 2000.
-
‘Sunlight availability protractor’ CRC, Garston, 2000.