Confirm your information and claim
To confirm the information in your claim is correct, check it before you submit it online.
When you’ve completed your claim you need to check that the information in it is correct. To do this, create or update your claim summary by following the instructions in the ‘Complete’ section under Claim Summary. Then if needed, you can go back into your claim and change it.
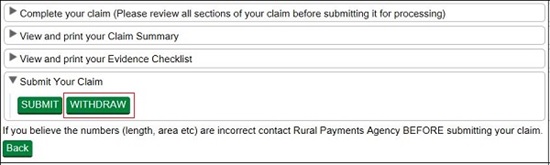
If you decide that you do not want to submit your claim, click ‘Withdraw’. A message appears to check that you do want to withdraw the claim.
Click ‘No’ if you do not want to withdraw it.
Click ‘Yes’ if you do want to withdraw it. You’ll see a screen message confirming that you’ve successfully withdrawn your claim. This claim will not be submitted to RPA, and you cannot open it again but you can create a new claim while the relevant green button is available.
Click ‘Back’ to return to the claim screen (where you’ll see the claim status is now ‘Withdrawn’ and the claim is no longer ‘Active’).
If you have checked your claim summary and the information in your revenue claim is correct, click ‘Submit’.

You’ll be asked to confirm that you’ve completed all the sections of the claim before you submit. Click ‘Cancel’ if you want to return to your claim to amend something, or click ‘OK’ if you want to continue to submit your claim.
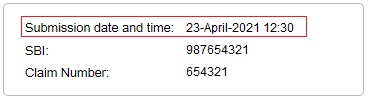
The screen will confirm that your claim has ‘submitted successfully’ and RPA has received your claim.
Click ‘Print’ if you want to print and keep the confirmation for your records.
Click ‘Back’ to return to the claims screen (where you’ll see that the status of your claim has changed to ‘Submitted’. It also shows the date and time your claim was submitted).
For more information read the ‘Supporting documents and evidence’ section.
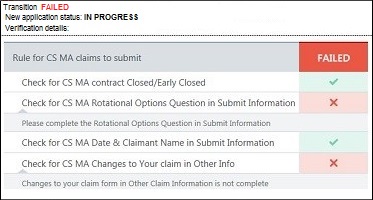
Claim fails to submit
If your claim fails to submit, a screen message will tell you this. It will also show the reasons why it did not submit with a red warning box beside it.
Read this message fully by using the scroll bar to the right of the message. You may find it useful to print and save the message. You may be able to do this by clicking the button on the right side of the mouse or touchpad, and choosing the print or save options.
Click ‘Back’ to return to the claims screen.
Check and correct all of the sections detailed in the message before you ‘Submit’ your claim again.
The information below will tell you what you need to do before you submit your claim again:
You have not entered a value for one or more agreement level options if you do not have a value then you must enter 0 (zero)
Your agreement contains at least one agreement level option. You must enter the amount claimed (or 0 if you do not wish to claim any of the option).
Read the ‘Agreement Level Options’ section for more information.
Please complete the Rotational Options Question in Submit Information
You have not answered the location of rotational options question. If your agreement contains rotational options, you must answer the question with ‘Yes’ or ‘No’.
If your agreement does not contain rotational options, you must answer ‘N/A’.
Read the ‘Rotational Options’ section for more information.
Changes to your claim form in Other Claim Information is not complete
You have either not answered the question under Changes to your claim, or you have answered ‘Yes’ to the question but have not entered the requested details in the box provided.
Read the ‘Changes to your claim’ section for more information.
You must select ‘Yes’ in the Declarations section to be able to proceed with your claim
You have not answered ‘Yes’ to confirm that you accept the declaration under Declarations.
Read the ‘Declarations’ section for more information.
After you’ve submitted your claim and returned to the claim screen, you may see the following green buttons beside your submitted claim details.

Making changes to your claim
If you need to make changes to your claim after you’ve submitted it send an email to ruralpayments@defra.gov.uk, use ‘Countryside Stewardship 2021 Revenue Claim’ as the email subject heading. Or you can write to us using the address in the ‘More information and Contact details’ section. Claims can be changed until midnight on 31 May 2021 without penalty. For each working day after this, a 1% penalty will be applied to the land parcel and the option the change relates to. Claims cannot be changed after 11 June 2021.
Summary and Evidence checklist
You may have already generated these at the ‘Complete your claim’ section. You should ‘generate’ and ‘download’ them again after you submit your claim to make sure they contain everything you’ve put into your claim.
Evidence checklist – the checklist tells you which evidence you need to submit with your claim and which you need to keep until you’re asked for it. As explained earlier in the ‘Complete’ section. If the evidence checklist is not visible on your screen read Countryside Stewardship grants on GOV.UK for more information about evidence.
Claim summary – you may want to print or save your summary to keep it for your records.
Important information if you have rotational options in your claim – currently Section 3 of the claim summary does not show the land parcel reference numbers you’ve added the areas to for your rotational options. We are looking into this and we intend to include the land parcel references in the summary as soon as we can.
If you want a record of the land parcels and have not already taken screenshots of the rotational options screens as explained in the ‘Add rotational options’ section, we suggest you write the land parcel reference numbers into the ‘Parcel numbers(s)/area(s)’ column in the summary.
This does not affect the information you’ve added and ‘saved’ in the rotational options screen. The information and the land parcel reference numbers are still contained within the screen and the claim itself in the Rural Payments service.
The ‘Agreement Area’ column in Section 3 of the claim summary does show the area(s) of rotational options you have claimed.
Read the ‘Supporting documents and evidence’ section for details about how to send your supporting documents to RPA.
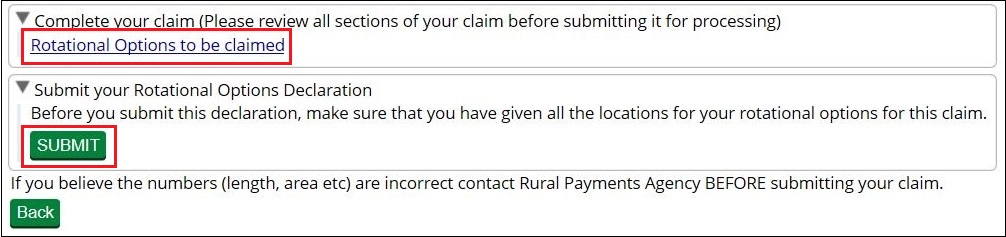
Rotational Options Declaration
After you’ve submitted your claim the Rotational Options Declaration only appears if, at the rotational options screen, you clicked ‘No’ telling us you have not confirmed all the locations of your rotational options.
Use this declaration to confirm the locations of your rotational options.
Click ‘Open’.
Then click ‘Rotational Options to be claimed’. If this is not visible in the list on your screen you may need to click ‘Complete your claim’ first.
Enter the locations as explained in the ‘Add rotational options’ section.
You can enter or amend the information as many times as you need to. Click Save each time you leave the screen to save the information you’ve entered.
You can only ‘submit’ your locations once using this declaration, then the Rotational Options Declaration button disappears from the claim screen. Therefore, it is important that you make sure you have entered all the locations for your rotational options before you click Submit.
After you’re sure you’ve entered all the locations, and clicked ‘Yes’ that you’ve confirmed the locations of all your rotational options, click ‘Submit’ to send the information to RPA.
After you submit your rotational options declaration you’ll see a screen message confirming that you’ve submitted the declaration successfully. Click ‘Print’ to print and keep this confirmation for your records.
Click ‘Back’ to return to the main screen (where the Rotational Options Declaration is no longer visible).
IMPORTANT: You must send this confirmation of the locations as soon as the information is available, to reach RPA no later than 1 September in the scheme year.
If you need to make any further changes to the information after you’ve submitted the locations in this rotational options declaration, write or send an email to reach RPA no later than 1 September in the scheme year.
RPA must receive your online claim, supporting documents, and any evidence that needs to be submitted, by midnight on 17 May 2021.
Supporting documents
For example,
-
Land Ownership Control form (if required), on GOV.UK
-
Whole Business Claim Declaration form (if required), on GOV.UK
For more information about supporting documents read the relevant scheme manual or Countryside Stewardship grants on GOV.UK.
Evidence
Some evidence RPA must receive by midnight on 17 May 2021, and some evidence you must keep until you’re asked for it. Your evidence checklist will show this. If the checklist is not visible on your screen you can read the same information for each individual option or item in Countryside Stewardship grants on GOV.UK.
How to submit your supporting documents and evidence
You can scan and email your supporting documents and evidence to ruralpayments@defra.gov.uk. The maximum size of emails we can accept is 32MB. For security reasons, we cannot accept discs, USB pen drives or other external storage media.
You must put your SBI and Claim number in the email and on all documents. Also use ‘Countryside Stewardship 2021 Revenue Claim’ as the email subject heading.
If we request photos, you can submit digital photos by email, but do not scan printed photos as the quality is not good enough.
Or you can post documents to RPA using the address in the ‘More information and Contact details’ section. We recommend you get proof of posting.
We’ll contact you if we have any queries.
We now make one single payment for a revenue claim. We normally start making payments in December following the claim, and continue until June the following year.
We’ll make all payments directly into the bank account we have details for, so it’s important that this information is up to date.
After you’ve submitted your claim, you can check the progress of your claim in the Rural Payments service. As your claim progresses, the claim status will change in the Countryside Stewardship claims screen.
Submitted
You have submitted your claim online and now need to send your supporting documents to RPA before the claim deadline.
Claim validation
Your claim, supporting documents and evidence are being checked to confirm eligibility.
When submitting a claim based on the draft agreement, the status will show as ‘claim validation’. This means that the claim has been submitted but will remain here until the agreement has been set live.
Final checking
Your claim is waiting for final check and authorisation to pay.
Preparing for payment*
Your claim is being sent for payment, or has been paid.
*The claim status will still show ‘Preparing for payment’ after it has been paid. Please check your nominated bank account to confirm if payment has been received. If your claim has been at ‘Preparing for Payment’ for longer than one month and you have not received your payment contact RPA using details from the ‘More Information and Contact details’ section.