Individual Vehicle Approval (IVA) for cars: help to get a pass
Updated 29 June 2017

© Crown copyright 2017
This publication is licensed under the terms of the Open Government Licence v3.0 except where otherwise stated. To view this licence, visit nationalarchives.gov.uk/doc/open-government-licence/version/3 or write to the Information Policy Team, The National Archives, Kew, London TW9 4DU, or email: psi@nationalarchives.gov.uk.
Where we have identified any third party copyright information you will need to obtain permission from the copyright holders concerned.
This publication is available at https://www.gov.uk/government/publications/individual-vehicle-approval-iva-for-cars-help-to-get-a-pass/individual-vehicle-approval-iva-for-cars-help-to-get-a-pass
Introduction
This guide tells you how to avoid the top 10 reasons that cars and other vehicles in the M1 inspection category fail the IVA inspection:
- headlamp aim
- general construction
- brakes
- rear fog lamps
- exterior projections
- speedometers
- statutory plates
- seat belt anchorages
- emissions
- interior fittings
This guide tells you:
- how each item is inspected
- what to check before each item is inspected
- the required standard
Full compliance with this guide doesn’t guarantee a pass. You’ll need to view the IVA Inspection manual for the full requirements and testing procedures needed to get your vehicle passed.
You must apply for vehicle approval if you’ve:
- built a vehicle
- rebuilt a vehicle
- radically altered a vehicle
- reconstructed a classic vehicle
- imported a vehicle
Vehicles that are in the M1 category include:
- cars
- left hand drive vehicles
- personally imported vehicles
- amateur built vehicles
- kit cars
- motor caravans
- hearses
- wheelchair accessible vehicles
- rebuilt vehicles
- ambulances
- armored vehicles
- vehicles manufactured in very low volumes
- vehicles manufactured using parts of a registered vehicle
Difference between IVA and MOT
IVA inspections are different from the annual MOT test.
The IVA inspection looks at the way your vehicle is constructed or adapted, while the annual MOT test looks at roadworthiness of your vehicle.
Your vehicle might pass the MOT test, but that doesn’t mean it will pass an IVA inspection.
1. Headlamp aim
1.1 How headlamp aim is inspected
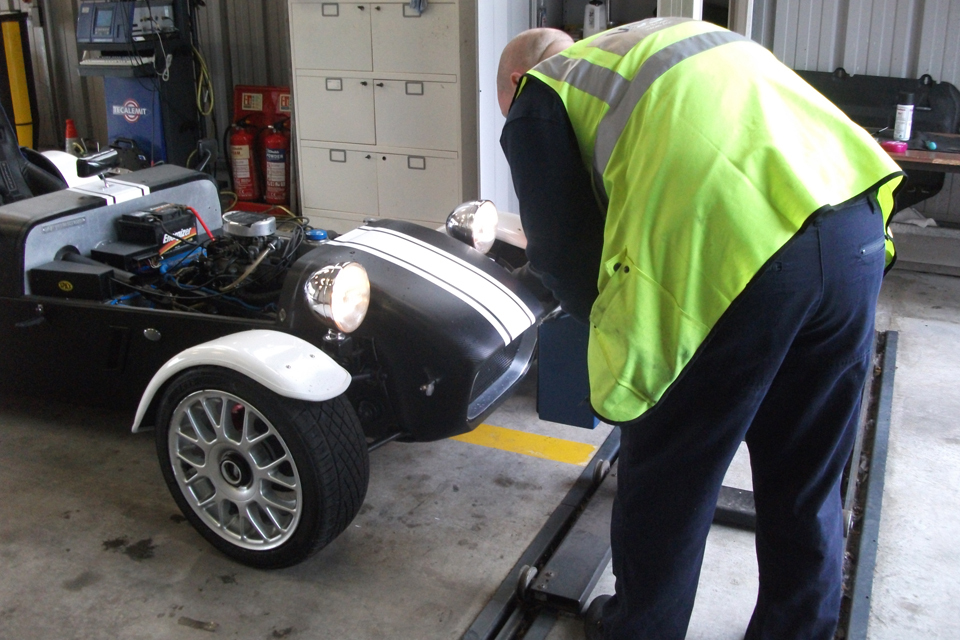
Head lamp aim inspection.
Check the headlamp aim using an approved head lamp aim tester. As part of the inspection DVSA will check for the correct:
- image
- height and horizontal aim
- dipping to the left
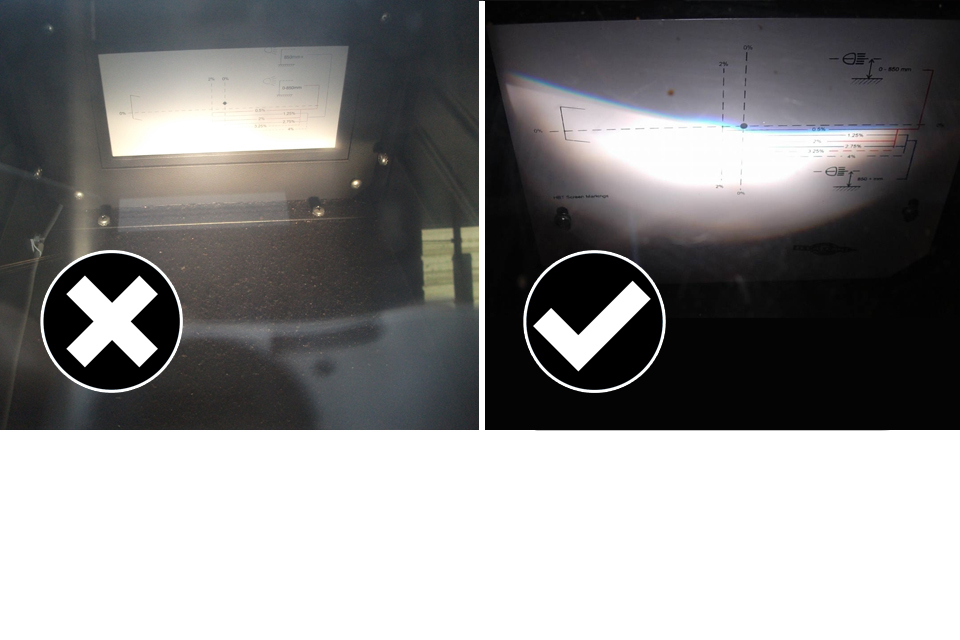
Example of a correct and incorrect head lamp output.
The images above show an incorrect and correct output. The headlamp aim in the incorrect example doesn’t provide a clear image to allow the headlamp aim to be checked. The correct example shows what your vehicle needs:
- a good clear image
- the ‘cut off’ to the left
- correct alignment
1.2 What to check before headlamp aim is inspected
Make sure that your headlamps dip the correct way for driving on the left. You might need to have headlamps on vehicles imported from countries that drive on the right converted or replaced before the inspection.
Have the headlamp aim checked with a calibrated headlamp aim tester before the inspection. An MOT station (class 4) can check and adjust the headlamps if you don’t have the equipment.
The IVA inspection doesn’t allow any kind of internal or external ‘masking’ of the headlamp.
1.3 The standard headlamp aim must meet
See section 25 (headlamps) of the IVA inspection manual for the full inspection standard.
2. General construction
2.1 How general construction is inspected
All aspects of design and construction are inspected to make sure that the vehicle is of no danger to the driver, passengers or other road users.
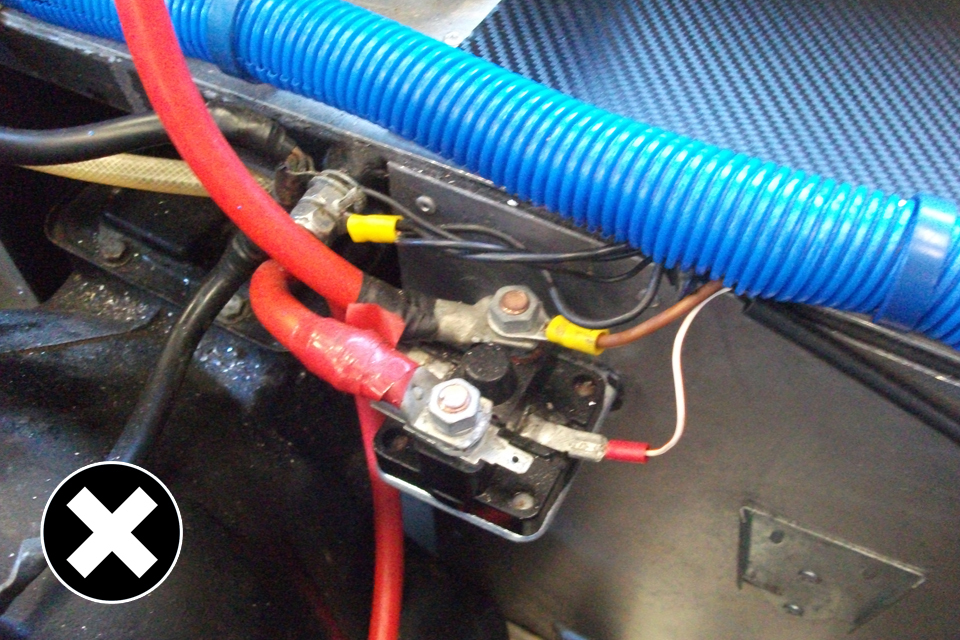
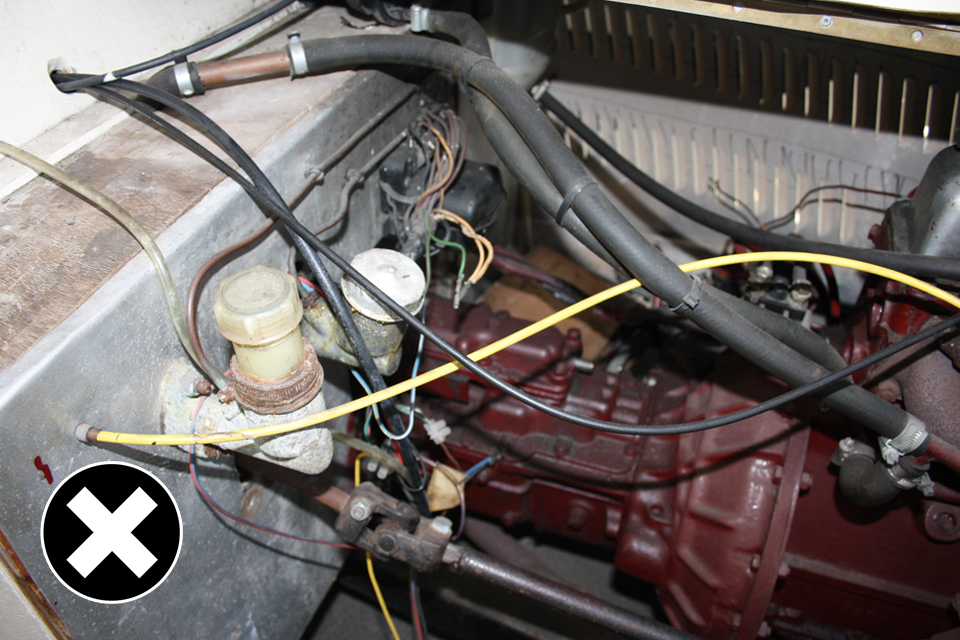
Not allowed: non insulated connections and tape wrapped around wires.
The ‘solenoid’ has non insulated connections with tape wrapped around the wires.
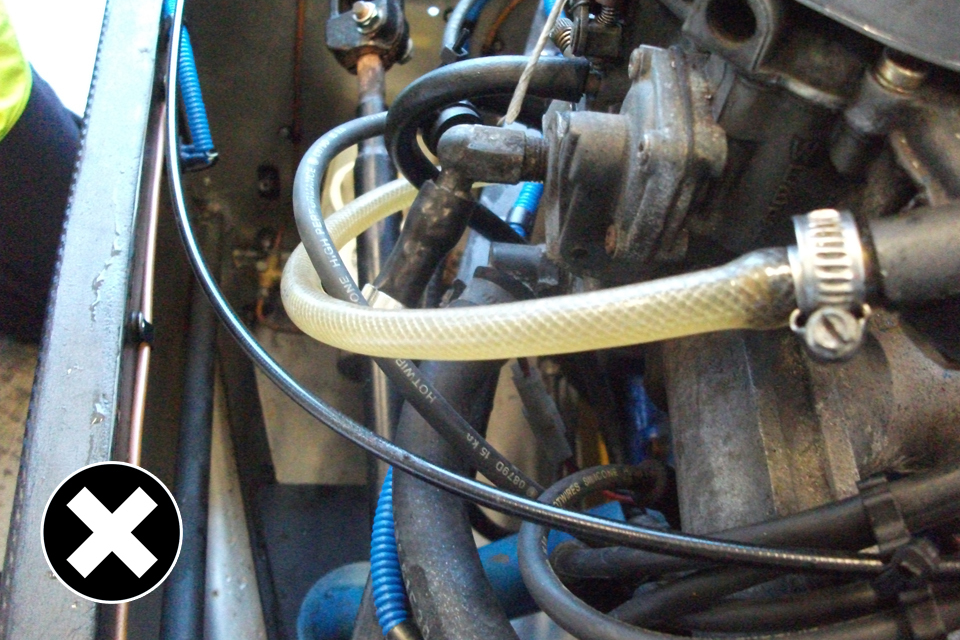
Not allowed: the petrol pipe is rubbing against the HT lead and is not clipped into place.
In the image above the petrol pipe is rubbing against the ‘High Tension (HT) lead and isn’t clipped into place. All pipes, wires and cables will need to be clipped into place at least every 300 millimetres (mm).
Proof will be required that the petrol pipe is suitable for use as it’s unmarked.
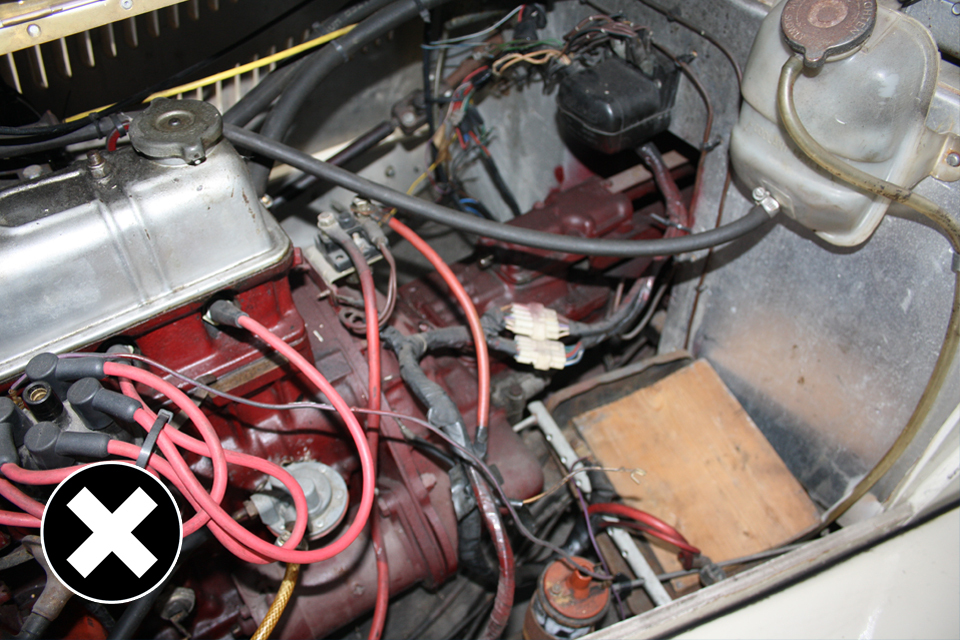
Not allowed: insecure hoses, cables and wires.
In this image there are insecure hoses, cables and wires. There are also wires that aren’t insulated.
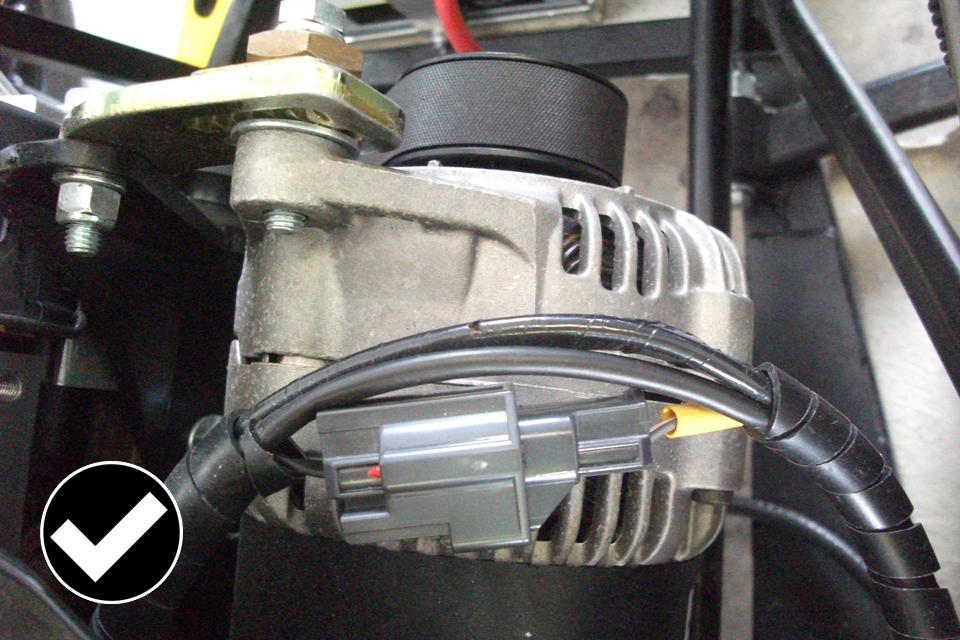
What DVSA would expect to find.
This is an image of what DVSA would expect to find. Wiring that is:
- nicely clipped and in ‘conduit’
- clear of the alternator
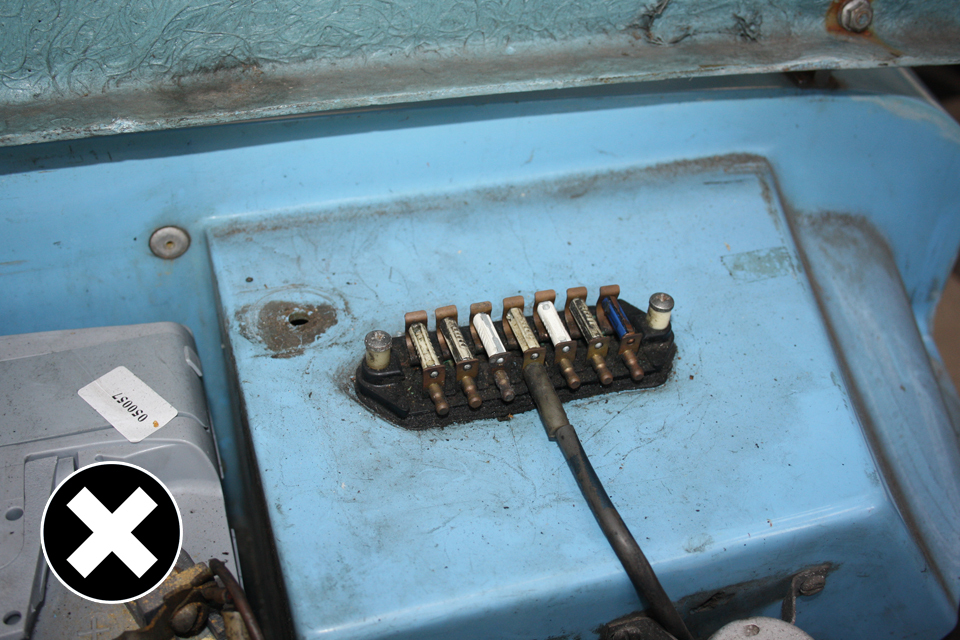
Not allowed: non insulated terminals and insecure wiring.
Non insulated terminals and insecure wiring aren’t allowed.
Not allowed: insecure wires and cables, wiring missing and uninsulated terminals.
This image shows:
- insecure wires and cables
- wiring missing from the brake master cylinder switch
- uninsulated terminals
DVSA expects to find neat, tidy and good workmanship.
2.2 What to check before general construction is inspected
DVSA will look at how the vehicle is designed and constructed and consider all aspects of the vehicle in all the conditions it’ll be operated under:
- speed
- load
- vibrations
- acceleration
- cornering
- braking forces
2.3 The standard general construction must meet
See the IVA inspection manual for the full inspection standard.
3. Brakes
3.1 How brakes are inspected
DVSA will check the brake system for:
- suitability
- strength
- fittings
- security
- operation
The whole system will be checked for:
- its capability
- how it works
- whether it’s strong enough to do the job, this takes into account speed and weight of the vehicle
- brake pipes/hoses that are twisted, kinked, rubbing against another surface and not secured
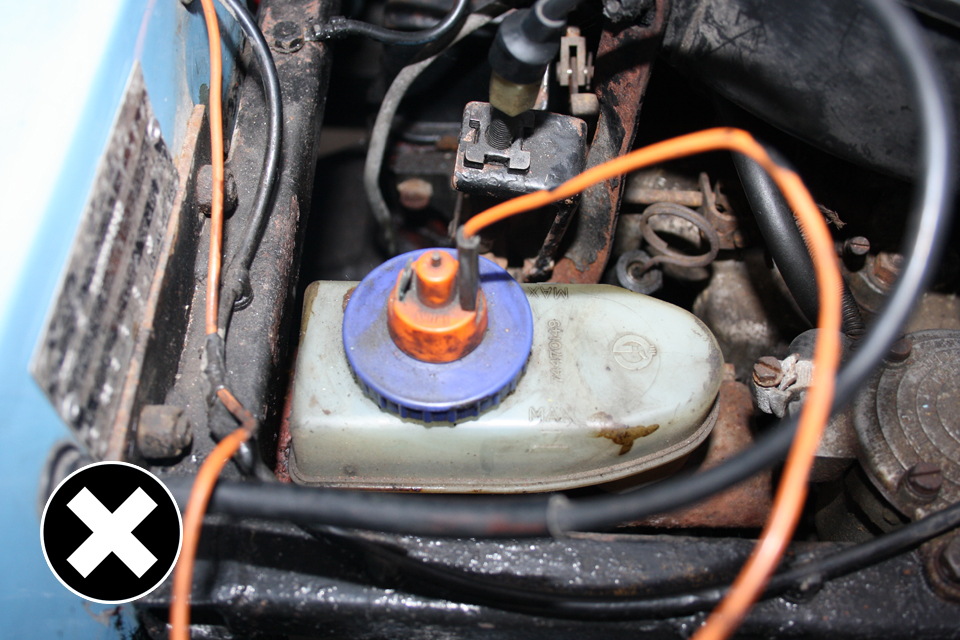
Not allowed: the brake master cylinder not mounted on a strong enough structure.
This image shows a ‘brake master cylinder’ that is mounted to a wooden/aluminium structure which isn’t strong enough.
The ‘brake master cylinder’ in this image isn’t suitable for a passenger vehicle as it’s of a ‘single line type’.
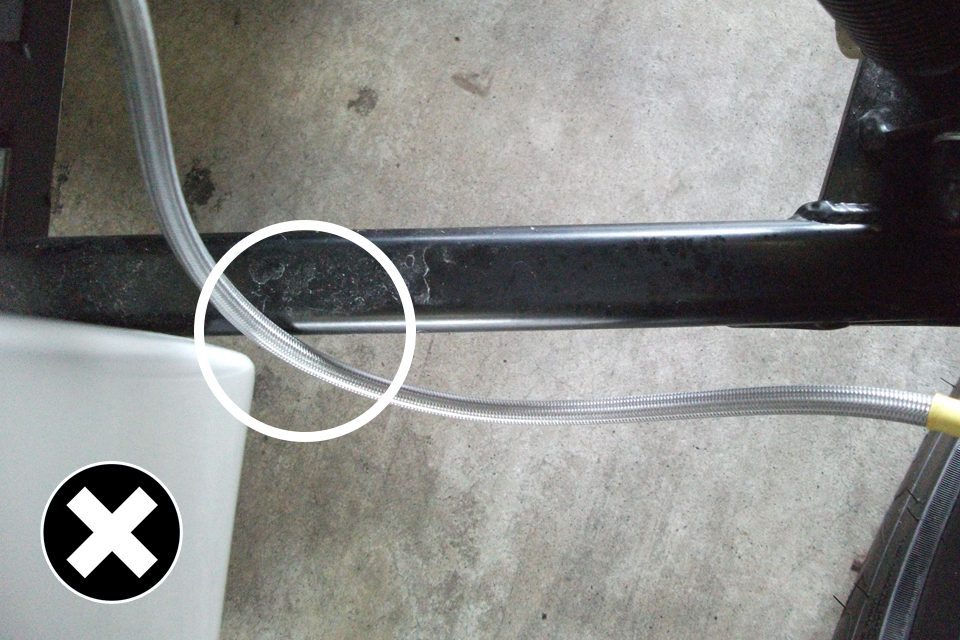
Not allowed: flexible brake hose rubbing against the suspension arms.
In this image the flexible brake hose is rubbing against the suspension arm. Eventually this hose would rub through and leak.

Allowed: indelible label fitted within 100mm of the master cylinder and identifies the brake fluid used.
An indelible label must be fitted within 100 mm of the master cylinder that indentifies the brake fluid used.
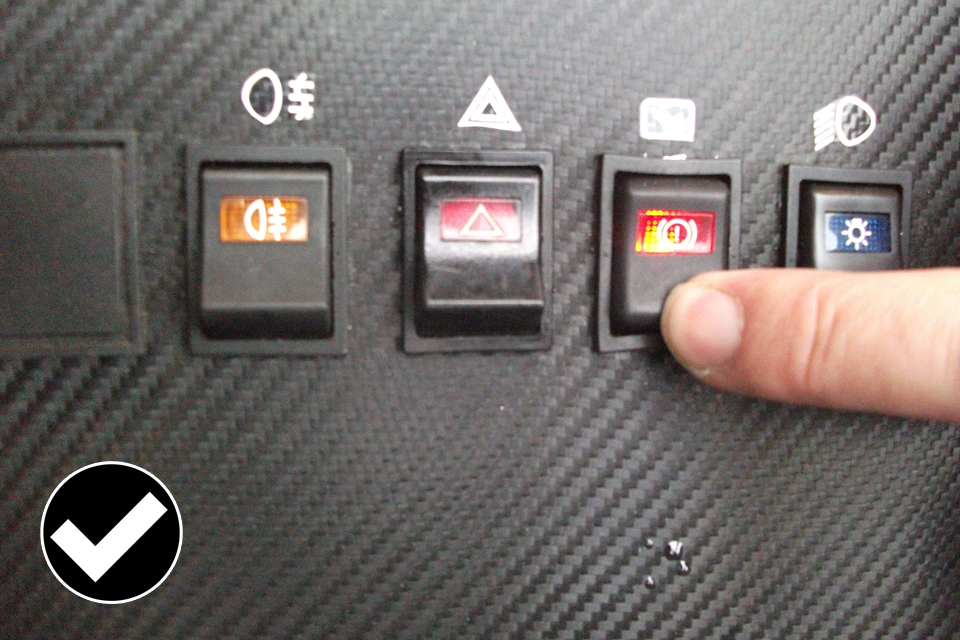
Allowed: test facility to check for failure of the hydraulic braking system that can be reached by the driver.
There must be a test facility to check for failure of the hydraulic braking system. This must be located within reach of the driver.

Not allowed: brake rations between axles mustn't be manually adjustable.
Braking ratios between axles mustn’t be manually adjustable.

A full brake test will be carried out for most vehicles.
For most vehicles DVSA will carry out a full brake test on rollers to check:
- service brake efficiency
- secondary brake efficiency (if possible)
- parking brake efficiency
- servo depleted brake effort
- balance
- for grab or judder
- the rate that the brake effort for each wheel increases or decreases
- whether there is little or no effort from any brake
- front to rear brake effort ratio
3.2 What to check before brakes are inspected
You can have the brake efficiency tested at an MOT station before the IVA inspection.
The IVA inspection tests to a different brake performance requirement compared to the MOT but it will give you an indication that the brakes work as intended.
To meet the IVA required standard for brake efficiency the brakes on your vehicle must have a:
- minimum service brake efficiency of 60%
- minimum secondary brake performance of 25% (where testable)
- minimum park brake efficiency of 18%
All brake efficiencies are calculated using the design gross weight or the calculated laden weight.
The IVA inspection includes a ‘non servo’ and brake distribution test.
3.3 The standard brakes must meet
See section 09A (brake system) of the IVA inspection manual for the full inspection standard.
4. Rear fog lamps
4.1 How rear fog lamps are inspected
Fog lamps must be fitted to the centre or offside rear of a vehicle for use in Great Britain.

Example of a correct and incorrect rear fog lamp fitting.
A fog lamp is a focused beam and must be fitted squarely to the rear of the vehicle.
In the image above it shows an example of where the required standard hasn’t been met as the lamp is fitted at an angle and the beam wouldn’t be focused squarely to the rear and an example of a fog lamp correctly fitted squarely to the rear of the vehicle.

Not allowed: fog lamp not high enough from the ground.
The image above shows that the fog lamp has been fitted at an incorrect height. DVSA will measure the height from the ground and the distance in from the extreme outer edge of the vehicle.

Fog lamp: fitted correctly but may not meet the exterior projections standards.
The fog lamp is correctly fitted. If it’s contactable with the 100 mm sphere it may not meet the required standard for exterior projections.
4.2 What to check before rear fog lamps are inspected
When you’ve imported a vehicle from:
- outside the EU it’s likely that it won’t have a rear fog lamp fitted so you will need to fit a rear fog lamp or lamps
- within the EU the light will probably be just on the nearside so will need to fit an additional one to the offside
If 2 rear fog lamps are fitted they must be a matched pair and mounted symmetrically.
A rear fog lamp must:
- have insulated wiring, that is secure and fitted through a grommet (where applicable)
- have a switch that is securely fitted
- have a warning system
- only illuminate when dip, main or front fog lamps are lit
- display an ‘e’ or ‘E’ mark with a ‘B’ or ‘F’ (see manual for exemptions)
- ‘e’ or ‘E’ mark means that the lamp is approved and is acceptable in the United Kingdom
- ‘B’ or ‘F’ mark signifies it’s a fog lamp
4.3 The standard rear fog lamps must meet
See section 26 (rear fog lamps) of the IVA inspection manual for full inspection standard.
5. Exterior projections
5.1 How exterior projections are inspected
DVSA will look for sharp edges that could cause injury to a pedestrian.

Not allowed: tape wrapped round 'non radiused' edges.
Tape wrapped around ‘non radiused’ edges isn’t allowed. These can be easily removed and will deteriorate over time.
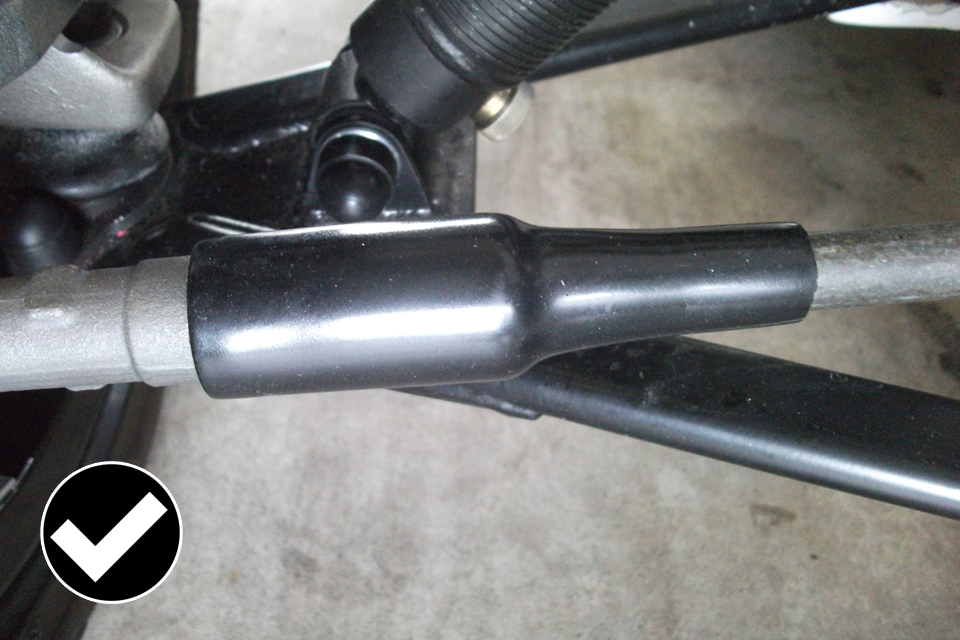
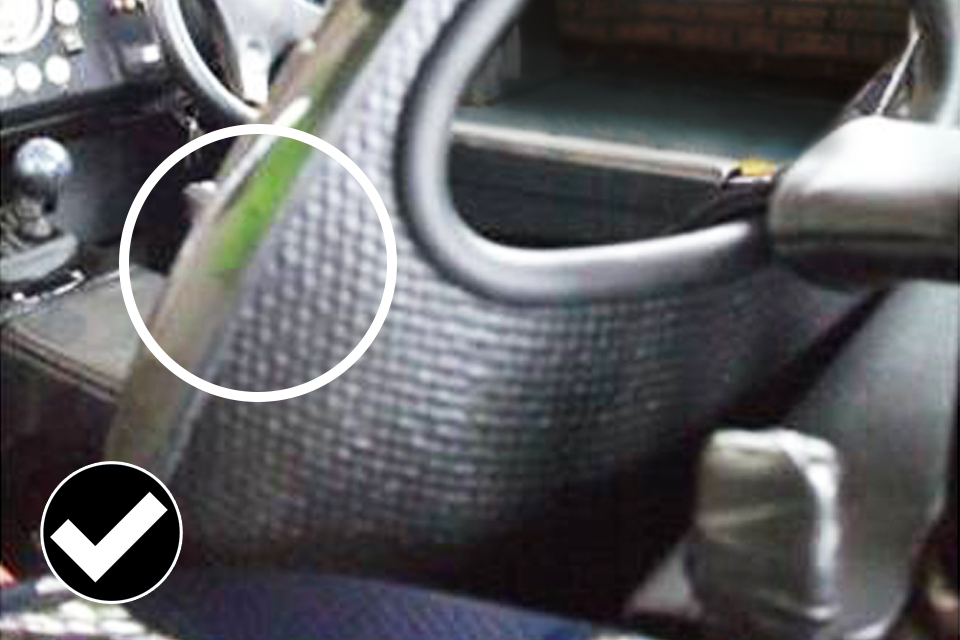
A good example of overcoming 'non radiused' edges.
The method, in the image above, of overcoming ‘non radiused’ edges is allowed as it can’t be easily removed and slides back to allow adjustment of the steering. These are unlikely to deteriorate.
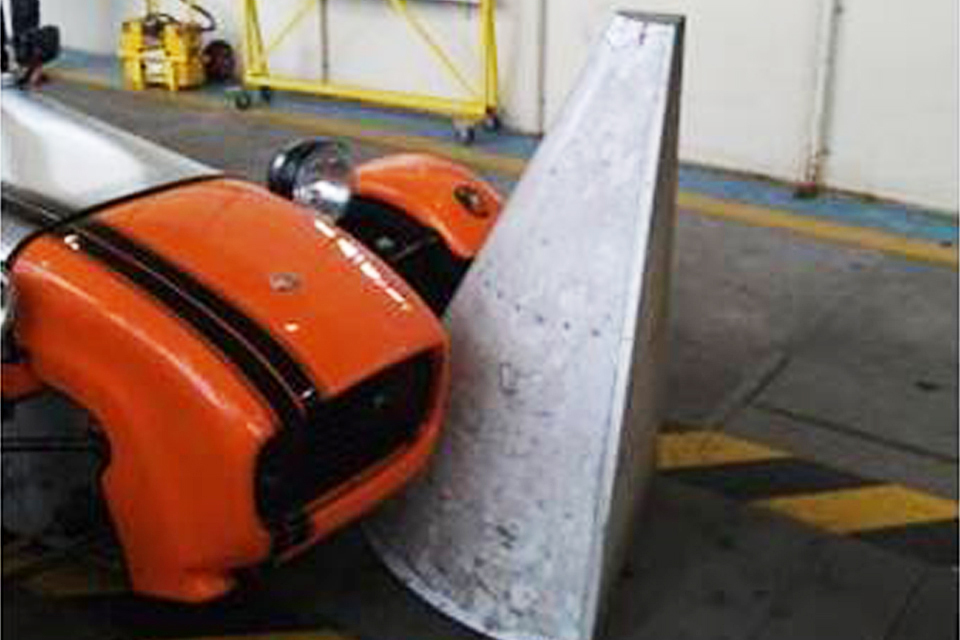
Cone is used to determine the floor line.

Cone is used to determine the floor line.
DVSA will use a 30 degree cone to determine the floor line of the vehicle. Any hard part that is an external service and is above the floor line up to 2 metres from the ground that can be contacted by the 100 mm sphere will be checked for sharp and non blunt edges.

100mm sphere will be used to check the exterior of the vehicle.

A radius gauge will be used to check edges.
DVSA will check for items that can be contacted with a 100 mm sphere (the sphere represents your knee) and anything it touches on the exterior of the vehicle needs to be either blunted or ‘radiused’.
A radius gauge will be used to check this.
In the first image above the 100 mm sphere comes into contact with a hard part of an external surface. The second image shows the radius being measured with a radius gauge.

If no windscreen the 100 mm sphere is used to check the inside of the vehicle.
Your vehicle may be subject to the exterior check,as shown above, if it has no windscreen fitted.

Seat edges that can be contacted will need to be 'radiused'.
Another example showing seat edges that can be contacted will need to be 'radiused'.
In the images above the seat edges can be contacted by the sphere and they need to be ‘radiused’.
5.2 What to check before exterior projections are inspected
DVSA uses a 100 mm sphere to assess the exterior. Anything that is contactable is checked with a radius gauge. Any hard part that the sphere touches must be ‘radiused’ to at least 2.5 mm or any items that project:
- more then 5mm needs to ‘radiused’ to 2.5mm
- less than 5mm needs to be blunted
A sharp edge may cause an injury, whereas a ‘radiused’ or a blunt edge/corner may cause less of an injury.
Check the exterior of the vehicle by look and touch to see what you think may cause injury. This is what DVSA will look for.
5.3 The standard exterior projections must meet
See section 16 (exterior projections) of the IVA inspection manual for the full inspection standard.
6. Speedometers
6.1 How speedometers are inspected
DVSA will use calibrated speed rollers to test the speedometer for accuracy.

Speedometer is checked for accuracy between 35 - 70 mph.
Speed will be checked for accuracy between 35 and 70 miles per hour (mph).

Now allowed: view of speedometer hidden from the driver.
You need to be able read the speedometer at all times. In the image above the steering wheel has hidden the speedometer. This wouldn’t be allowed as the driver can’t see the speed they’re going.

Allowed: view of speedometer is correct.
Here the speedometer:
- is clear
- is easy to read
- lights up
- has maximum marked increments of 20 mph
- reads to the maximum declared speed of the vehicle
6.2 What to check before speedometers are inspected
The speedometer will need to indicate mph and must read accurately.
You can have your speedometer checked before the inspection by using a rolling road.
Speedometers that operate on GPS or bicycle or racing instruments are not allowed.
Where DVSA isn’t able to check the accuracy of the speedometer on the rollers you may be able to prove to DVSA that it’s suitable and accurate by:
- evidence from the manufacturer of the speedometer
- proving to the examiners satisfaction that it meets the required standard
6.3 The standard speedometers must meet
See section 17 (speedometers) of the IVA inspection manual for the full inspection standard.
7. Statutory plates and Vehicle Identification Number (VIN)
7.1 How statutory plates and VIN are inspected
A statutory plate must be fitted for each stage of the build of your vehicle.
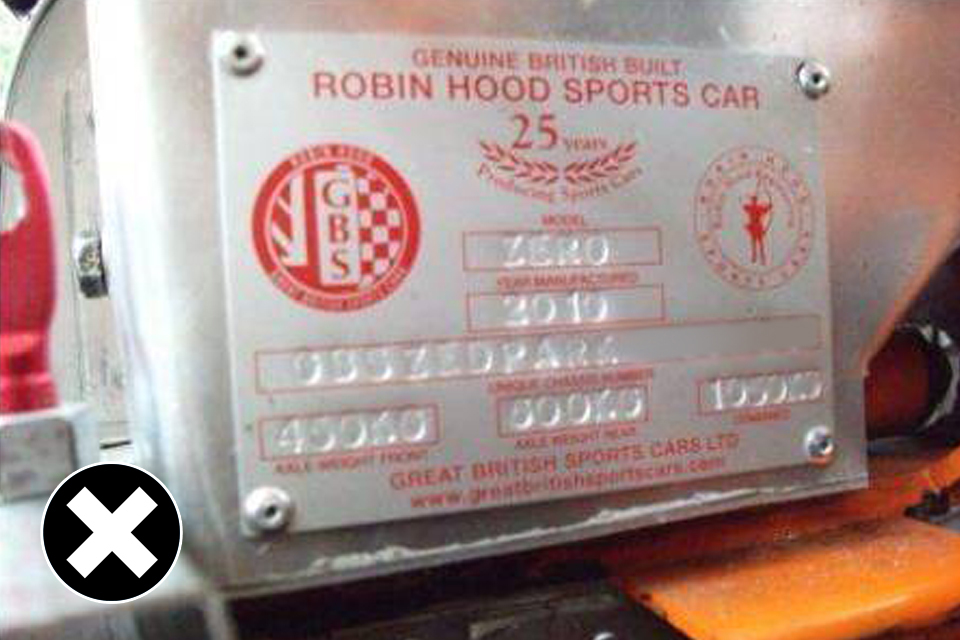
Not allowed: the plate is rectangular but doesn't have the information in a clearly defined separate rectangle.
The plate is rectangular but doesn’t have the information in a clearly defined separate rectangle.
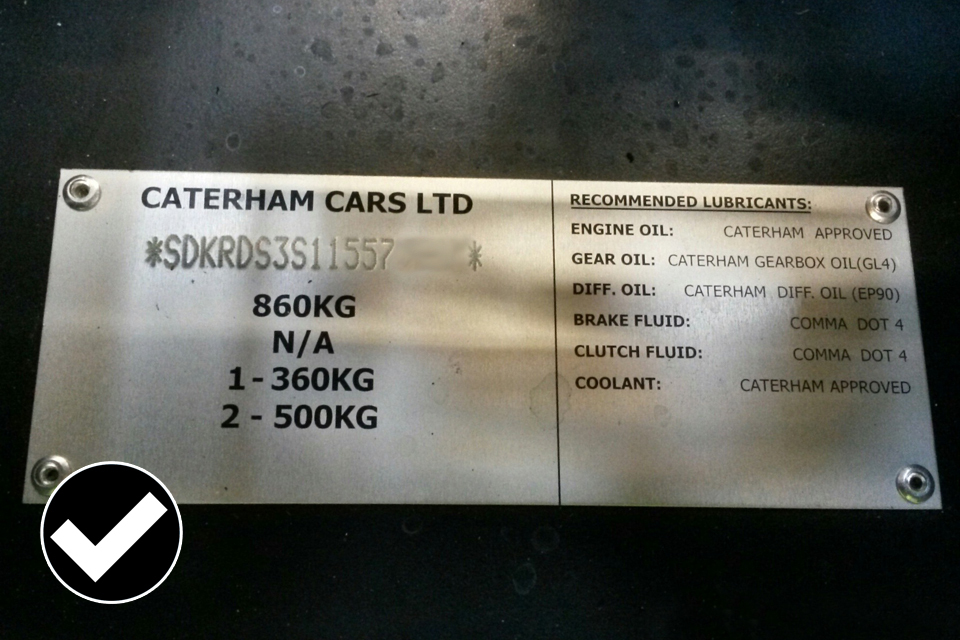
Allowed: the plate contains all the information required in a clearly defined rectangle.
The plate contains all the information required in a clearly defined rectangle.
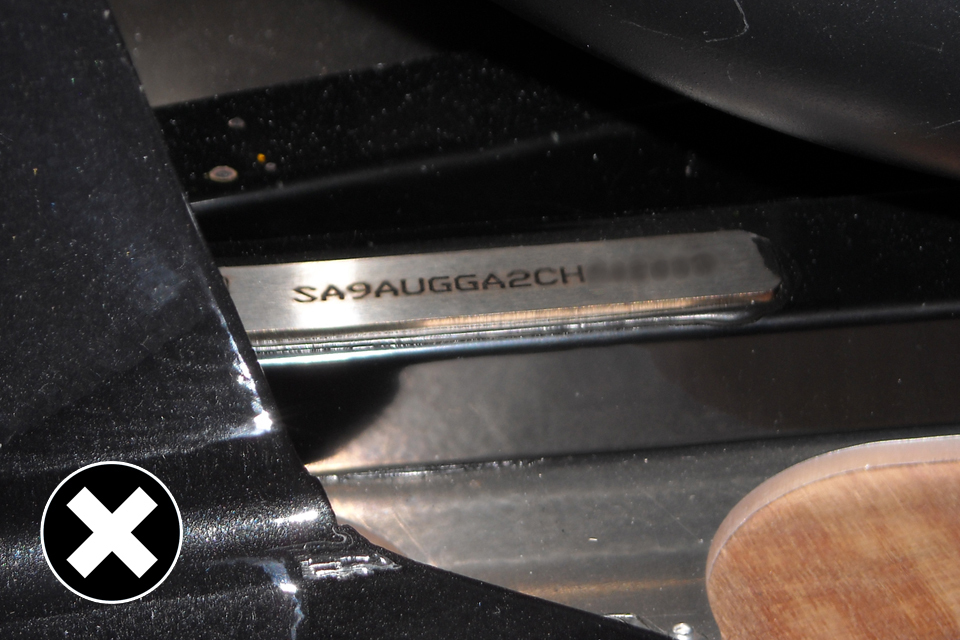
Not allowed: plate needs to be seam welded to the frame/body.
A ‘stamped in’ VIN must be:
- marked on the chassis or frame
- permanent (stamped, hammered, etched)
In the above image the VIN is stamped into a plate that is bonded to a part of vehicle. This isn’t allowed as the plate has not been seam welded to the frame/body.
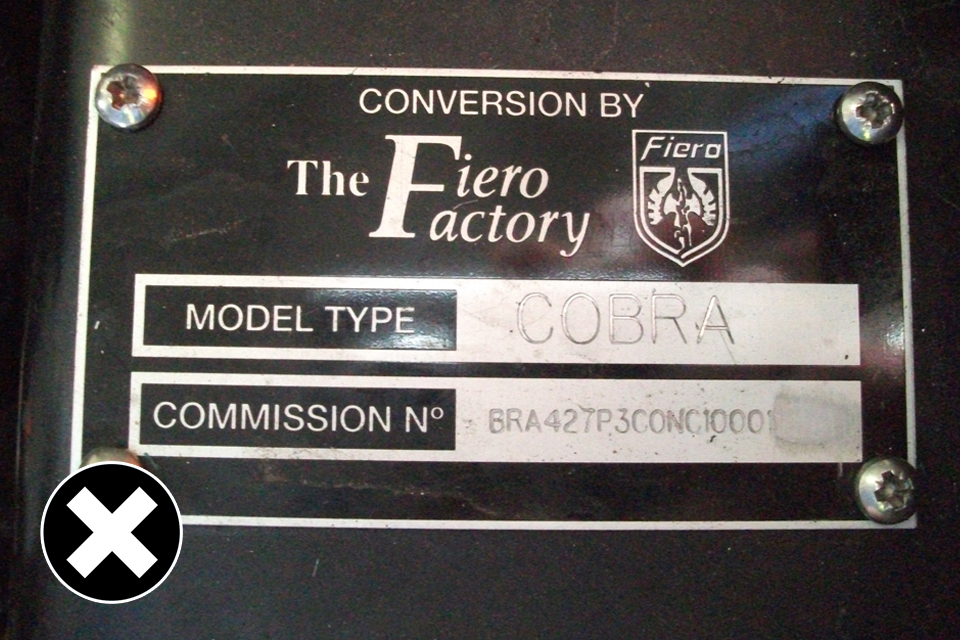
Not allowed: incorrect and missing information.
In the image above the plate doesn’t contain the required information.
7.2 What to check before statutory plates and VIN are inspected
The plate must:
- be permanent
- be durable
- contain the required information in the correct order
The only information allowed on the plate must be within a clearly defined rectangle and in the correct order. The order is:
- name of manufacturer
- approval number and/or build stage (if applicable)
- VIN
- maximum permitted laden mass of vehicle
- maximum train weight (if applicable)
- maximum laden mass for each axle in order from front to rear
There may be other information on the plate but this must be outside of the clearly defined rectangle.
7.3 The standard statutory plates and VIN must meet
See section 18 (statutory plates) of the IVA inspection manual for the full inspection standard.
8. Seat belt anchorages
8.1 How seat belt anchorages are inspected
DVSA will check the seat belt mountings and assess the:
- strength
- suitability

Seat belt anchorage above view.

Not allowed: seat belt anchorage underneath view.
In the first image the seat belt anchorage point looks securely bolted from above but, as shown in the second image, underneath the seatbelt bolts to a frame that is secured to wooden panels.
In an accident this may not be able to withstand the imposed load on the anchorage point and would pull straight through.

Seat belt anchorage above view.

Not allowed: another view of seat belts anchorage that isn't safe.
When looking from above, as shown in the first image, the seat belt anchorage point looks fine but underneath there is no triangulation of the mounting.
This will result in the mounting pulling inwards and upwards straight through the glass fibre.

Not allowed: this anchorage looks fine when inspected from above. The next image will show why it isn't.

Not allowed: with the anchorage bolt removed it shows that there is no reinforcement, bracing or buttressing.
DVSA can ask for bolts to be removed to clearly see how the seat belt is attached.
In the image above it’s found that the anchorage is just tapped to the frame with no reinforcement, bracing or buttressing. This isn’t allowed.

Allowed: a correct example of seat belt anchorage.
DVSA will look for an anchorage to:
- be of adequate strength
- be fully triangulated and braced
- be buttressed with reinforcement
- have fixing bolts of adequate strength
- have bolts screwed through the locking device (if applicable)
8.2 What to check before seat belt anchorages are inspected
Check that the seat belt anchorages are of adequate strength and suitable to meet the standards.
To prove the quality of the build, if the seat belt anchorages are boxed in, DVSA may accept:
- engineering drawings of the vehicle seat belt anchorages
- photographs of the anchorages before they’re boxed in
When built from a reputable vehicle kit and you’ve used the anchorages supplied with the vehicle they may meet the required standards.
You need to meet the required standards if you make or fit your own anchorages, please refer to the manual sections listed in 7.3.
8.3 The standards seat belt anchorages must meet
See the sections, listed below, of the IVA inspection manual for the full inspection standard:
9. Emissions
9.1 How emissions are inspected
Emissions: DVSA will need proof of engine age.
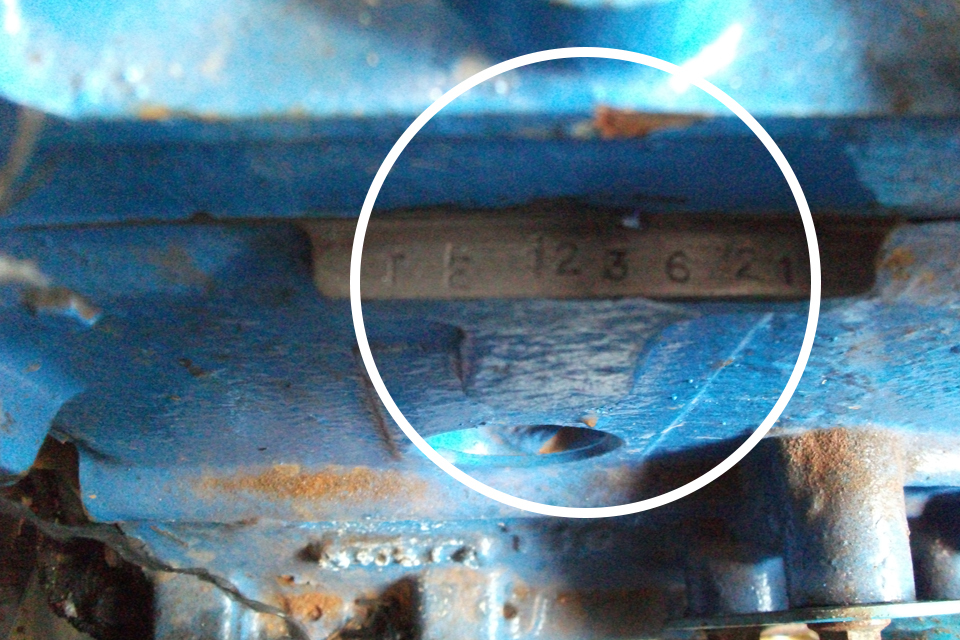
Emissions: DVSA will need proof of engine age.
DVSA may need proof of engine age if it’s been taken from another vehicle.
The proof can be:
- a letter from the engine manufacturer
- a letter from a recognised authority (such as an engine or vehicle manufacturer)
- the original V5C from the donor vehicle
You can find more information in the IVA 1C guidance notes.
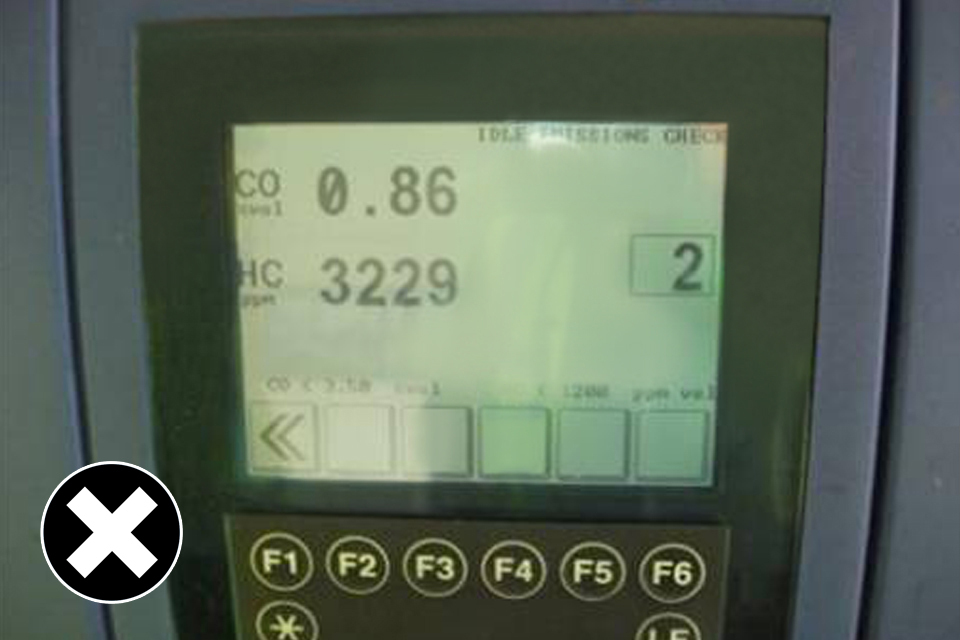
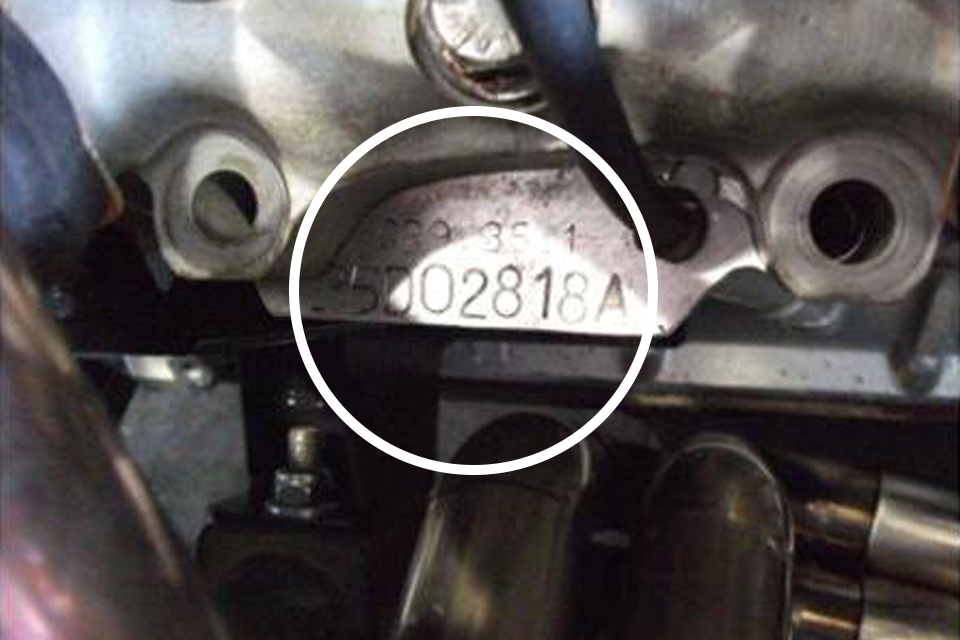
Not allowed: in the example a 1989 engine is tested and the CO is fine but the HC is too high.
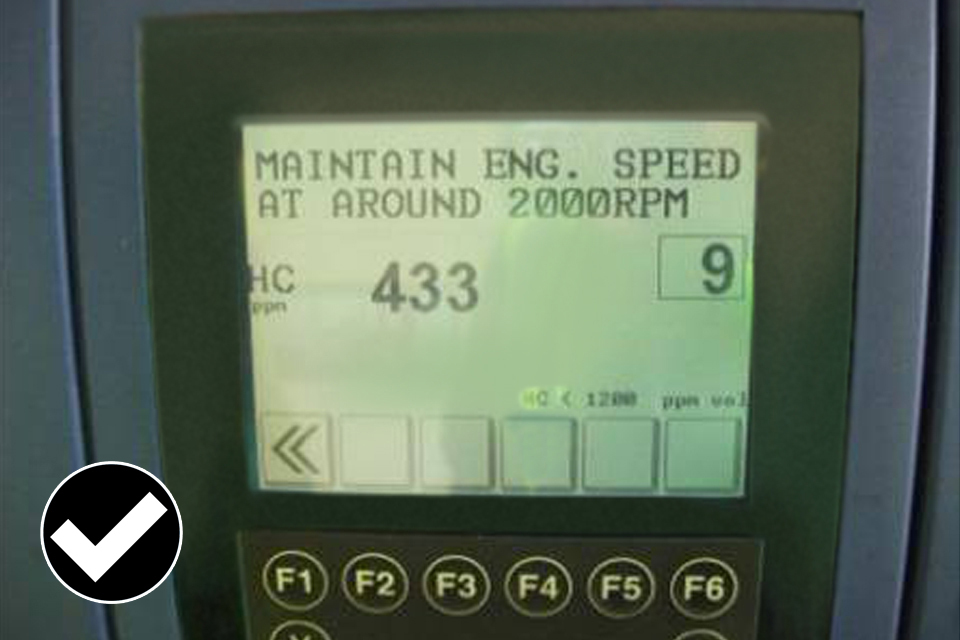
Allowed: the 1989 engine is tested at an increased speed of 2000 rpm and if the HC is within specification the vehicle will pass the emissions test.
In the image above the vehicle has a pre catalyst equipped engine (this engine is from 1989). The CO is fine but the Hydrocarbons (HC) are too high.
DVSA can increase the engine speed to around 2000 rpm and if the HC is now within specification, the vehicle will pass the emissions test.
9.2 What to check before emissions are inspected
For spark ignition engine vehicles the emissions test is based on the age of the engine.
There are different figures for different ages of the production of the engine ranging from:
- a visual check for pre 1975 engines
- to a maximum of 0.2% CO, 200 ppm HC and ‘lambda’ 0.97 - 1.03 for post 1 September 2012 catalyst equipped engines
It’s the age of the engine that is important and not the vehicle that the engine was taken from.
The IVA standard for both spark and combustion ignition emissions is identical to the MOT standard so you can have the vehicle checked at a local MOT station before the inspection.
DVSA will ask for the cam belt history and won’t test if there is doubt about the history or condition of the engine.
9.3 The standard emissions must meet
See section 02 A-C (emissions) of the IVA inspection manual for the full inspection standard.
10. Interior fittings
10.1 How interior fittings are inspected
DVSA will inspect the interior of your vehicle for areas that could cause injury if the vehicle is involved in an accident.

How to work out the 'specified zone' that have seats that face forward.

How to work out the 'specified zone' that have seats that face sideward or to the rear.
The interior of your vehicle is divided into two zones:
- ‘specified zone’
- rest of the interior
DVSA will use a:
- 165 mm head form to check the ‘specified zone’
- 100 mm sphere to check the rest of the interior
The ‘specified zone’ is measured as 150 mm above the rear of the seat ‘squab’ of the lowest seat in its lowest, rear most position and projected forwards and backwards. This can be either the front or rear seats.
The images above show an example of the ‘specified zone’. Anything in the area that a head could touch must be ‘radiused’ to 2.5 mm.
Anything below the ‘specified zone’ that a knee could touch must be at least blunted.

165 mm sphere is used to check what is contactable within the 'specified zone'.
DVSA will use a 165 mm sphere to see if anything in the ‘specified zone’ is contactable. Anything contactable will need to be ‘radiused’ to 2.5 mm.
Items that project from the instrument panel more than 9.5 mm must retract or detach leaving no sharp edges.

Allowed: switches protrude from dashboard but the 165 mm sphere will contact the protective arches.
In the above image the switches protrude from the dash more than 9.5 mm but the sphere will contact the protective arches that have been ‘radiused’ to more than 2.5 mm first so in this example it meets the required standard.

Steering wheel has an exemption zone of 127 mm around the steering wheel.
There is an exemption zone of 127 mm around the steering wheel. Anything in this zone is exempt from the inspection.
The lower boundary of the exemption zone is horizontal to the lower edge of the steering wheel.

Lower edge of the instrument panel.

Not allowed: the lower edge of the instrument panel needs to be 'radiused'.
When the lower edge of the instrument panel is in the ‘specified zone’ it needs to be either:
- ‘radiused’ to a minimum of 19 mm
- ‘radiused’ to 5mm if covered with a non rigid material

Not allowed: steering wheel with 'unradiused' edges.
Airbags are prohibited on a non mass produced vehicle, so the steering wheel is the first thing you may hit in the event of an accident, this wheel with its ‘unradiused’ edges may cause injury.

Allowed: steering wheel with edges that are correctly protected.
This steering wheel is nicely ‘radiused’, has soft protective covers on the spokes and a cushioned centre part.

If parking brake lever is in the 'specified zone' it will be checked.
The parking brake lever is testable and must meet the required standard if it is in the ‘specified zone’.

The gear lever will be checked in all forward gear positions and if contacted by the head form must be 'radiused' to 3.2 mm.
The gear lever has its own required standard. It will be checked in all forward gear positions and if contacted by sphere must be ‘radiused’ to 3.2 mm.
In the image above the chrome surround is in the ‘specified zone’ and is being contacted by the head form.

Gear box surround is checked with a radius gauge.
This image shows the chrome surround radius being checked with a radius gauge.

Not allowed: this method of internal protection cobvering a reinforcing bar fitted under the dashboard would not be used by a major manufacturer.
The image above shows a method of internal protection that won’t be allowed.
10.2 What to check before interior fittings are inspected
DVSA won’t accept any method of ‘radiusing’, or softening, that wouldn’t be used by a major manufacturer, ie stuck on bits of rubber, or pipe lagging.
Before the inspection check the interior to make sure that all edges are smooth, soft and rounded.
An imported mass produced unmodified vehicle should be compliant but you should check to make sure that no extras have been fitted that might have projections that wouldn’t meet the required standard.
10.3 The standard interior fittings must meet
See section 12 (interior fittings) of the IVA inspection manual for the full inspection standard.