Complete your application
Use this section to help you complete your application. You must also complete an options map and a Farm Environment Record (FER) map – read Annexes 1 and 2
IMPORTANT: Creating your Mid Tier application before 31 March 2022.
Before you start your application click the ‘Update land use’ link on the Business overview screen. You need to do this even if you know your land use is up to date. This will make the information in the ‘Land use’ screen become available for your Mid Tier application.
It’s important that this information is available for your Mid Tier application as the options available to you in the ‘Select options’ screen are based on the land use recorded in the ‘Land use’ screen.
Before you start your application you must read the Mid Tier manual on GOV.UK.
After you’ve signed in to the Rural Payments service, click ‘View business’. Scroll down the ‘Business overview’ screen and click ‘Countryside Stewardship applications’.
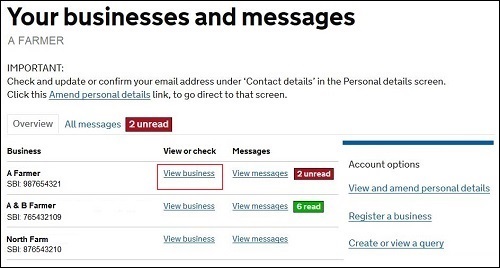
If you cannot see the ‘Countryside Stewardship applications’ link, you should check that you have the correct permission level to create an application. For more information read the ‘Check your permission levels’ section. If you still cannot see the link after your permission level has been updated in the Rural Payments service, you should ‘sign out’ then ‘sign in’ again, to refresh your account.
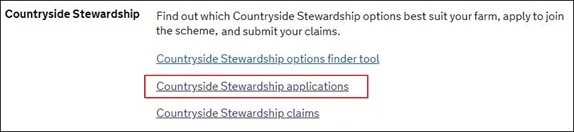
Use the Countryside Stewardship application screens to apply online for Mid Tier.
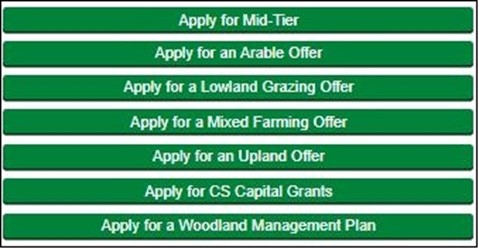
There’s a ‘Help’ link on the screens that will take you through each process step-by-step.
On the Countryside Stewardship applications screen, click the green button ‘Apply for Mid Tier’.
When your application is successfully created a ‘Successful’ message will appear.
Scroll down the screen and click ‘Back’ to return to the previous screen where you can ‘open’ your application. Read the ‘Open your application’ section.
After you’ve successfully created your application, you’ll see it in the ‘Countryside Stewardship applications’ screen with its own application number. The status will be ‘Eligibility’.
Click ‘Open’ to continue your application.

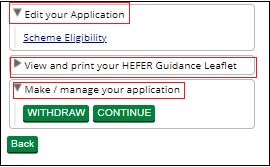
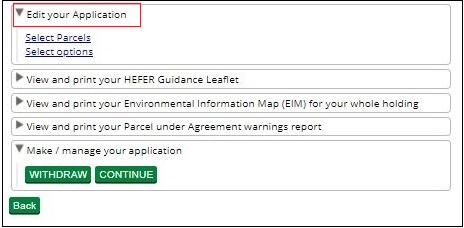
You now need to complete the Eligibility questions. Click ‘Edit your Application’ in the list. Then click ‘Scheme eligibility’.
You must answer all the eligibility questions to progress to the next stage of your application. Answer each question with Yes, No or Not applicable.
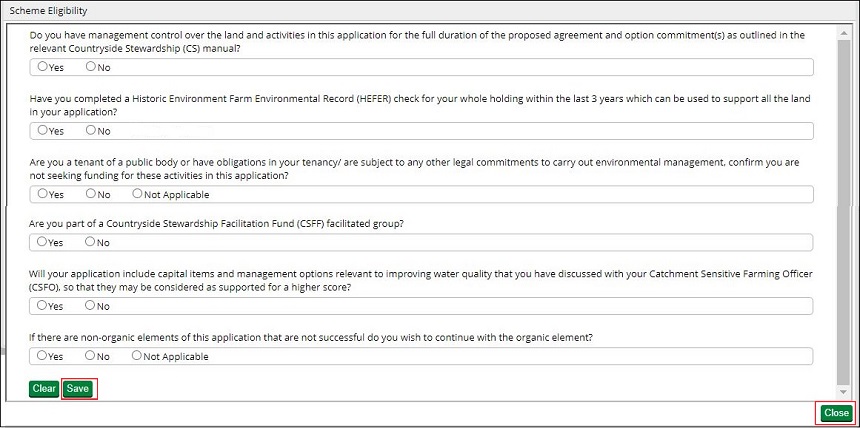
You must answer all the questions accurately, as the answers are used to assess your eligibility. For more information about eligibility read ‘Who Can Apply’ in the scheme manual. Search for ‘Mid Tier’ on GOV.UK.
Do you have management control over the land and activities in this application for the full duration of the proposed agreement and option commitment(s) as outlined in the relevant Countryside Stewardship (CS) manual?
You must be able to answer ‘Yes’ to confirm that you have management control throughout the agreement. If you answer ‘No’, you must remove the land parcels and relevant options from your application that you do not have management control over.
Have you completed a Historic Environment Farm Environment Record (HEFER) check for your whole holding within the last 3 years which can be used to support all the land in your application?
You must be able to answer ‘Yes’ to confirm that you have completed a HEFER for your whole holding within the last 3 years that can be used to support your application.
If you answer ‘No’ you will see one of two new messages:
- if there are more than 28 days until the application deadline ‘You must complete a HEFER to support all the land in your application – for more information read the ‘Historic Environment Farm Environment Record (HEFER) Guidance Leaflet’. You can create this using the instructions in the ‘View and print documents’ section.
- if there are less than 28 days until the application deadline ‘You must complete a HEFER to support all the land in your application. However, there may not be enough time to complete the HEFER if it needs consultation before the application deadline. For more information read the Historic Environment Farm Environment Record (HEFER) Guidance Leaflet’. You can create this using the instructions in the ‘View and print documents’ section.
After you’ve completed a HEFER return to this screen and answer ‘Yes’ to continue with the eligibility questions and your application.
Are you a tenant of a public body or have obligations in your tenancy/are subject to any other legal commitments to carry out environmental management, confirm you are not seeking funding for these activities in this application
You must be able to answer ‘Yes’ to confirm that you are not seeking funding in this application for the activities outlined in the question. If you answer ‘No’, because you cannot give the confirmation, you must remove the options from your application that would provide this funding. Answer ‘Not applicable’ if you are not a tenant and this question does not apply to you.
Are you part of a Countryside Stewardship Facilitation Fund (CSFF) facilitated group?
Answer ‘Yes’ to confirm that you are part of a Countryside Stewardship Facilitation Fund (CSFF) facilitated group. If you answer ‘Yes’ you must send your completed facilitator’s endorsement form to reach RPA by the application deadline. Answer ‘No’ if you are not part of a CSFF facilitated group.
Will your application include capital items and management options relevant to improving water quality that you have discussed with your Catchment Sensitive Farming Officer (CSFO), so that they may be considered as supported for a higher score?
Answer ‘Yes’ to confirm your application contains capital items and management options relevant to improving water quality, and then tell us the name of your CSFO and the name of the Catchment/River Basin. Answer ‘No’ if your application does not contain these items or options.
If there are non-organic elements of this application that are not successful, do you wish to continue with the organic element?
Answer ‘Yes’ to confirm you want to continue with the organic element of this application if the non-organic elements are unsuccessful. Answer ‘No’ if you do not want to continue with the organic element of this application if the non-organic elements are unsuccessful. Answer ‘Not applicable’ if you do not have organic elements.
Click ‘Save’ after you’ve completed all of the questions and you’ll receive a message confirming the details have ‘saved’ successfully. If you have not answered a question, a message will appear in red asking you to answer it.
After you’ve successfully saved your answers, click ‘Close’ to return to the previous screen.
Read more information about how to create the Historic Environment Farm Environment Record (HEFER) guidance letter in the ‘View and print documents’ section.
You can now either continue to the next stage of your application or withdraw your application by using the buttons under ‘Make/manage your application’.
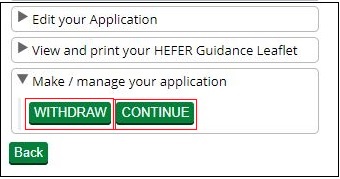
Click ‘Withdraw’ – if you do not want to go ahead with your application at this point. You need to confirm that you want to withdraw the application. If you answer ‘Yes’, you’ll see a message confirming that you’ve withdrawn your application successfully. On the application screen, the status will be ‘Withdrawn’.
If you answer ‘No’, the status of your application will not change and you can continue your application.
If you withdraw your application you can create a new one while the green application buttons are available.
Click ‘Continue’ – if you want to move to the next stage of your application.
- Either a ‘successful’ message will appear. Click ‘Back’ to continue your application
- Or a ‘failed’ message will appear.
This means your application cannot move to the next stage as there is an issue with the answers you have given to the eligibility questions. It is important that you read the onscreen message as it will tell you why your application has failed to progress.
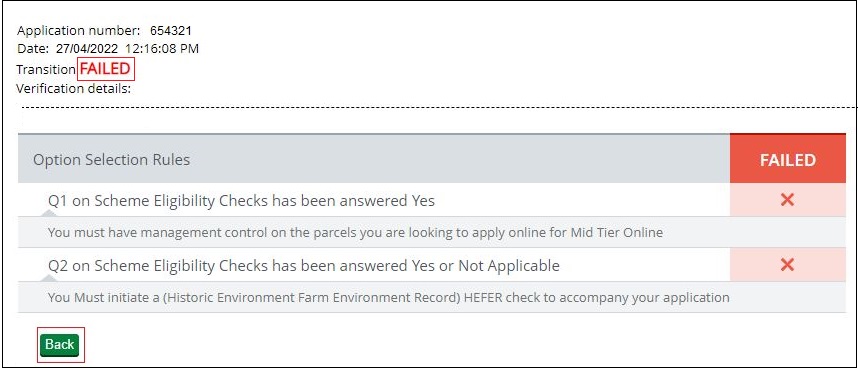
Scroll down the screen to click ‘Back’.
Open the application again to review and update the answers to the eligibility questions.
After you’ve successfully answered the eligibility questions, ‘Open’ your application again on the Countryside Stewardship applications screen.
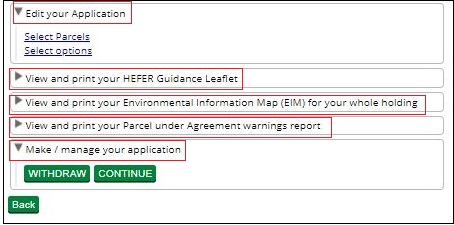
Using the list on your screen, you can add details to your online application using ‘Edit your application’. Or use the other choices to create the HEFER guidance leaflet, Environmental Information Map (EIM) and land parcel warnings report. Read how to create these documents in the ‘View and print documents’ section.
Click ‘Edit your Application’.
A list of everything you need to do in your application appears.
You now need to add the land parcels you want to use for this application.
Click ‘Edit your Application’ in the list. Then click ‘Select parcels’.
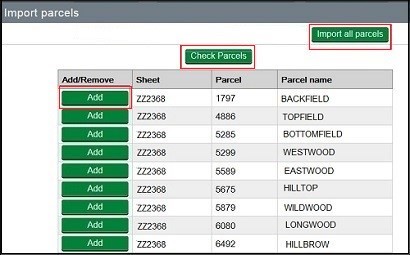
Click ‘Import parcels’ to open a window with a list of all of the land parcels under your SBI.

The screen shows a list of all parcels associated with your SBI. The system shows the very latest live parcel information. If a land parcel is missing read the ‘Check and Change’ section.
You can then add individual land parcels you want to include in your application.
To add land parcels to your application one at a time click ‘Add’ next to each land parcel you want to include. After you’ve added a land parcel, the ‘Add’ button changes to ‘Remove’. Click ‘Remove’ to take land parcels from your application.
Or you can add all of the land parcels in the list together by clicking ‘Import all parcels’.
IMPORTANT: Remember to include all land parcels in the application that you may need for rotational options for the whole 5 years of the agreement.
Check land parcel warnings
After you’ve added all of the required land parcels to the application you can check whether any of them are already included in another application or agreement.
To check whether they’re in a live agreement, ‘View and print your Parcels under agreement warnings report’. To check whether they’re in another application click ‘Check Parcels’, and a new column will appear for ‘Parcel Availability’:
- If the land parcel is not in another application a tick will show next to the relevant land parcel details.
- If any land parcel is already in another type of application, a green ‘Warning’ button will appear for that land parcel. You must remove all land parcels with warnings, as explained later in this section.
Your list of land parcels may extend over 2 or more pages depending on the number of land parcels you have. The number of pages of land parcels shows at the bottom of the list. Click the single arrow to move to the next page of the list.
If there are no warnings in the ‘Parcel availability’ column, and you want to use all of the land parcels in the list in your application, click ‘Close’ to continue your application.
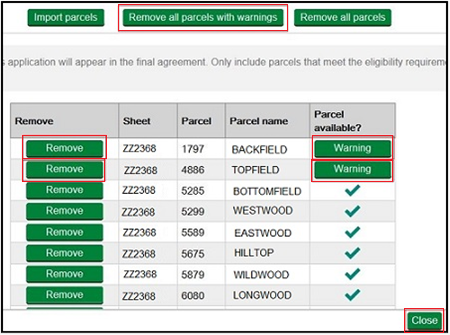
Click ‘Remove’ to take the land parcel from the application. Or click ‘Remove all parcels with warnings’ if you want to remove all land parcels together.
A message will appear to confirm that the land parcel is removed from the application.
Click ‘Close’ to leave the land parcel screen.
IMPORTANT: Remember to ‘View and print your Parcels under agreement warnings report’ which will list all the land parcels that are already in a live agreement. For more information about creating the report read the ‘View and print documents’ section. Return to the parcels under agreement screen to ‘Remove’ any of the land parcels listed in the report.
You now need to select the options you want to use for this application. You add these to your application at the next stage of your application.
Click ‘Edit your Application’ in the list. Then click ‘Select options’.
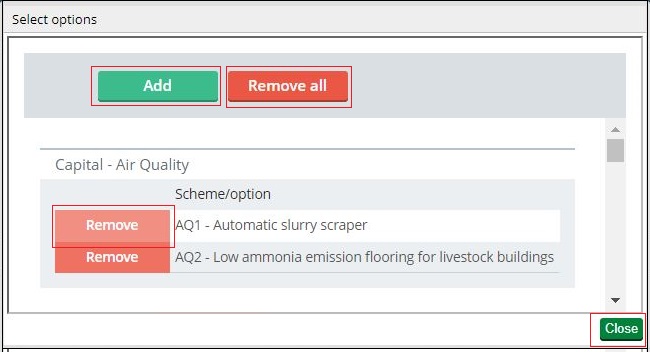
Click ‘Add’ to show a screen with ‘Option group’, ‘Option offers’ and ‘Option code’ boxes.
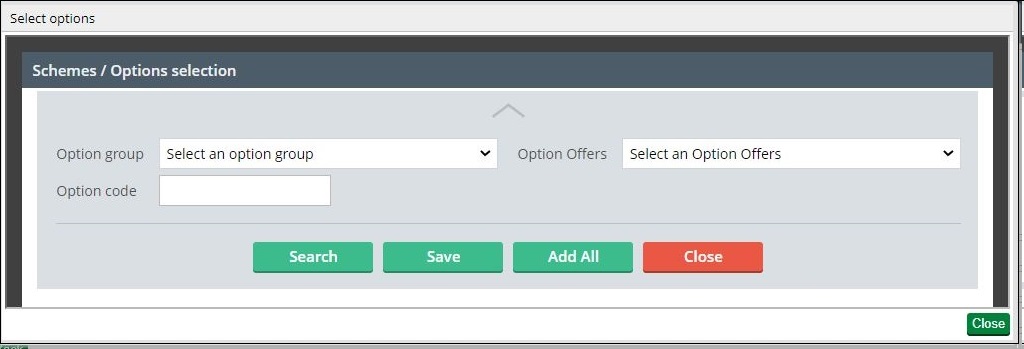
Click the drop-down arrow in ‘Option group’ to show a list of option groups available. Choose an option group and then select ‘Search’ to see the list of options available in the group, click the green ‘Add’ button to choose each option you want to apply for. Click ‘Add All’ to choose all of the options in the group. Click ‘Save’ to confirm the options you have chosen. Click the red ‘Close’ button to return to the ‘Select options’ screen.
To identify and choose options from a group of Wildlife Offers, click the drop-down arrow in ‘Option offers’ and use the ‘Search’ button to see the list of options available for Mid Tier. Click ‘Add’ to choose each option you want to apply for. Click ‘Add All’ to choose all of the options in the group. Click ‘Save’ to confirm the options you have chosen. Click the red ‘Close’ button to return to the ‘Select options’ screen.
If you know the option code you want to apply for, enter it into the ‘Option code’ box, and click ‘Add’.
Click the ‘Back’ button in the lower section of the screen to show a list of all the options you’ve chosen. If you’ve made a mistake click the red ‘Remove’ button to delete the option code, or ‘Remove all’ if you want to remove all the options together. If you want to choose more options click the ‘Add’ button. Click the red ‘Close’ button to return to the ‘Select options’ screen.
When you have chosen your options click ‘Close’ to return to the ‘Edit your application’ screen.
Read how to create the HEFER guidance leaflet, EIM and land parcel warnings report in ‘View and print documents’ section.
You can now either continue to the next stage of your application or withdraw your application by using the buttons under ‘Make/Manage your application’.
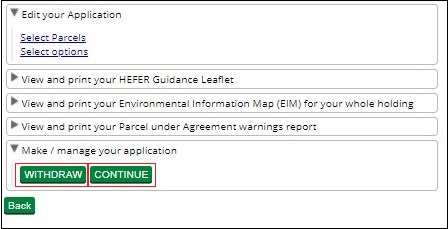
Click ‘Withdraw’ – if you do not want to go ahead with your application at this point. You need to confirm that you want to withdraw the application. If you answer ‘Yes’, you’ll see a message confirming that you’ve withdrawn your application successfully. On the application screen, the status will be ‘Withdrawn’.
If you answer ‘No’, the status of your application will not change and you can continue your application.
If you withdraw your application you can create a new one while the green application buttons are available.
Click ‘Continue’ – if you want to move on to the next stage of your application.
Either a ‘successful’ message will appear. Click ‘Back’ to continue your application.
Or a ‘failed’ message will appear. This means your application cannot move to the next stage as there is an issue with it. You may not have selected any land parcels or there may be issues with ones you have selected. This may also happen if you did not check for warnings earlier in your application. Or you may not have added a Revenue option to your application, your application must contain at least one of these.
It is important that you read the onscreen message as it will tell you why your application has failed to progress.
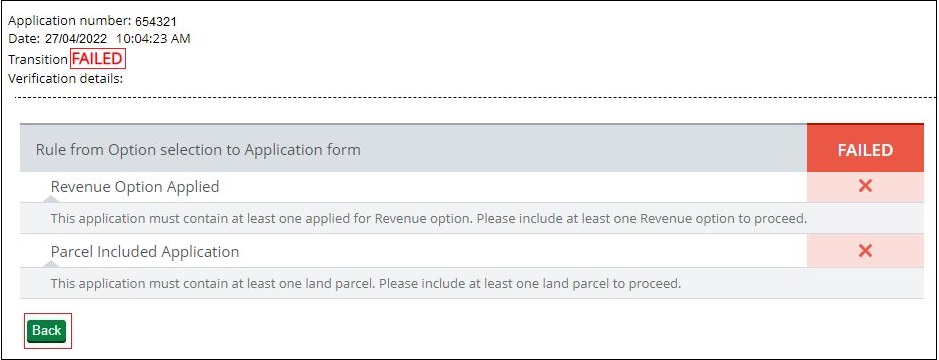
Scroll down the screen to click ‘Back’.
Open the application again and update it, for example:
- remove any land parcels with warnings and any listed in your ‘Parcels under agreement warnings report’
- add some land parcels as none have been added yet
- add a revenue option to your application if you have a ‘Revenue option applied’ message.
After you’ve successfully added the land parcels and chosen the options you’d like to use in your application, ‘Open’ your application again on the Countryside Stewardship applications screen.
Using the list on your screen, you can add details to your online application using ‘Edit your application’. Or use the other choices to create the application summary, HEFER guidance leaflet, land parcel warnings report, Environmental Information Map (EIM) and Options and Farm Environment Record (FER) map. Read how to create these documents in the ‘View and print documents’ section.
Click ‘Edit your Application’.
A list of everything you need to do in your application appears.
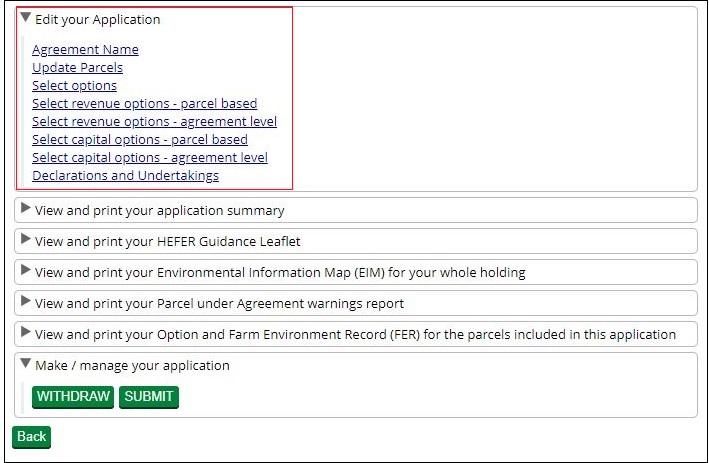
You must enter an agreement name or you will not be able to submit your application.
You must give your agreement a name such as the name of the land or farm. This will make it easier for you to identify the agreement. Enter a name into the box and then ‘Save’ and ‘Close’ to return to the previous screen. You can use both letters and numbers in the agreement name.

Click ‘Update parcels’ to see all of the land parcels you have added to the application. This is an opportunity to check which land parcels you’ve included in the application and change them if needed.
Use the ‘Remove’ or ‘Add’ buttons as explained in the earlier ‘Add land parcels to your application’ section. If you add different land parcels, remember to click ‘Check Parcels’ for warnings against your land parcels in another application.
Also remember to View and print your land parcel warnings report again to check for land parcels already in an agreement.
Remember that you must show all the land parcels you’ve added to your application in your Options/FER map. If you change the land parcels you have in your application you can generate and download the map again in the Rural Payments service so that it contains the correct land parcels.
Click ‘Select options’ to see the options you have chosen to use in your application. You will add these to your application using:
- Select revenue options – parcel based
- Select revenue options – agreement level
- Select capital options – parcel based
- Select capital options – agreement level
This is an opportunity to check which options you’ve selected to include in the application and change them if needed.
Use the ‘Search’, ‘Save’, ‘Add’, ‘Add All’, ‘Remove’ and ‘Remove All’ buttons as explained in the earlier ‘Select your options’ section.
You now need to add the revenue options you have already chosen to the relevant land parcels in your application.
Click ‘Edit your Application’ in the list. Then click ‘Select revenue options – parcel based’.
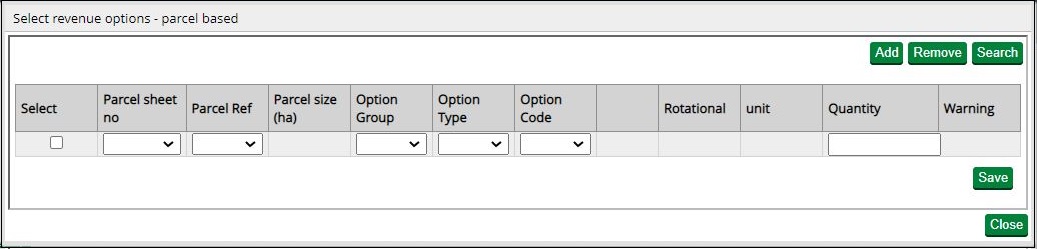
Click ‘Add’ to create a blank land parcel row with drop-down lists to choose:
- the Parcel Sheet No.
- the Parcel Reference
- the Option Group
- the Option Type
- the Option Code
Add the quantity you want to apply for.
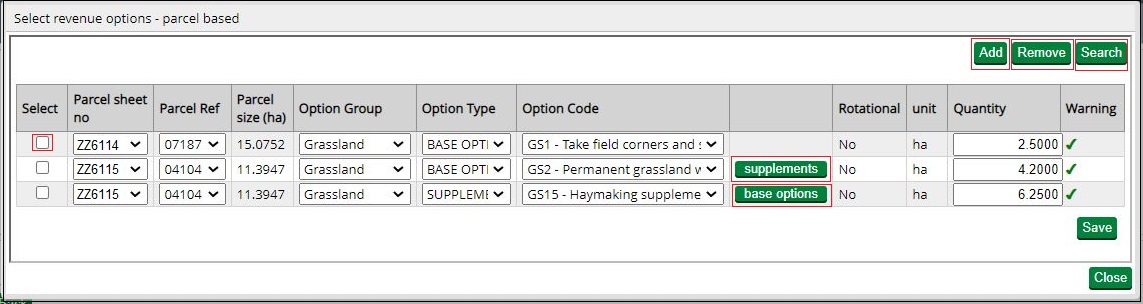
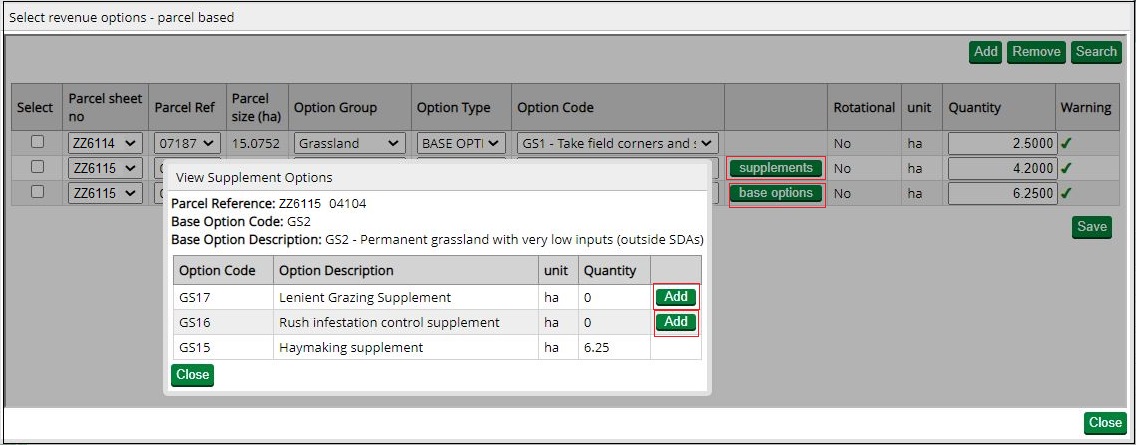
If a green button appears in the row this means there are other supplements or parcel based options available. Click the green button to see a list of the base or supplement options available, you can add these to your options by clicking the ‘Add’ button. You’ll need to add the quantity for the base option or supplement.
To delete a row click ‘Select’ at the beginning of the row, then click ‘Remove’ at the top of the screen.
If some of the information you’ve added is incorrect you will see a red warning message. Update the information until you see a green tick at the end of the row.
Remember to click ‘Save’ before you click ‘Close’ to return to the ‘Edit your application’ list.
You now need to add the quantity for each of the agreement level revenue options you have already chosen at the ‘Select options’ screen. If you do not add a quantity the option will not be included in your application.
Click ‘Select revenue options – agreement level’.
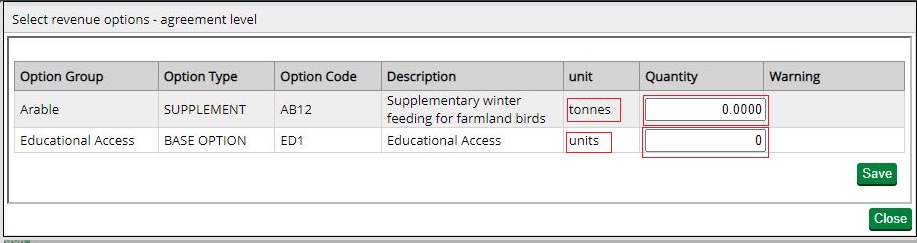
Enter the quantity for each of the rows visible on your screen. There are 2 different units of quantity that are used in this screen:
- Tonnes – these can be up to 4 decimal places for options for example ‘Supplementary winter feeding for farmland birds’
- Units – are whole numbers (no decimal places). For option ‘ED1 – Educational Access’ add a quantity of ‘1’. You should not tell us the exact number of visits at this stage, you will tell us this when you submit a claim.
When you’ve added quantities to the agreement level revenue options, a green tick appears in the box at the end of the row.
Remember to click ‘Save’ before you click ‘Close’ to return to the ‘Edit your application’ list.
You now need to add the capital options you have already chosen to the relevant land parcels in your application. Click ‘Edit your Application’ in the list. Then click ‘Select capital options – parcel based.
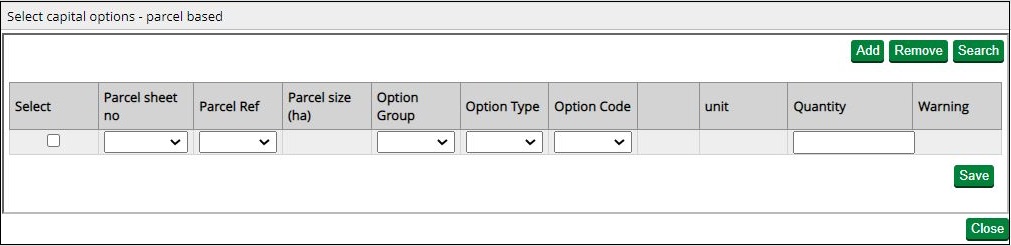
Click ‘Add’ to create a blank land parcel row with drop-down lists to choose:
- the Parcel Sheet No.
- the Parcel Reference
- the Option Group
- the Option Type
- the Option Code
Add the quantity you want to apply for.
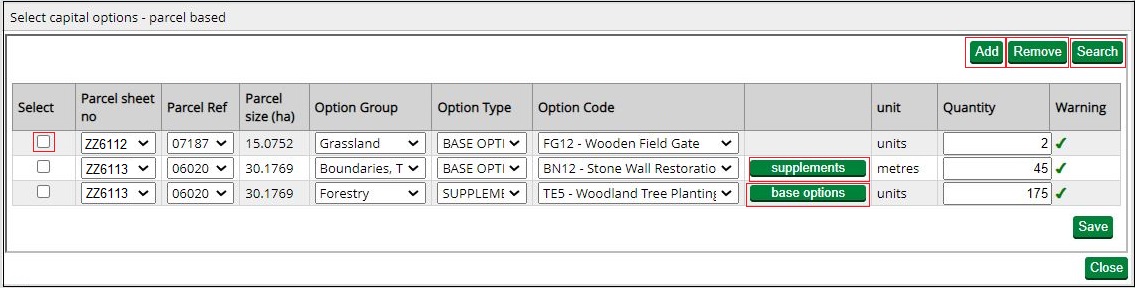
If a green button appears in the row this means there are other supplements or parcel based options available. Click the green button to see a list of the base or supplement options available, you can add these to your options by clicking the ‘Add’ button. You’ll need to add the quantity for the base option or supplement.
To delete a row click ‘Select’ at the beginning of the row, then click ‘Remove’ at the top of the screen.
If some of the information you’ve added is incorrect you will see a red warning message. Update the information until you see a green tick at the end of the row.
Remember to click ‘Save’ before you click ‘Close’ to return to the ‘Edit your application’ list.
You now need to add the quantity for each of the agreement level capital options you have already chosen at the ‘Select options’ screen. If you do not add a quantity the option will not be included in your application.
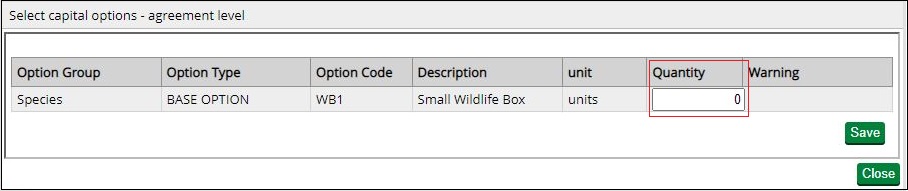
Enter the quantity for each of the rows visible on your screen. This should be entered as a whole number with no decimal places.
When you’ve added quantities to the agreement level capital options, a green tick appears in the box at the end of the row.
Remember to click ‘Save’ before you click ‘Close’ to return to the ‘Edit your application’ list.
You must complete this declaration or you cannot submit your application.
Read all the declarations and undertakings. Use the scroll bar at the side of the declaration to read it all.
Then click ‘Yes’ to confirm that you accept the declarations and responsibilities, then click ‘Close’.

You should create (generate and download) your application summary before submitting your application to RPA.
Using the list on your screen, you can ‘View and Print’ the maps you need before you fill in your application, and ‘View and Print’ details about your online application before you submit it:
- application summary – shows all the information you’ve added to your application – create it after you’ve filled in your application but before you submit your application
- Historic Environment Farm Environment Report (HEFER) guidance leaflet – print it before you complete your application
- Environmental Information Map (EIM) – for your reference only – print it before you fill in your application to help you mark your priority features on the FER map
- land parcel warnings report – after you’ve added land parcels to your application, use this report to check if any of the land parcels you’ve added are already in another agreement
- Options and Farm Environment Record (FER) map – use this when you’re adding the options to your application (read Annexes 1 and 2) – print it before you add the options to your application.
Application summary
This summary shows the information you have entered into your application. It’s important that you use it to check you’ve given the correct information, before you submit your application. Then if needed, you can go back into your application and change it.
(You also get another opportunity to create an application summary after you’ve submitted your application to RPA to keep as a record of the application you’ve submitted.)
Click ‘View and print your application summary’.
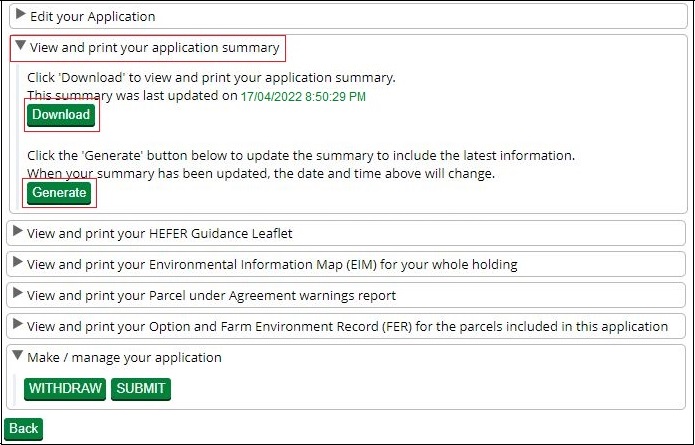
Click ‘Generate’ to create the application summary. The first time you generate the letter the ‘Download’ button will not be clearly visible. When the letter is ready the ‘Download’ button turns green and the button will now always be visible. The date and time that appears next to the Download button tells you when you last generated it.
After you’ve generated the summary, click ‘Download’ to read, print or save the it. (To print or save it place the cursor at the bottom and middle of the screen and an option to do this should appear.)
We’d recommend that you keep an updated copy of this summary for your records at the time you submit your application online. It shows the date and time it was last generated.
If you always click ‘Generate’ before you click ‘Download’, you’ll always see the most up to date information in your application.
Do not send it to us as a paper form – we cannot accept it.
Historic Environment Farm Environment Record (HEFER) guidance leaflet
The HEFER guidance leaflet explains what the HEFER is and what you must do to make sure the Scheduled Monuments and historic environment features on your land are protected.
Click ‘View and print your HEFER guidance leaflet’.
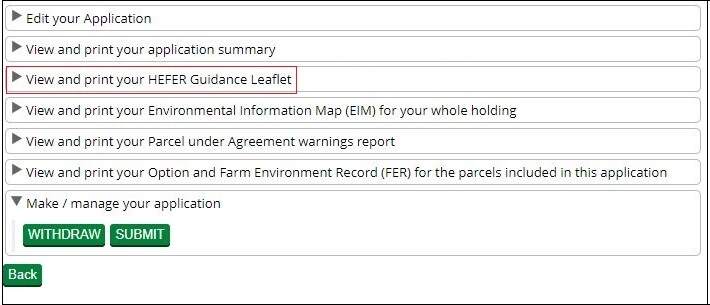
To create your HEFER guidance leaflet follow the instructions in the application summary section.
Environmental Information Map (EIM)
The EIM map shows the priority features on your land, you may need to mark these features on your Farm Environment Record (FER) map. The EIM map is for your information only and should be created before you fill in your application.
Click ‘View and print your Environmental Information Map (EIM) for your whole holding’.
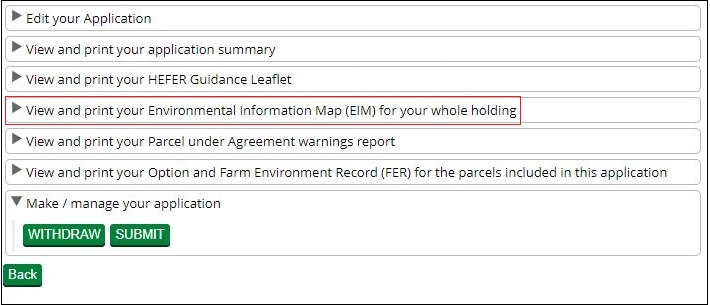
To create your Environmental Information Map (EIM) follow the instructions in the application summary section.
We’d recommend that you print or save this map now and keep it for your records. The map will show the date and time it was last generated.
Parcels under agreement warnings report
This warnings report lists any land parcels that need to be removed from your application. This is because they are already included in a live agreement or another application. The report also shows details of the agreement/application that the land parcels are currently included in, and the status of that agreement or application. For more information read ‘Check land parcel warnings’ in the ‘Complete’ section.
If all of the land parcels in your application are available to use, the report will not contain any information.
Click ‘View and print the Parcel under Agreement warnings report’.
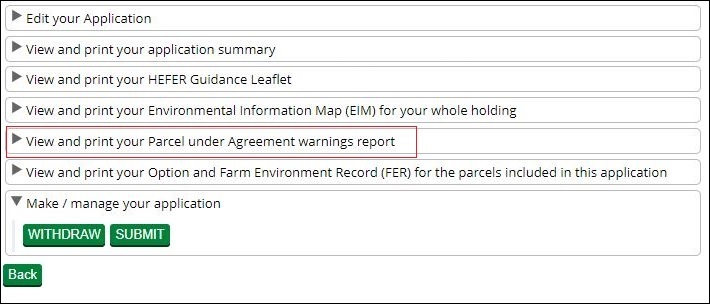
To create your parcels under agreement warnings report follow the instructions in the application summary section.
You must return to the land parcel screen to remove all the land parcels from your application that appear in the warnings report.
Options and Farm Environment Record (FER) map
You must complete an Options map and a FER map for all Mid Tier applications. (Read Annexes 1 and 2 for more information about how to complete your options map and your FER map.)
Print 2 copies of the Options/FER map. Use one copy to show your options choices, and the other copy to show the environment features on your holding.
The map will show the land parcels you’ve added to your application.
IMPORTANT: If you update your application by adding or removing land parcels after you’ve printed the maps, the printed maps will no longer show the correct land parcels. You’ll need to repeat the process and print the maps again so that they show the new selection of land parcels.
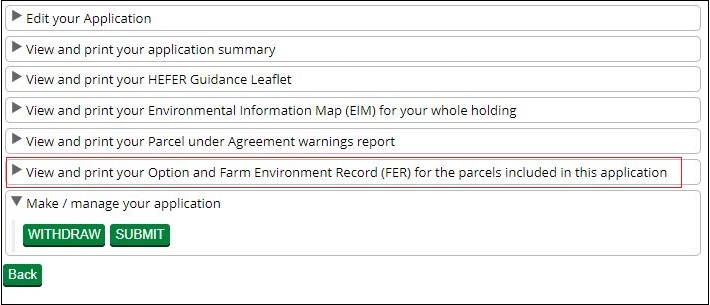
Click ‘View and print your Option and Farm Environment Record Map (FER)’.
To create your maps follow the instructions in the application summary section.